Manipulating Data Components in Page Report
You can redefine the data and add detail, group, and aggregation fields in data components, apply chart style, convert between chart and crosstab, rotate a table or crosstab, and more, in Page Report Studio. This topic describes how you can manipulate different data components in Page Report.
Data components refer to crosstabs, tables, banded objects, charts, and geographic maps. For the data components that you created in Logi Report Designer, to perform some of the manipulation actions requires that the data fields that the components use can be converted to corresponding view elements. The actions include:
- Converting between charts and crosstabs
- Modifying the chart definition
- Adding and converting columns, and aggregating on detail columns in tables
- Adding view elements to data components by dragging them from the Resource View panel
Tip: To display the Resource View panel, select Menu > View > Resource View or the Resource View button
 on the toolbar. You can use the search bar at the top of the panel to search for any desired resource in a fast and convenient way.
In addition, you need a Logi Report Live license for Server to use the features involving business view or changes of report template. If you do not have the license, contact your Logi Analytics account manager to obtain it.
Most of the manipulations require selecting the component first. To select a component, select anywhere in the component, when the icon  appears at its upper left corner, select the icon.
This topic contains the following sections:
- Manipulating a Chart
- Manipulating a Crosstab
- Manipulating a Table
- Manipulating a Banded Object
- Manipulating Geographic Map Group Markers
Manipulating a Chart
For heat maps, Page Report Studio only supports the Show Tips feature on them but does not support other chart actions.
- Changing the chart type
- Right-click on the chart and on the shortcut menu, select the required type from the Chart Type submenu, which lists all the chart types and subtypes (the current one and the inapplicable subtypes are grayed out).
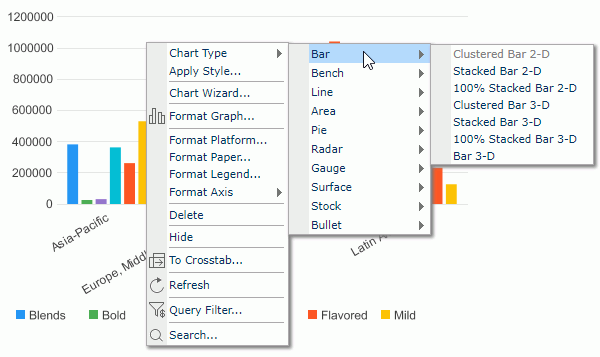
- Select the chart, select the Chart Type button
 on the toolbar, and then select a suitable subtype from the drop-down menu.
- Right-click on the chart and on the shortcut menu, select the required type from the Chart Type submenu, which lists all the chart types and subtypes (the current one and the inapplicable subtypes are grayed out).
- Modifying the definition of a chart
You can modify the definition of a chart, including the chart type, data display, and style. To do this:- Right-click on the chart and select Chart Wizard from the shortcut menu to display the Chart Definition dialog box.
- In the Chart Type tab of the Chart Definition dialog box, specify the type for the chart.
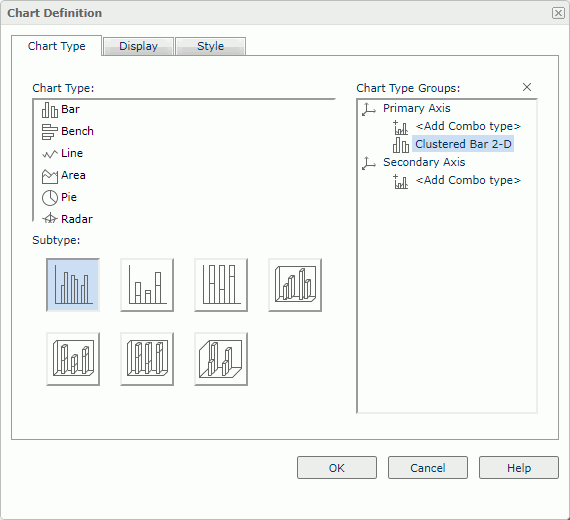
- In the Display tab, change the group and aggregation object used by the chart.
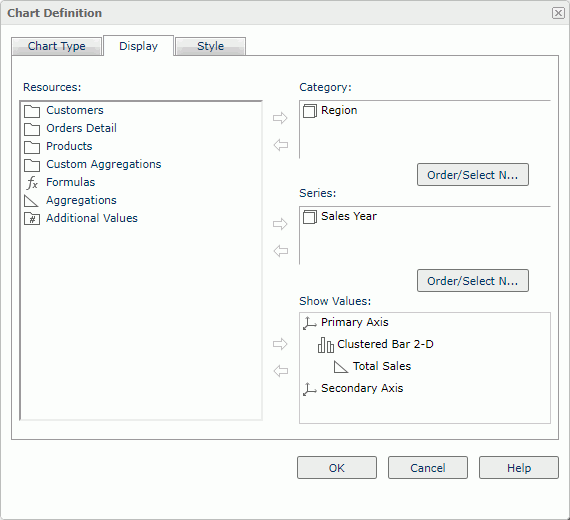
- In the Style tab, modify the style for the chart as required. When there is only one style available, this style will be applied to the chart by default and the Style tab will be hidden from the dialog box.
- Upon finishing, select OK to apply the modifications.
For more information, see Creating a Chart Report.
- Converting a chart into a crosstab
- Select anywhere in the chart to select the chart, then do any of following:
- Right-click the icon
 or any part of the chart except for the legend and label, then select To Crosstab on the shortcut menu.
 - Select Menu > Report > To Crosstab.
Server displays the To Crosstab dialog box.
- Right-click the icon
- In the Display tab, select a group object
 in the Resources box and select
  to add it as a group field to the Columns or Rows box; add the aggregation objects
  to the Summaries box to summarize data in the crosstab. For each column/row/summary field, you can select in the Display Name text box and type a name to label the corresponding column header/row header/summary, or select the Auto Map Field Name checkbox beside the text box if you want to automatically map the label text to the dynamic display name of the field (when the text box is blank and the checkbox is not selected, no label will be created). In the Sort column, specify a sort manner on a group object. To adjust the display order of the aggregation objects, select one in the Summaries box and select
  or
or  .
.
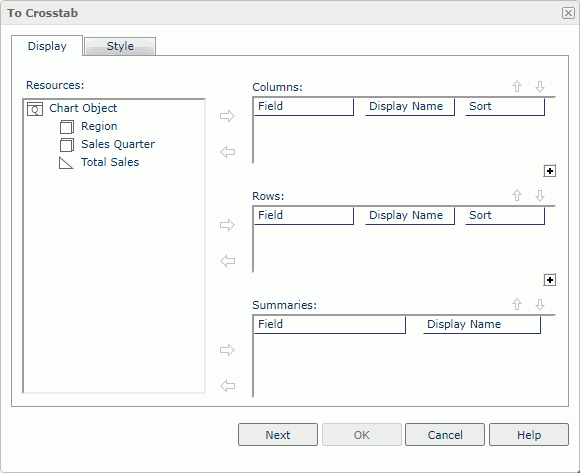
- In the Style tab, apply a style to the crosstab as required.
If the chart is in a table or banded object, by default, the crosstab converted from the chart will take on the style of the table or banded object. If you want to apply another style to the crosstab, clear the Inherit Style option and choose the desired style in the Style box. However, when there is only one style available, this style will be applied to the crosstab by default and the Style tab will be hidden from the dialog box.
- Select OK to finish the conversion.
 If you created a chart on a business view in Page Report Studio, the chart can contain additional values which are supported only in charts. Therefore, when you convert the chart with additional values into crosstab, Server does not convert the additional values together with the chart.
 - Select anywhere in the chart to select the chart, then do any of following:
- Formatting chart elements
The elements in a chart can be formatted to suit your requirement.
- To format the platform/paper/legend of a chart, right-click on the chart and select Format Platform/Format Paper/Format Legend from the shortcut menu. In the Format Platform dialog box/Format Paper dialog box/Format Legend dialog box, specify the settings as required.
- To format an axis, right-click on the chart and select the axis from the Format Axis submenu. In the Format Category (X) Axis dialog box, Format Value (Y) Axis dialog box or Format Value (Y2) Axis dialog box, specify the axis settings.
- To format the graph such as the areas, bars or lines of a chart, right-click on the chart and select Format Graph from the shortcut menu (for a combo chart, the option name is Format Graph (Y) and Format Graph (Y2)). In the Format Area dialog box, Format Bar dialog box, Format Bench dialog box, Format Donut dialog box, Format Line dialog box, Format Pie dialog box, Format Radar dialog box, Format Scatter dialog box, Format Stock dialog box, Format Surface dialog box, Format Activity Gauge dialog box, Format Bar Gauge dialog box, Format Bubble Gauge dialog box, Format Dial Gauge dialog box or Format Solid Gauge dialog box, set the graph settings as required.
- For a pie chart, if you specify to display KPI values on it, you can format the KPI value labels, for example, edit the size and border of the labels, change the label font size and font color. To do this, right-click on the chart and select Format KPI Label from the shortcut menu, then in the Format KPI Label dialog box, set the properties according to your requirements.
When an activity, bar, dial, or solid gauge chart displays the gauge labels, pointer labels and target labels, you can also format the labels accordingly. To do this, right-click on the chart and select Format Gauge Label/Format Pointer Label/Format Target Label from the shortcut menu, then in the Format Gauge Label dialog box/Format Pointer Label dialog box/Format Target Label dialog box, specify the properties.
A chart created in Logi Report Designer can have chart labels, and these labels can be further formatted in Page Report Studio. To format a chart label, right-click the label and select Format Label from the shortcut menu. In the Format Label dialog box, specify the properties.
Manipulating a Crosstab
- Rotating a crosstab
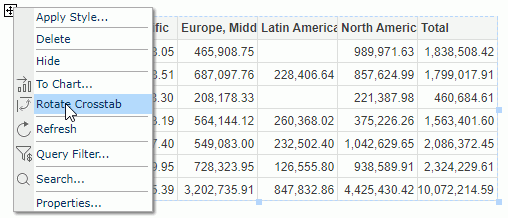
Columns and rows in a crosstab can be exchanged. This operation is called rotating a crosstab.To rotate a crosstab, first select it, and then do one of the following:
- Select Menu > Report > Rotate Crosstab.
- Select the Rotate button
 on the toolbar.
 - Right-click the icon
 of the crosstab and select Rotate Crosstab from the shortcut menu.
- Converting a crosstab into a chart
- Select the crosstab and do any of following:
- Select Menu > Report > To Chart.
- Right-click the icon
 and select To Chart from the shortcut menu.
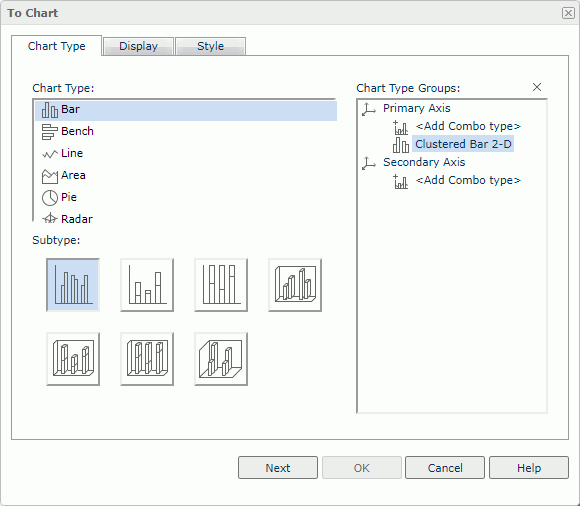
Server displays the To Chart dialog box.
- In the Chart Type tab, specify a suitable type for the chart. With a certain type specified, you can further define the chart as a combo chart by selecting <Add Combo Type> in the Chart Type Groups box.
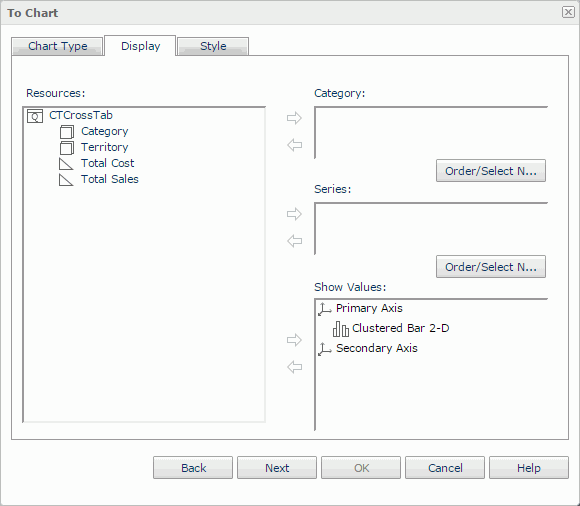
- In the Display tab, the Resources box lists all the group and aggregation objects used in the selected crosstab. The chart can only be defined based on these objects. Add a group object
 from the Resources box to the Category box, and so to the Series box, and aggregation objects
  to the Show Values box respectively.
- In the Style tab, set the style for the chart as required.
If the crosstab is in a banded object, by default, the chart converted from the crosstab will take on the style of the banded object. If you want to apply another style to the chart, clear the Inherit Style option and choose the desired style in the Style box. However, when there is only one style available, this style will be applied to the chart by default and the Style tab will be hidden from the dialog box.
- Select the OK button to finish the conversion.
- Select the crosstab and do any of following:
- Auto fitting values in a crosstab
When the values in the crosstab row/column headers or aggregation cells need more space to completely display, right-click any value in the row/column header or aggregation cell and select Autofit from the shortcut menu. Page Report Studio then adjusts the width of the corresponding cells to match the contents in them. - Changing the group index in a crosstab
The group index in a crosstab can be modified, namely you can move a group to a higher or lower level. To do this, drag a value in the row/column header to the required destination till a highlighted line appears, then release the mouse. You can also drag a column header to a row level and vice versa.
- Changing the aggregate function for an aggregation in a crosstab
Right-click the aggregation that is based on a detail object and select Switch Function from the shortcut menu, then choose a new function from the submenu. If DistinctSum is selected as the function, you will be prompted with the Select Fields dialog box to specify the detail objects according to whose unique values to calculate DistinctSum. - Removing column/row headers or aggregations from a crosstab
Drag a value in the header or any aggregation value outside the report page. A message box is then prompted you whether to remove the field. Select OK to confirm the removal.
From the Resource View panel, you can drag view elements and dynamic resources into a crosstab to add new column/row headers and aggregations in the crosstab. To do this, first select the crosstab to locate the business view it uses in the Resource View panel, then:
- To add a column header:
Drag a group object or dynamic formula used as Group
  from the Resource View panel and move the mouse pointer above or below an existing column header until a highlighted horizontal line appears, then release the mouse.

- When the crosstab has no column/row/aggregation labels, the new column header will be directly placed where the highlighted line lies.
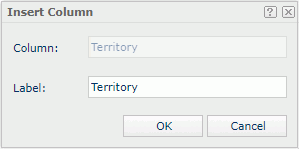
- When you have specified any labels to label the column headers/row headers/aggregations in the crosstab using the wizard, Server displays the Insert Column dialog box. You can specify a label to label the new column header. Select OK and the new column header will be placed where the highlighted line lies.
- To add a row header:
Drag a group object or dynamic formula used as Group
  from the Resource View panel and move the mouse pointer to the left or right of an existing row header until a highlighted vertical line appears, then release the mouse.

- When the crosstab has no column/row/aggregation labels, the new row header will be directly placed where the highlighted line lies.
- When you have specified any labels to label the column headers/row headers/aggregations in the crosstab using the wizard, Server displays the Insert Row dialog box. You can specify a label to label the new row header. Select OK and the new column header will be placed where the highlighted line lies.
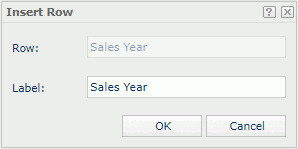
- To add an aggregation in the crosstab:
Drag a detail object , aggregation object
  , dynamic formula used as Detail
  , dynamic formula used as Aggregation
  or dynamic aggregation
  from the Resource View panel and move the mouse pointer above or below the desired aggregation, then release the mouse.
The position determines whether detail aggregations, subtotals or grand totals will be created in the crosstab.

- If the selected object has predefined aggregate function,
- When the crosstab has no column/row/aggregation labels, the object is inserted into the specified position directly.
- When you have specified any labels to label the column headers/row headers/aggregations in the crosstab using the wizard, Server displays the Insert Aggregation dialog box. By default, the display name of the object will be used to label the new aggregation; to edit the label text for the new aggregation, select in the Label text box and type a new one; if you want to automatically map the label text to the dynamic display name of the object, select the Auto Map Field Name option. Then select OK and the aggregation is inserted to the specified position.
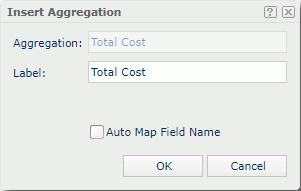
- If the selected object has no predefined aggregate function, Server displays the Insert Aggregation dialog box. From the Aggregate Function drop-down list, select the function for calculating the object. When DistinctSum is selected, you should select the ellipsis button
 next to the Distinct On text box to specify one or more detail objects according to whose unique values to calculate DistinctSum using the Select Fields dialog box. By default, the display name of the object will be used to label the new aggregation; to edit the label text for the new aggregation, select in the Label text box and type a new one; if you want to automatically map the label text to the dynamic display name of the object, select the Auto Map Field Name option. Select OK and the aggregation is inserted to the specified position. However, whether the label you specify would be displayed depends on if you have added any labels to label the column headers/row headers/aggregations in the crosstab using the wizard and if there is appropriate position to place the label in the current crosstab. If no label is defined in the wizard, the label you add in the Insert Aggregation dialog box will be ignored.
- If the selected object has predefined aggregate function,
Manipulating a Table
- Rotating a table
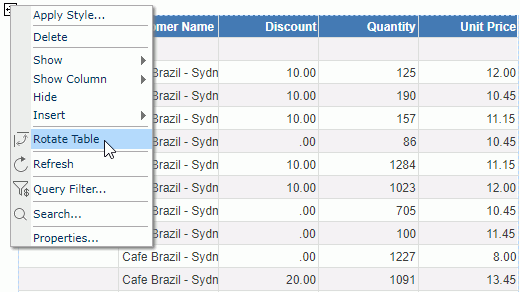
You can rotate a table to switch its appearance between the horizontal and vertical layout modes by selecting it and doing one of the following:- Select Menu > Report > Rotate Table.
- Select the Rotate button
 on the toolbar.
 - Right-click the icon
 of the table and select Rotate Table from the shortcut menu.
- Showing table columns
You can specify which columns will be shown in a table. To do this, right-click the icon of the table, then on the shortcut menu, select the names of the columns you want to show from the Show Column submenu.
 - Hiding/Deleting table columns
To hide or remove a specific column in a table, right-click the column header and select Hide Column or Remove Column from the shortcut menu. When a column is hidden, you can show it again using the Show Column shortcut menu. - Adjusting the width of table columns according to contents
When the contents in a table column need more space to completely display, you can adjust the width of the table column according to the contents. However, to use this feature, you need to first enable the Autofit property for either the label or DBField in the column (to enable the property, right-click the label in the column header or any value in the column and select Properties on the shortcut menu, then in the Font tab of the Label Properties dialog box or Data Field Properties dialog box, select Autofit), then right-click the column header and select Autofit from the shortcut menu. - Changing group direction
You can make the group headers that are placed horizontally in a table to be displayed vertically. To do this, right-click the group header row or a value of the group and select Vertical to Detail from the shortcut menu.For groups displayed vertically in group columns, you can specify to place them horizontally in the table. To do this, right-click a blank cell or a value in the group column and select Horizontal to Detail from the shortcut menu.
- Inserting table columns
A table could contain the following types of columns: detail column, summary column and group column. You can insert them with the corresponding shortcut menu commands.- To insert a common column into a table:
- Right-click any column header or the icon
 of the table, then select Insert > Common Column on the shortcut menu.
 - Drag object from the Resource View panel to the column header to add it in the column using the method of replacing the field in a column.
- Right-click any column header or the icon
- To insert a detail or summary column into a table:
- Right-click any column header or the icon
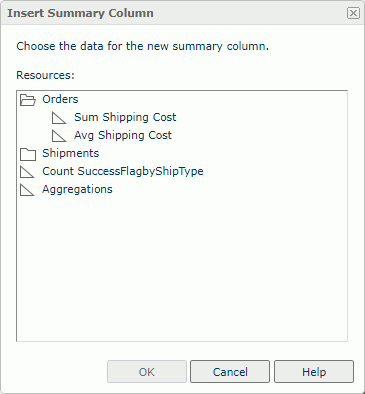
 of the table, then select Insert > Detail Column/Summary Column from the shortcut menu.
 - In the corresponding insert column dialog box, specify the resource you want to use for the new column, then select OK.
- Right-click any column header or the icon
- To insert a group column into a table:
- Right-click any column header or the icon
 of the table, then select Insert > Group Column from the shortcut menu. Server displays the Insert Group Column dialog box, with the existing groups the table contains listed in an indented structure in the right box. You can edit the groups if you want.
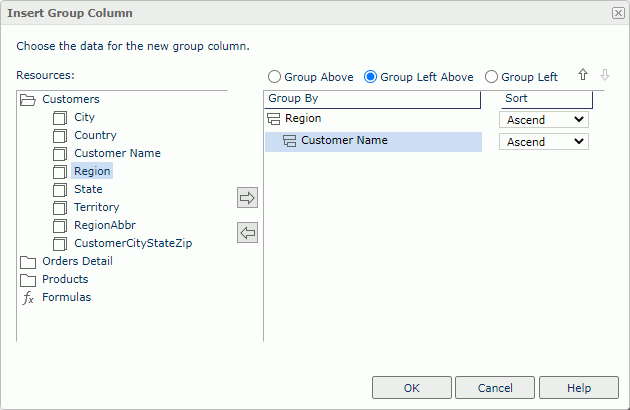
- From the Resources box on the left, select the group object you want to use for the new group column and select
 to add it to the right box as the group-by field, then specify the sort direction of the group in the Sort column.
 - Select the newly added group-by field and specify its position in the table:
- Group Above
Specifies to place the group-by field in its own row above the detail information. - Group Left Above
Specifies to place the group-by field in its own row and column above and left of the detail information. - Group Left
Specifies to place the group-by field in its own column left of the detail information.
- Group Above
- Repeat the preceding steps to add more group columns if you want. You can make use of the
 and
and  buttons to adjust the group levels.
 - Select OK to insert the group columns.
- Right-click any column header or the icon
 If you right-click any column header and use its shortcut menu to insert a common, detail or summary column, Server displays the Insert Column dialog box for you to specify the position of the column to insert, which can be before or after the selected column. However, if you use the table shortcut menu to insert the column,
- If it is a common column, Server inserts the column as the last column in the table.
- If it is a detail/summary column, Server inserts the column after the last detail/summary column, or as the last column in the table when there is no detail/summary column.
- To insert a common column into a table:
- Converting table columns
You can convert a group column into a detail column. For a detail column, when the object in it can be used as group-by field, you can also convert it to a group column.- To convert a group column into a detail column, right-click in the column header and select Convert to Detail from the shortcut menu, then the conversion is done.
- To convert a detail column into a group column:
- Right-click in the column header and select Convert to Group from the shortcut menu.
- In the Select Group Position dialog box, specify the position for the newly converted group-by field.
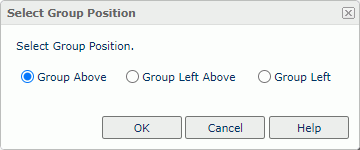
- Group Above
If selected, a new group header panel is added to hold the group-by field and the detail column is removed. - Group Left Above
If selected, the detail column is converted to a group column and a new group header panel is added to hold the group-by field. - Group Left
If selected, the detail column is converted to a group column and the group-by field is placed in the column.
- Group Above
- Select OK to save the changes.
- Aggregating on a detail column
You can summarize the data in a detail column. To do this:- Right-click in the column header and select Aggregate On from the shortcut menu. Server displays the Aggregate On dialog box.
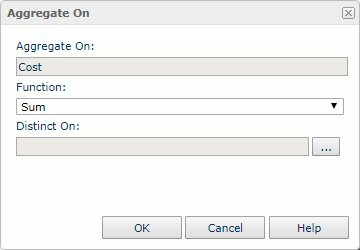
- From the Function drop-down list, specify a function to summarize the data.
When DistinctSum is selected, you should select the ellipsis button
 next to the Distinct On text box to specify one or more group and detail objects according to whose unique values to calculate DistinctSum using the Select Fields dialog box.
For the usage about each function, refer to Aggregate Functions in the Logi Report Designer Guide.
- When done, select OK.
- If the table has groups, you will find data in each group level and the whole table are summarized respectively in the column.
- If the table has no groups, the summary will be based on the whole table.
When you finish summarizing a detail column, you will find a dynamic aggregation object is created at the same time which is given a default name Function_DetailFieldName in the Dynamic Resources > Aggregations list of the Resource View panel and you can use it again in the current report.
- Right-click in the column header and select Aggregate On from the shortcut menu. Server displays the Aggregate On dialog box.
- Adjusting the order of columns and rows in a table
To adjust the order of columns, drag a column header to the left or right boundary of another column header, when a highlighted line appears along the target column boundary, release the mouse.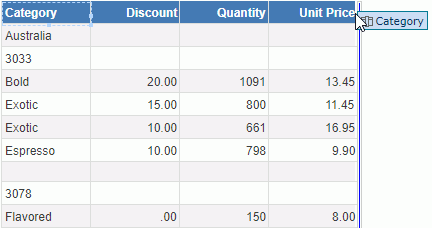
When a table contains several group rows, you can adjust the order of the group rows to edit the group levels. To do this, drag a value in a group row above or below another group row until a horizontally highlighted line appears, then release the mouse.
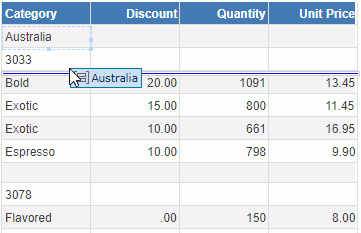
From the Resource View panel, you can drag view elements and dynamic resources into a table to replace the existing fields or add new columns/rows in the table. To do this, first select the table to locate the business view it uses in the Resource View panel, then:
- To replace the field in a table column:
Drag the required object from the Resource View panel and move the mouse pointer to the column header until the label in the header is highlighted, then release the mouse.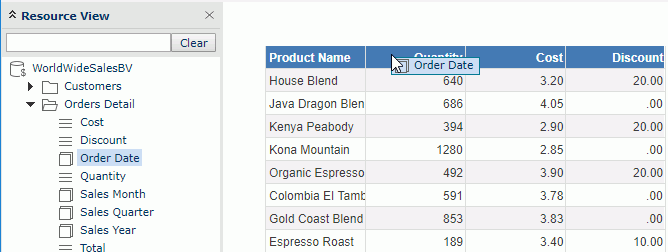
- To add new table columns and rows:
Drag the required object from the Resource View panel and move the mouse pointer to an existing column or row boundary until a highlighted line appears suggesting the position, then release the mouse. Depending on the object you select and the position where you drop the object, as well as the current table group structure, Page Report Studio determines whether a detail column, a summary column, a group column or a group row is added. - To add object values to a table column
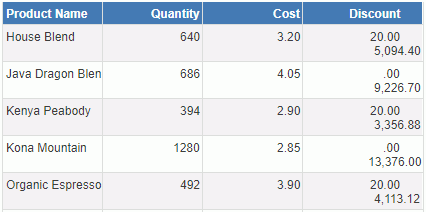
Drag the required object from the Resource View panel and move the mouse pointer to any value in the target column and release the mouse.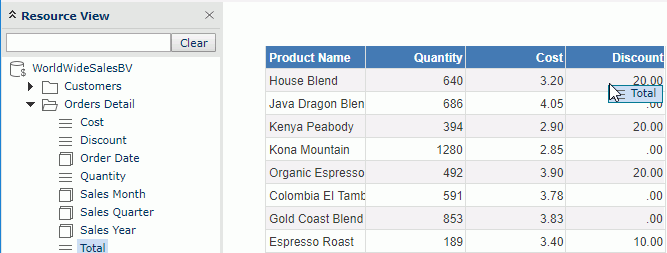
Values of the selected object are then added in the column together with the existing values.
Manipulating a Banded Object
- Hiding/Showing DBFields and field labels in a banded object
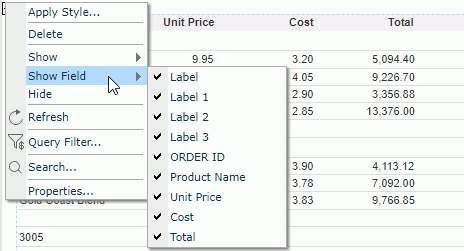
The DBFields and their corresponding labels in a banded object can be hidden or shown. To do this, right-click the icon of the banded object, then on the shortcut menu, select the DBFields and labels you want to show from the Show Field submenu. For a DBField or label that is shown, it will be marked with a check mark, and vise verse. You can also hide a DBField or label by right-clicking it and selecting Hide from the shortcut menu.
- Hiding/Showing a panel in a banded object
A panel in a banded object can be hidden or shown. To do this, right-click the icon of the banded object, then on the shortcut menu, select the item which indicates the panel name from the Show submenu. For a panel which is shown, the item is with a check mark, and vice versa. You can also hide a panel by right-clicking it and selecting Hide from the shortcut menu.
 - Resetting data in a banded object
After sorting and filtering data in a banded object, you can right-click an object in the banded object and select the Reset item from the shortcut menu to reproduce the data of the banded object using the data cached in the data buffer. This will clear all sort and filter conditions from the banded object. - Expanding/Collapsing a group panel in a banded object
You can expand and collapse the group panels in a banded object created in Logi Report Designer if it is enabled with the feature. For more information, see Expanding/Collapsing the Group Records in Banded Objects in the Logi Report Designer Guide.
From the Resource View panel, you can drag view elements and dynamic resources into a banded object to add new groups and detail fields in the banded object. To do this, first select the banded object to locate the business view it uses in the Resource View panel, then:
- To add a group:
Drag a group object or dynamic formula used as Group
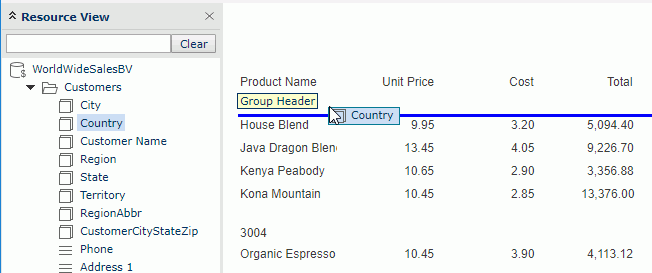
  from the Resource View panel and move the mouse pointer above or below any existing group until a highlighted horizontal line appears and the tip Group Header shows up (if there is no existing group in the banded object, move to the bottom boundary of the column header until the tip Banded Page Header and a highlighted horizontal line show up), then release the mouse.
- To add a detail field:
Any type of the view elements and dynamic resources can be used as detail fields in a banded object. Drag an object from the Resource View panel and move the mouse pointer to the detail panel until the tip Detail Panel shows up, then release the mouse.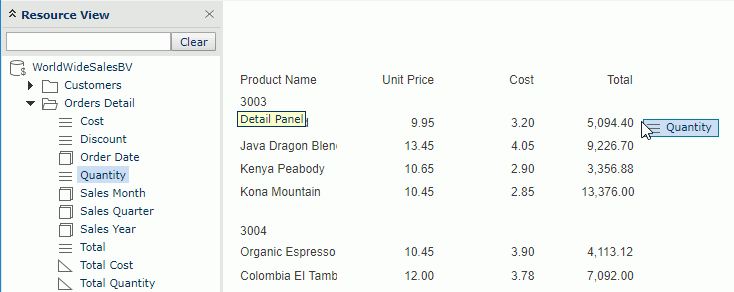
Manipulating Geographic Map Group Markers
- Going up/down on geographic map group markers
- For the group level that is higher than some other group levels in a geographic map component, right-click its group marker and select Go Down from the shortcut menu to jump one group level down.
- For the group level that is lower than some other group levels in a geographic map component, right-click its group marker and select Go Up from the shortcut menu to jump one group level up.
- Showing/Hiding geographic map group markers
By default, all visible group markers are shown. To hide them, right-click the geographic map (not the group markers) and select Hide Markers from the shortcut menu. If you want to show them again, right-click the geographic map and select Show Markers from the shortcut menu.
 Previous Topic
 Back to top