 Previous Topic
Schedule Dialog Box Properties
This topic describes how you can use the Schedule dialog box to schedule a task to run a report or multiple reports at specific times and publish the report results to different destinations in various formats.
This topic contains the following sections:
- General Tab Properties
- Parameter Tab Properties
- Publish Tab Properties
- Conditions Tab Properties
- Notification Tab Properties
- Duration Tab Properties
You see these elements on all the tabs:
Back
Select Back to go back to the left tab.
Next
Select Next to go to the right tab.
Finish
Select Finish to submit the task with the settings you specified here.
Cancel
Select Cancel to close the dialog box without saving any changes.
Help
Select Help to view information about the Schedule dialog box.
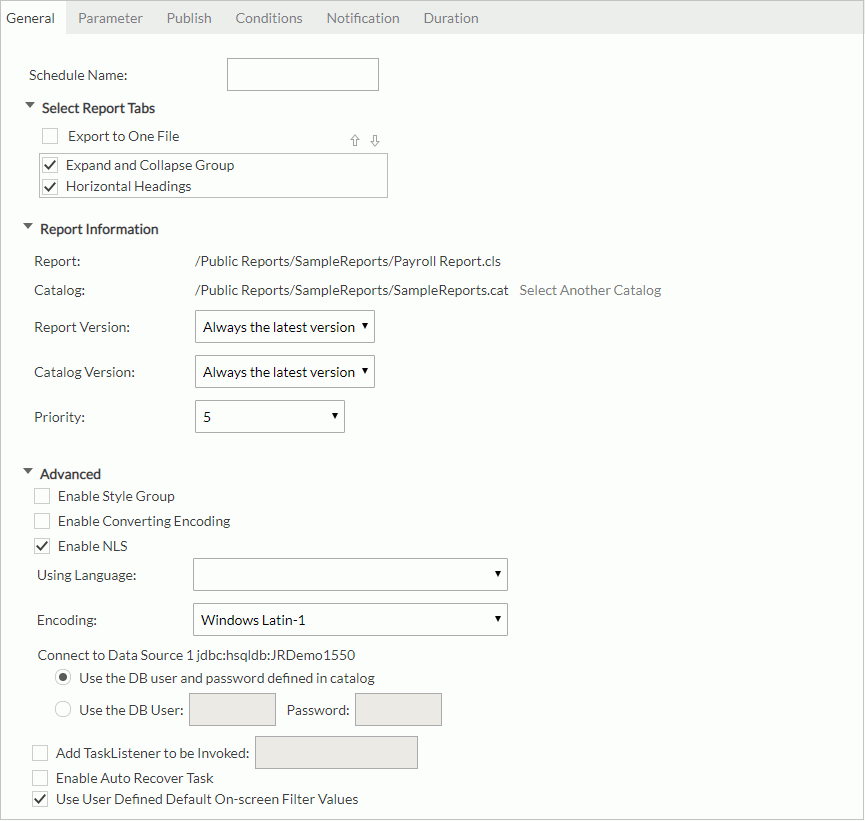
General Tab Properties
The General tab enables you to specify the general information of the schedule task. It varies when you schedule to run a single report or multiple reports.
For Single Report
Schedule Name
Specifies the name for the schedule task.
Select Report Tabs
The section is available for page reports only. It enables you to specify the report tabs you schedule to run. The selected report tabs will be exported in the list order. If the page report has only one report tab, it is selected by default.
- Export to One File
If the property is selected, the selected report tabs will be exported to one result file. -
 Move Up button
Moves the specified report tab higher in the list. -
 Move Down button
Moves the specified report tab lower in the list.
Bursting Configuration
Available when scheduling a bursting report.
- Select Schema
Select one or more bursting schemas defined for the report to generate bursting results based on.
Non-bursting Result
Available when scheduling a bursting report. Specifies whether to generate non-bursting result based on whole data without data splitting.
Select Dynamic Connection
The section is available when there are multiple dynamic connections for the current signed-in user. It enables you to specify a dynamic connection.
- Data Source
Displays the data source name in the catalog. - Connection Name
Displays the dynamic connection name. - Connection
Specifies a dynamic connection from the drop-down list. - Connection Properties
Shows the information of the selected dynamic connection, which is read only.
Report Information
Specifies the report information.
- Report
Lists information about the report. - Catalog
Lists the catalog information. Unavailable to shared reports.- Select Another Catalog
Specifies another catalog for the report in the Select Another Catalog dialog box.
- Select Another Catalog
- Report Version
Specifies the report version used for the schedule task. The default version is always the latest version. This property is unavailable to shared reports. - Catalog Version
Specifies the catalog version used for the schedule task. The default version is always the latest version. This property is unavailable to shared reports. - Priority
This property is available to administrators. Specify the priority level of the scheduled task. The priority levels are from 1 to 10 in ascending order of lowest priority to highest priority. By default, Server ignores this property unless you modify server.properties in<install_root>\binto set queue.policy not equal to 0.
Advanced
Configures some advanced settings.
- Enable Style Group
If a style group has been specified via the Override Style Group option in the server profile, this option gets selected by default and the specified default style group is selected in the Style Group drop-down list, which will be applied to run all the selected report tabs or web report for all export formats. You can also choose another style group from the Style Group drop-down list to run the page report tabs or web report.When the <No Style> item is selected in the Override Style Group drop-down list, this option is unselected by default and the style group properties of the selected report tabs or web report for the corresponding export formats that are predefined in Logi Report Designer will be used in the schedule task. These predefined style group properties take effect when publishing to version, disk, email, and FTP.
- Enable Converting Encoding
Specifies to enable the conversion of encoding. From the Before Converting and After Converting drop-down lists, select encodings as required. - Enable NLS
Specifies whether to enable NLS for the report. If the option is selected, the Using Language drop-down list will be displayed for you to choose a language. If there is no NLS resource defined for the report, you can only run the report using the default language. - Encoding
Specifies the encoding of the report from the drop-down list. - Connect to [Data Source Name]
Specify the DB user and password for connecting to the data source.- Use the DB user and password defined in catalog
Select if you want to use the DB user and password defined in the catalog. - Use the DB User
Select this property, and you can then specify another DB user and password instead of the one defined in the catalog.
- Use the DB user and password defined in catalog
- Add TaskListener to be Invoked
Select to call a Java application before/after the task runs to obtain information about the task. - Specify a preferred server to run the task
Enables you to directly specify a server in a cluster to perform the schedule task instead of using load balancing. This property is available only when there are more than one active server in a cluster and when the Identify Server Preference option in the server profile. - Enable Auto Recover Task
Select if you want Server to automatically recover the task.- Maximum Retry Times
Specify the maximum number of times for retrying running the task to recover it. - Retry Interval
Specify the interval between retries. - Recreate All Results
Select if you want to recreate all results. By default, Server only recreates failed results.
- Maximum Retry Times
- Use User Defined Default On-screen Filter Values
Applies the default on-screen filter values specified to the report for the user. Unavailable when Enable Setting Default On-screen Filter Values For the corresponding report type is not selected in the server profile.
For Multiple Reports
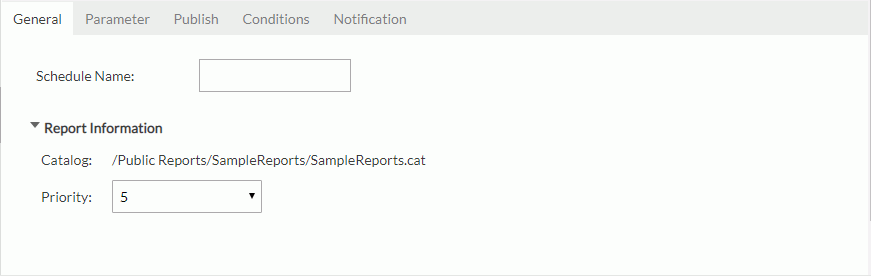
Schedule Name
Specifies the name for the schedule task.
Report Information
Specifies the report information.
- Catalog
Lists the catalog used by the selected reports. - Priority
This property is available to administrators. Specify the priority level of the scheduled task. The priority levels are from 1 to 10 in ascending order of lowest priority to highest priority. By default, Server ignores this property unless you modify server.properties in<install_root>\binto set queue.policy not equal to 0.
 Back to top
Parameter Tab Properties
The Parameter tab enables you to specify the parameter values if any to run the reports.
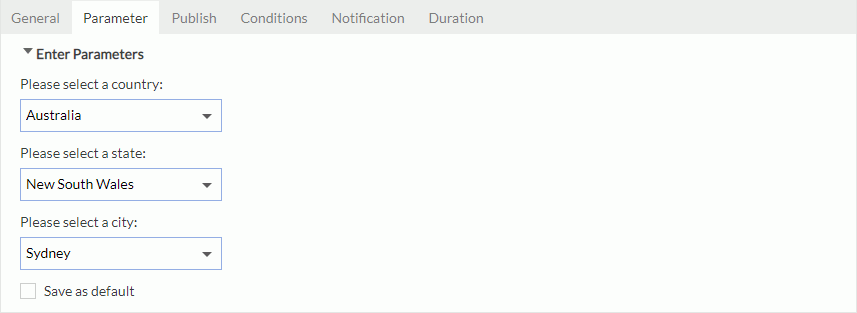
Enter Parameters
Lists all the parameters used by the reports. Edit the values according to your requirement.
If no parameter is used in the report, Server displays "No Parameter Needed" here.
 Use Saved Values
If it is available, you can select the previously saved parameter values to apply to the report and save parameter values for reuse later.
Save as default
Select Save as default to save current parameter values as the default parameter values for the report. Server displays this option when you did not clear Enable Setting Default Parameter Values For the corresponding report type in the server profile.
This option is a user-report level setting. It is an action and takes effect after you submit the scheduled task. Its initial status is always cleared.
Publish Tab Properties
The Publish tab enables you to specify the type of the task. There are two main tasks to publish your reports: Default Task and User Task. By default, Default Task is used to publish the reports. To use the User Task, select the User Task link in the Default Task page.
Default Task
If you select Default Task to publish your reports with, when specifying the task type, you can choose from the following sub tasks:
- To Version
Publishes the report result to the versioning system. - To Disk
Publishes the report result to the file system. This type is not supported to organization users or when you schedule to run multiple reports. - To E-mail
Publishes the report result to email. - To Printer
Publishes the report result to a printer. This type is not supported for bursting result or when you schedule to run multiple reports. - To Fax
Publishes the report result to fax. This type is not supported for bursting result or when you schedule to run multiple reports. - To FTP
Publishes the report result to an FTP site. This type is not supported when you schedule to run multiple reports.
 If you are scheduling a bursting report, the Publish tab changes according to the bursting setting that you made in the General tab of the Schedule dialog box. For more information, see Scheduling Bursting Reports.
User Task
If you select User Task to publish your reports, you can implement a customized task with schedule properties. This property is unavailable to organization users or to bursting reports.
- User Task Class Name
Specifies the class name for the user task. - Display Name
Specifies the display name for the user task. - User Task Properties
Specifies user task properties to define tasks. - Import User Task Properties from File
Imports a user task from a properties file. - Upload Properties
Uploads the properties to Logi Report Server. The properties will be listed in the User Task Properties area.
To Version
The To Version tab is for you to specify settings for publishing the report result to the versioning system.
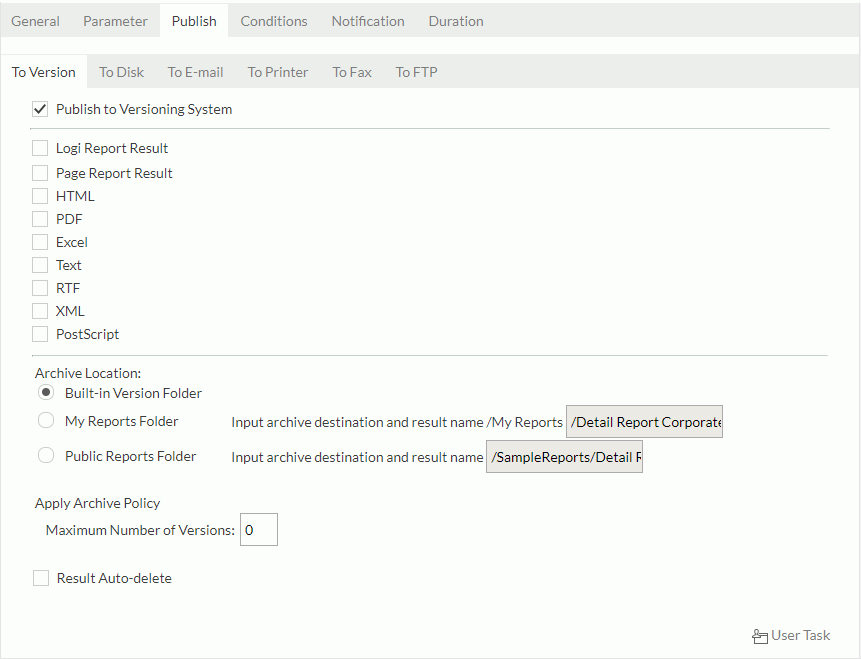
Publish to Versioning System
Specifies to publish the report result to the versioning system. You can publish the result to the following formats:
- Logi Report Result
Publishes the page report to a Logi Report result file (RST file). RST files can be exported to HTML, PDF, Text, Excel, XML, RTF and Postscript formats via Logi Report Server. This property is unavailable for bursting result, or when the schedule task contains both page reports and web reports.- Zip Result
Specifies to compress the result to reduce the disk size and I/O; however, it uses more CPU resources. - Run Linked Report
Select if you want to generate the linked reports (excluding the detail reports) in the output when the report is linked with other reports. Generating linked reports at the same time will cause performance issue, especially when the linked reports contain a large amount of data. If you are only interested in the primary report, leave this property cleared. - Precision Level
Specifies the precision level with which to publish the report result. Changing the default value may cause abnormalities in report layout.
- Zip Result
- Page Report Result
Publishes the page report to a page report result file (RSD file) that can be viewed in a Page Report Studio window. Some reports cannot be published in the Page Report Result format, such as self-contained (CLX) reports, multi-level nested master and subreports, reports containing data objects, and reports developed from a dynamic query or hierarchical data source (HDS). This property is unavailable for bursting result, or when the schedule task contains both page reports and web reports.An RSD file is a middle result for page report that can preserve data and the working status of a page report and can be shared with others. Based on the RSD file, you can rebuild a page report to analyze data and to export to other formats. An RSD file is a standalone working file so all the useful information is added into it, such as catalog, report template, NLS, data, parameters and security. The security information of an RSD file is the user of the generator that creates it. When different users open the same RSD, they will get the same result based on the same security configuration. You cannot refresh a report viewed from an RSD file to refetch data from the database. When the system rebuilds a report according to the RSD file, it will only load data from the RSD file. When opening a report RSD, you cannot go back to the actions which the RSD generator took before generating the RSD file but can take actions based on the current RSD resources.
- Zip Result
Specifies to compress the result. The compressed file's suffix will still be .rsd, its size will be smaller which reduces IO and disk usage; however, it uses more CPU resources. - Precision Level
Specifies the precision level with which to publish the report result. Changing the default value may cause abnormalities in report layout.
- Zip Result
- Web Report Result
Publishes the web report to a static web report result file (WST file). WST files can be exported to HTML, PDF, Text, Excel, XML, RTF, and Postscript formats via Logi Report Server. This property is unavailable for bursting result, or when the schedule task contains both page reports and web reports.- Zip Result
Specifies to compress the result to reduce the disk size and I/O; however, it uses more CPU resources. - Run Linked Report
Select if you want to generate the linked reports (excluding the detail reports) in the output when the report is linked with other reports. Generating linked reports at the same time will cause performance issue, especially when the linked reports contain a large amount of data. If you are only interested in the primary report, leave this property cleared. - Precision Level
Specifies the precision level with which to publish the web report result. Changing the default value may cause abnormalities in report layout.
- Zip Result
- HTML
Publishes the report result to the versioning system in HTML format. - PDF
Publishes the report result to the versioning system in PDF format. - Excel
Publishes the report result to the versioning system in Excel format. - Text
Publishes the report result to the versioning system in Text format. - RTF
Publishes the report result to the versioning system in RTF format. - XML
Publishes the report result to the versioning system in XML format. - PostScript
Publishes the report result to the versioning system in PostScript format.
Archive Location
Specifies the location for the saved report result version. This property is unavailable for bursting result.
- Built-in Version Folder
Specifies to save the report result version to the built-in version folder. This property is not available to organization users when the report is in the Public Reports folder, and to shared reports either. - My Reports Folder
Specifies to save the report result version to the My Reports folder. - Public Reports Folder
Specifies to save the report result version to the Public Reports folder. Not available to organization users. - Organization Reports Folder
Specifies to save the report result version to the Organization Reports folder. Available to organization users only.
Apply Archive Policy
Applies an archive policy to the report result version. Some of the following properties are unavailable for bursting result.
- Archive as New Version
Specifies whether to use multiple versions for the report result.- Maximum Number of Versions
Specifies the maximum number of versions that will be listed in the version table of the report result. The default value is 0, which means that the version number is unlimited.
- Maximum Number of Versions
- Replace Old Version
Specifies to replace the old version when a new version is generated.
Result Auto-delete
Specifies the deleted date of the result. Set the result to be automatically deleted within one hundred years. If the time you specify exceeds one hundred years, Logi Report Server will keep the report result forever.
- Result Expires in N Days
Specifies a period after which the report result will be automatically deleted. - Result Expires After
Specifies a certain day on which the report result will be automatically deleted.
Set Permissions
The property is unavailable when the schedule task is based on multiple reports.
When the schedule task is based on a single report, the property is available only when the Archive Location is specified to be a public folder and when you have the Grant permission on the report. Select the link to open the Set Permissions dialog box to set user permissions to the specified report tabs in the page report or web report.
To Disk
The To Disk tab is for you to specify settings for publishing the report result to the file system. It is not available to organization users or when you schedule to run multiple reports.

Publish to Disk
Specifies to publish the report result to the file system. You can publish the report result to the following formats:
- Logi Report Result
Publishes the page report to a Logi Report result file (RST file). This property is unavailable for bursting result. - Page Report Result
Publishes the page report to a page report result file (RSD file). This property is unavailable for bursting result. - Web Report Result
Publishes the web report to a static web report result file (WST file). This property is unavailable for bursting result. - HTML
Publishes the report result to the file system in HTML format. - PDF
Publishes the report result to the file system in PDF format. - Excel
Publishes the report result to the file system in Excel format. - Text
Publishes the report result to the file system in Text format.- File Suffix
Specifies the suffix of the Text file, which can be .txt or .dat.
- File Suffix
- RTF
Publishes the report result to the file system in RTF format. - XML
Publishes the report result to the file system in XML format. - PostScript
Publishes the report result to the file system in PostScript format.
For each format, you can decide whether to publish the results to the server resource tree or to the server disk path. Then you need to type in the blank location text box root of the resource tree or disk path as shown in the examples:
- Example for server resource tree:
/report1.rst - Example for server disk path:
C:\temp\report1.rst
When publishing a page report, if you choose the Logi Report Result and Page Report Result formats, you need only provide one file path because all selected report tabs will be output into one file. For other formats, if you leave the Export to One File property in the General tab cleared, you need to specify a file path for each selected report tab.
To E-Mail
The To E-mail tab is for you to specify settings for publishing the report result to email. Some properties in the tab are unavailable for bursting result.
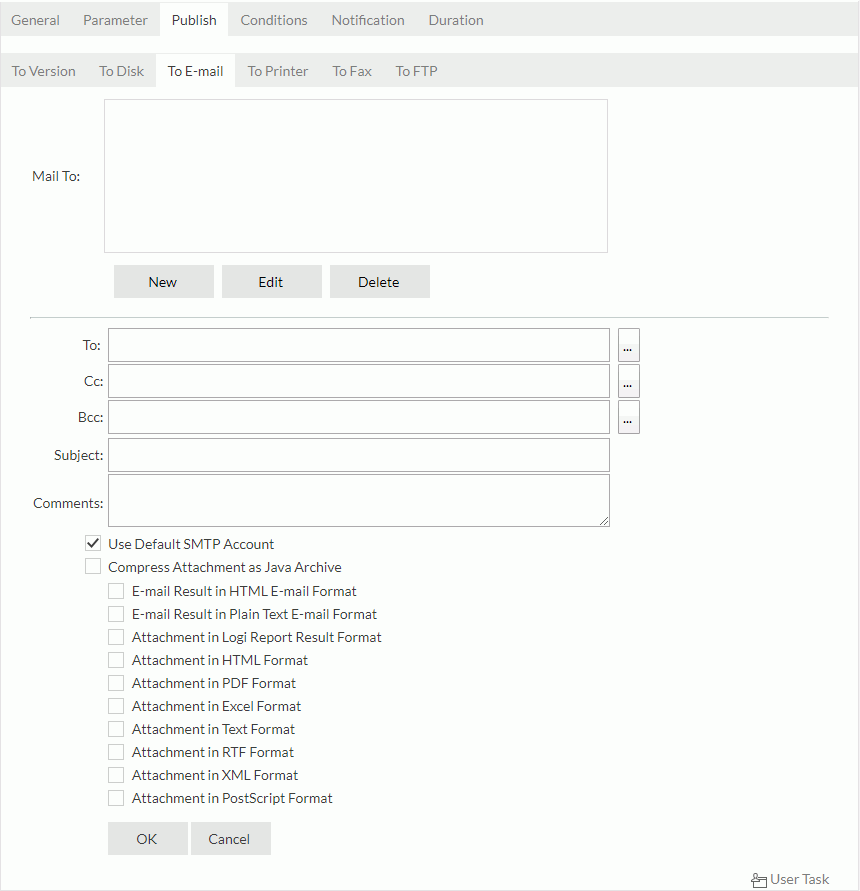
Mail To
Lists the email addresses you have sent mail to.
Creates a new email.
- To
Specifies the addresses you want to send the email to. - Cc
Specifies the addresses you want to send additional copies of the email to. - Bcc
Specifies the addresses you want to secretly send additional copies of the email to. The recipients in the Bcc list are known to the sender and themselves only. -
 Ellipsis button
Opens the Select Role, Group and User dialog box to select users, groups, and roles in the Logi Report Server security system to use their mail addresses to send the email. - Subject
Specifies the subject of the email. - Comments
Specifies the contents of the email or comments to the contents. - Use Default SMTP Account
Specifies whether to use the default SMTP account configured in the Administration > Configuration > E-mail Server page on the Server Console as the email publish account.The property is selected by default. Clear it and you will be able to specify a different account using the following properties:
- E-mail Address
Specifies the email address of the new SMTP account. - User Name
Specifies the username of the new account. - Password
Specifies the password of the new account.
- E-mail Address
- Compress Attachment as Java Archive
Specifies whether to compress the mail attachment as Java Archive. - E-mail Result in HTML E-mail Format
Sends the report result via email to the specified address in HTML format. The report result will be shown in HTML format in the mail body.- Run Linked Report
Select if you want to generate the linked reports (excluding the detail reports) in the output when the report is linked with other reports. Generating linked reports at the same time will cause performance issue, especially when the linked reports contain a large amount of data. If you are only interested in the primary report, leave this property cleared.
- Run Linked Report
- E-mail Result in Plain Text E-mail Format
Sends the report result via email to the specified address in plain text format. The report result will be shown in plain text format in the mail body with no other information such as color and images.- The two formats, E-mail Result in HTML E-mail Format and E-mail Result in Plain Text Format, cannot work concurrently.
- If you choose to send the mail in E-mail Result in HTML E-mail Format, the report result will overwrite the comments that you type for the mail.
When you select one of the following formats, that is you want to send the report result as an attachment file, you can specify a file name for the file by setting the File Name property.
- Attachment in Logi Report Result Format
Sends the report result via email to the specified address with a Logi Report result file as attachment. Unavailable when the schedule task contains both page reports and web reports. - Attachment in Web Report Result Format
Sends the web report result via email to the specified address with a WST file as attachment. Unavailable when the schedule task contains both page reports and web reports. - Attachment in HTML Format
Sends the report result via email to the specified address with an HTML file as attachment. - Attachment in PDF Format
Sends the report result via email to the specified address with a PDF file as attachment. If an administrator enabled Split PDF in the Administration > Configuration > Export > E-mail tab on the Server Console, Server disables the TOC and Sign properties here. - Attachment in Excel Format
Sends the report result via email to the specified address with an Excel file as attachment. - Attachment in Text Format
Sends the report result via email to the specified address with a Text file as attachment.- File Suffix
Specifies the suffix of the attached Text file, which can be .txt or .dat.
- File Suffix
- Attachment in RTF Format
Sends the report result via email to the specified address with a RTF file as attachment. - Attachment in XML Format
Sends the report result via email to the specified address with an XML file as attachment. - Attachment in PostScript Format
Sends the report result via email to the specified address with a PostScript file as attachment. - OK
Retains the settings and adds the email address into the Mail To list. - Cancel
Cancels operations.
Edit
Edits the specified email in the Mail To list.
Delete
Deletes the specified email from the Mail To list.
To Printer
The To Printer tab is for you to specify settings for publishing the report result to a printer. It is not available for bursting result or when you schedule to run multiple reports.
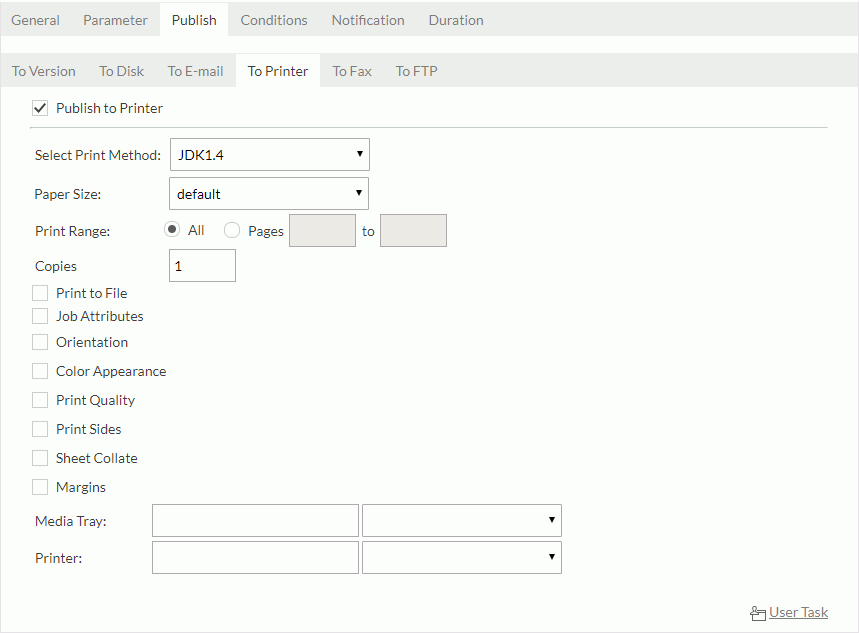
Publish to Printer
Specifies to publish the report result to a printer.
Select Print Method
Specifies the JDK print method to print the report result.
Printer
Specifies the name with the path of the printer. You can type it in the box or select it from the drop-down list.
When JDK1.4 is selected in the Select Print Method drop-down list, the following properties will be available.
Paper Size
Specifies the paper size.
Print Range
Specifies the pages to be printed.
Copies
Specifies the number of copies you want to print. The number of copies will be applied to all specified pages.
Print to File
Prints the document to a file instead of a printer. This kind of files can only be opened and printed by serial port printer on Windows via DOS command.
- File Name
Specifies the name of the file to which you print. If no path is provided in the file name, the file will be saved to the working directory of the server.
Job Attributes
Specifies the properties of the print task.
- Priority
Specifies the print priority for this task. - Job Name
Specifies the name of the print task. - User Name
Specifies the name of the user.
Orientation
Specifies the orientation for the printed result.
- Landscape
Prints the report result in a Landscape orientation. - Portrait
Prints the report result in a Standard letter orientation. - Reverse Landscape
Prints the report result in a Reverse Landscape orientation. - Reverse Portrait
Prints the report result in a Reverse Portrait orientation.
Color Appearance
Specifies to print the report result in Monochrome or in Color.
Print Quality
Specifies the print quality. It can be Draft, Normal, or High.
Print Sides
Specifies the print sides for the report result.
- One Side
Imposes each consecutive print-stream page upon the same side of consecutive media sheets. - Duplex
Imposes each consecutive pair of print-stream pages upon the front and back sides of consecutive media sheets, such that the orientation of each pair of print-stream pages on the medium is correct for the reader as if for binding on the long edge. - Tumble
Imposes each consecutive pair of print-stream pages upon front and back sides of consecutive media sheets, such that the orientation of each pair of print-stream pages on the medium is correct for the reader as if for binding on the short edge.
Sheet collate
Specifies the printing order for printing multi-page report.
- Collated
If selected, when you print two copies of a three-page report, the page order is 1, 2, 3; 1, 2, 3. - Uncollated
If selected, when you print two copies of a three-page report, the page order is 1, 1; 2, 2; 3, 3.
Margins
Specifies the paper margins for the report result (MM or Inch).
Media Tray
First select a printer, and then from the drop-down list, specify the media tray.
To Fax
The To Fax tab is for you to specify settings for publishing the report result to fax. It is not available for bursting result or when you schedule to run multiple reports.

 Before you can fax the report result, you must configure your modem first, otherwise Server displays a warning message.
Publish to Fax
Specifies to publish the report result to fax.
Quality
Specifies the quality of the fax: Best, Normal, and Fast.
Include Cover Sheet
Specifies to send a cover sheet with the fax.
The following items are displayed on the fax cover sheet.
To
Specifies the name of the recipient.
From
Specifies the name of the sender.
Company
Specifies the sender's company.
Date
Specifies the date on which the fax is to be sent. You can select the Calendar icon  to select a date from the calendar.
Fax Number
Specifies the fax number of the recipient.
Phone Number
Specifies the phone number of the sender.
Re
Specifies the subject of the fax.
Comments
Specifies the comments of the fax.
Urgent
Specifies whether the fax is urgent or not.
For Review
Specifies that the recipient only needs to view the fax.
Please Comment
Specifies that the recipient is required to comment on the content of the fax.
Please Reply
Indicates that a reply is required for the fax.
To FTP
The To FTP tab is for you to specify settings for sending the report result to an FTP site. It is not available when you schedule to run multiple reports. Some properties in the tab are unavailable for bursting result.
FTP To
Lists the FTP sites you can send the report result to.
New
Creates a new FTP site.
- Protocol Type
Specifies the protocol type used for publishing the report result to FTP.- FTP (Standard File Transfer Protocol)
Files are transferred in a non-secure (plain text) style. - SFTP using SSH2
SFTP (SSH File Transfer Protocol, also known as Secure FTP) is a way of securely transferring files over remote systems and is supported by most UNIX servers running SSH2. Ask your server administrator about availability. - SCP (Secure Copy)
This is a means of securely transferring computer files between a local and a remote host or between two remote hosts, using the Secure Shell (SSH) protocol. If this type is selected, you will not be able to create folders to the FTP server. - FTPS with TLS/SSL (Explicit)
Explicit connection type of FTP security with TLS/SSL. - FTPS with TLS/SSL (Implicit)
Implicit connection type of FTP security with TLS/SSL.
- FTP (Standard File Transfer Protocol)
- FTP Site Name
A user defined name of the FTP site. It is optional. - Host Address
The domain name or IP address of the FTP site. It cannot be null. - Port
The port of the FTP server. It is optional, and by default 21 is used for Standard FTP and Explicit FTPS, 22 SCP and SFTP, and 990 for Implicit FTPS. - Logon Type
The way to authenticate to the FTP server. Available when SFTP using SSH2 is selected as the protocol type.- Normal
Uses a password to authenticate. - Key File
Uses a Secure Shell Protocol (SSH) key file to authenticate.
- Normal
- User Name
The username is valid to the authentication of the FTP server that can access the FTP site. If not specified, "anonymous" will be used as the username by default. - Password
The password is valid to the authentication of the FTP server that enables the username to access the FTP site. Unavailable when Logon Type is set to Key File. - Key File
The SSH key file used for authentication. Available when Logon Type is set to Key File. - Passphrase
The passphrase to decrypt the SSH key file. Available when Logon Type is set to Key File. - Account
The account of the FTP user if there exists. - Folder Location
The location where to put the report result files on the FTP server. If not specified, the root path "/" of the FTP server will be used by default. - Handler Class
A customized FTP-client handler class can be used instead of the one provided in Logi Report. You should specify a fully-qualified class name that is package name plus class name, for example, test.DemoJakartaFTPHandler. - Formats
Specifies in which formats to send the report result file to the FTP site. You can specify one or more formats. For each format, you need to specify a name for the result file.- Logi Report Result
Sends the report result in a Logi Report result file to the specified FTP site. - Web Report Result
Sends the web report result in a WST file to the specified FTP site. - HTML
Sends the report result in an HTML file to the specified FTP site. - PDF
Sends the report result in a PDF file to the specified FTP site. - Excel
Sends the report result in an Excel file to the specified FTP site. - Text
Sends the report result in a Text file to the specified FTP site.- File Suffix
Specifies the suffix of the Text file, which can be .txt or .dat.
- File Suffix
- RTF
Sends the report result in a RTF file to the specified FTP site. - XML
Sends the report result in an XML file to the specified FTP site. - PostScript
Sends the report result in a PostScript file to the specified FTP site.
- Logi Report Result
- Check Connection
Checks whether to be able to connect to the specified FTP location with the specified user account. - OK
Retains the settings and adds the FTP site into the FTP To list. - Cancel
Cancels the creation of the new FTP site.
Edit
Edits the specified FTP site in the FTP To list.
Delete
Deletes the specified FTP site from the FTP To list.
Conditions Tab Properties
The Conditions tab enables you to specify the conditions for the publishing task. It contains the following sections:
Time Tab Properties
The Time tab enables you to set settings for specifying the time for when the task is to be performed.
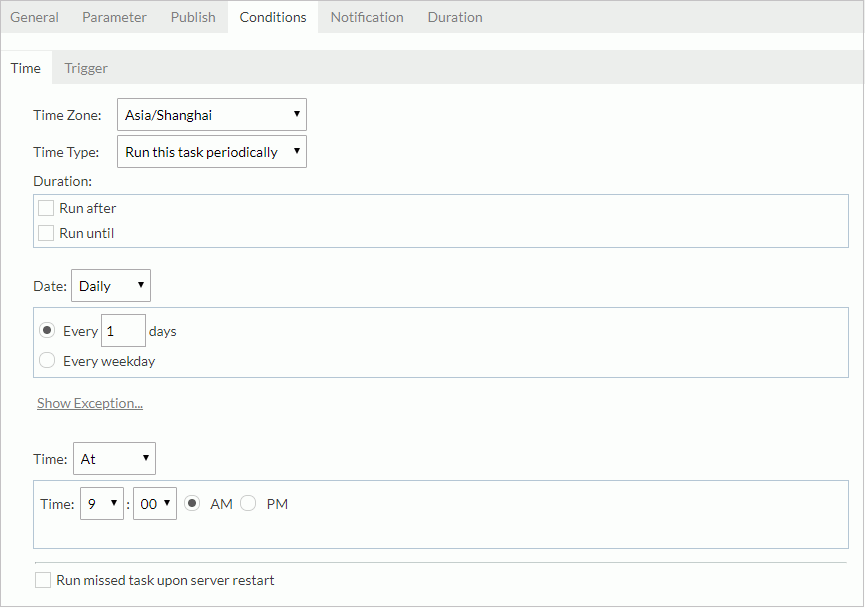
Time Zone
Select the time zone.
Time Type
Specify when you want to perform the task.
- Run this task immediately
Select if you want to perform the task as soon as you submit it. - Run this task at
Select if you want to perform the task at a specific time.- Date
Select the Calendar icon to select a date from the calendar. - Time
Specify the time of the day.
- Date
- Run this task periodically
Select if you want to perform the task on a repeated basis.- Duration
Specify the period during which you want to perform the task on a repeated basis.- Run after
Select and then specify the start date and time of the period. - Run until
Select and then specify the end date and time of the period.
- Run after
- Date
Specify the dates when you want to perform the task.- Daily
Select if you want to perform the task per a specific number of days or every weekday (from Monday to Friday). - Weekly
Select if you want to perform the task on the specific days of the week per a specific number of weeks. - Monthly
Select if you want to perform the task on a specific day of the month or week, per a specific number of months. - Show/Hide Exception
Select to show or hide the exception date box, which lists the dates when you do not want to perform the task.- Add
Select to add an exception date via the Select Condition dialog box. - Remove
Select to remove the selected exception dates.

- Add
- Daily
- Time
Specify the exact time of the day when you want to perform the task.
- At
Select if you want to perform the task at a specific time of the day. - Hourly
Select if you want to perform the task at a specific minute per a specific number of hours. - Minutely
Select if you want to perform the task per a specific number of minutes. - Run missed task upon server restart
Select if you want to run missed tasks when you restart the server.
- Duration
Trigger Tab Properties
Use the Trigger tab to set settings for specifying a trigger for the task.
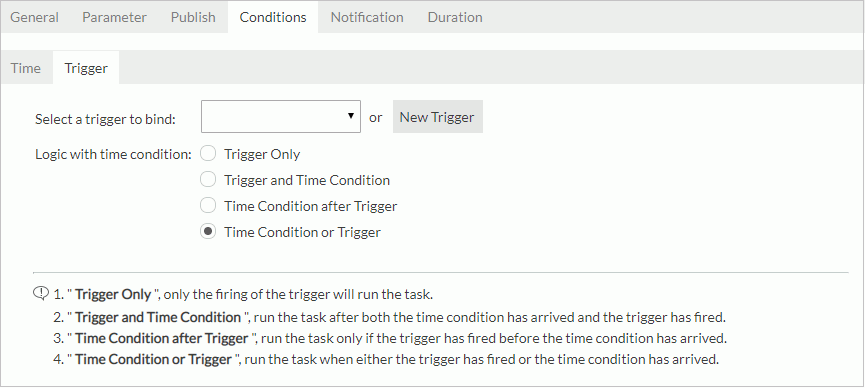
Select a trigger to bind
Select a trigger from the list for the task.
New Trigger
Select to open the New Trigger dialog box to create a new trigger. This property is not available to organization users.
Logic with time condition
Specify the logic between the time condition and trigger condition.
- Trigger Only
Select if you want to perform the task only when an administrator fires the trigger. - Trigger and Time Condition
Select if you want to perform the task when both time is up and an administrator fires the trigger. When you select this logic: - No matter which condition is ready, Server performs the task only when its counterpart is ready.
- If you specify to perform the task at a specific time, you must select Run missed task upon server restart, otherwise Server regards the task as expired and deletes it when the time condition is ready before the trigger condition.
- Time Condition after Trigger
Select if you want to perform the task when time is up after an administrator fires the trigger. If the time condition is ready before the trigger condition, Server regards the task as expired and deletes it. - Time Condition or Trigger
Select if you want to perform the task when either time is up or an administrator fires the trigger.
Notification Tab Properties
Use the Notification tab to notify someone by email when the task finishes running, regardless of whether it is successful or unsuccessful.
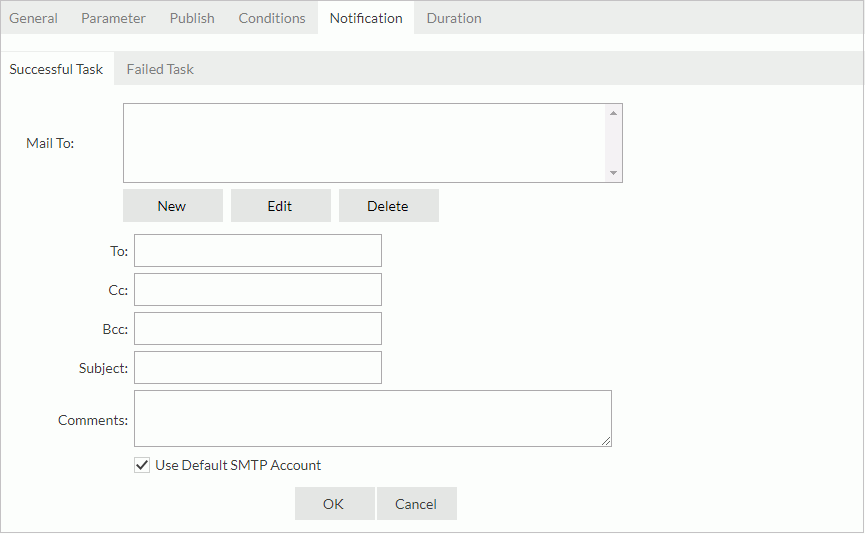
Successful Task/Failed Task
Select if you want to send an email when the task is successful/unsuccessful.
Mail To
Lists the email addresses you have sent mail to.
Creates a new email.
- To
Specifies the address you want to send the email to. - Cc
Specifies the address you want to copy the email to. - Bcc
Specifies the address you want to secretly copy the email to. - Subject
Specifies the subject of the email. - Comments
Specifies the contents of the email or comments to the contents. - Use Default SMTP Account
Specifies whether to use the default SMTP account configured in the Administration > Configuration > E-mail Server page on the Server Console as the email publish account.The property is selected by default. Clear it and you will be able to specify a different account using the following properties:
- E-mail Address
Specifies the email address of the new SMTP account. - User Name
Specifies the username of the new account. - Password
Specifies the password of the new account.
- E-mail Address
- OK
Retains the settings and adds the email address into the Mail To list.
- Cancel
Cancels operations.
Edit
Edits the selected email in the Mail To list.
Delete
Deletes the selected email from the Mail To list.
Duration Tab Properties
The Duration tab is available only when you have enabled the task-level timeout mechanism. In this tab, you can specify a time duration for the task, and ask Logi Report Server to cancel the task or to notify you or someone else of the task status via email if the task has not yet finished running when the task duration is up.

The following are the available properties:
Timeout
Specifies the time duration for the task.
Notify by e-mail after the specified time
Sends an email about the task information when the specified time is up.
- Mail To
Specifies the email address of the recipient.
Cancel the task after the specified time
Cancels the running task when the specified time is up.