 Previous Topic
Scheduling to Run a Report
This topic describes how you can create a schedule task on a specified report to run the report and publish the report result to different destinations in various formats.
- Do either of the following to open the Schedule dialog box.
- In the resource tree on the Server Console, browse to the report you want to schedule to run, then:
- Put the mouse pointer over the report row and select the Schedule button
 on the floating toolbar.
 - Select the report row, right-click in the row and select Schedule from the shortcut menu.
- Select the report row and select Run > Schedule on the task bar of the Resources page.
- Put the mouse pointer over the report row and select the Schedule button
- On the Server Console, select My Tasks on the system toolbar, then select the Scheduled tab. Select New Schedule on the task bar of the My Tasks page, then in the New Schedule dialog box, select the Select Report to Create Schedule radio button, specify the folder and then the catalog in which the report you want to schedule to run is saved, then select the report and select OK.
- In the Logi Report Server Start Page, select Schedule in the Manage category. Server displays the My Tasks page with the Scheduled tab selected. Select New Schedule on the task bar of the My Tasks page, then in the New Schedule dialog box, select the Select Report to Create Schedule radio button, specify the folder and then the catalog in which the report you want to schedule to run is saved, then select the report and select OK.
- In the resource tree on the Server Console, browse to the report you want to schedule to run, then:
- In the General tab,
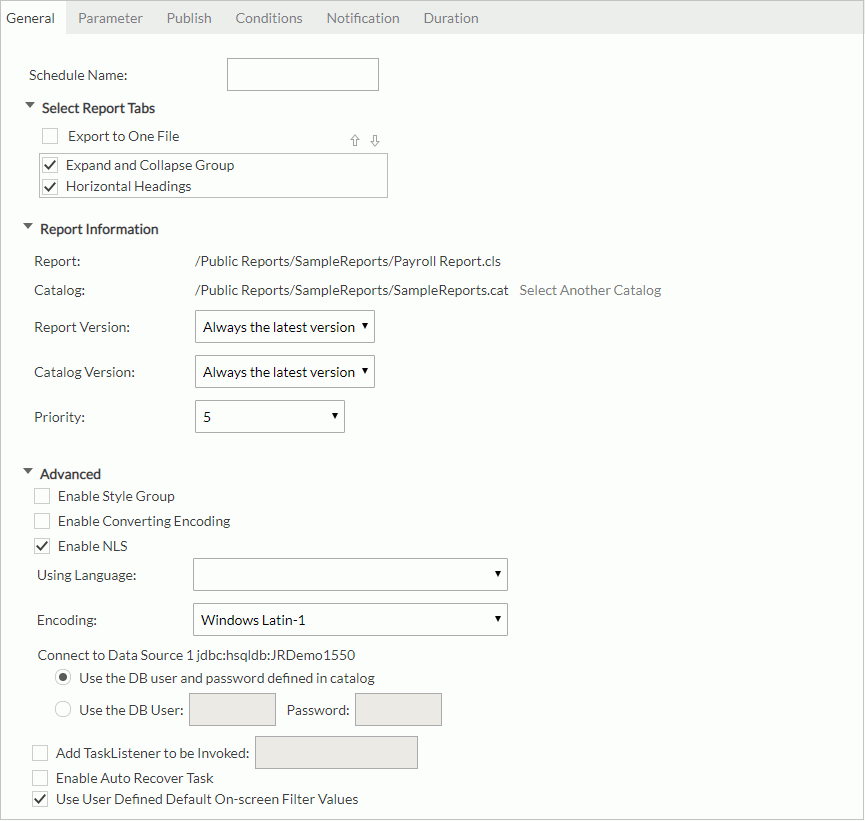
- Specify the name for the task in the Schedule Name text box.
- For a page report, select the report tabs you want to run from the page report. You can choose multiple normal report tabs or one bursting report at a time (for scheduling a bursting report, see Scheduling Bursting Reports). When multiple normal report tabs are selected, select Export to One File if you want to export them to just one result file. The report tabs will be exported in the list order. You can change the order of the report tabs by selecting
 and
and  .
. - If there are multiple dynamic connections available, expand the Select Dynamic Connection section and select a connection from the drop-down list. You can select Connection Properties to view the connection information.
- Expand the Report Information section, you can select Select Another Catalog to specify another catalog for the report, and then select the report version and catalog version from the corresponding drop-down lists (the catalog and report/catalog version cannot be changed if the report is a shared report).
Assign a priority to the task from the Priority drop-down list. The Priority property is available to administrators only and the priority levels are from 1 to 10 in ascending order of lowest priority to highest priority (by default this property is ignored unless server.properties is modified to set queue.policy not equal to 0).
- Expand the Advanced section to configure some advanced settings for the report.
Specify the style group for the report.
Select the Enable Converting Encoding option and specify the encoding before and after converting from the corresponding drop-down lists.
If the report is defined with NLS, select Enable NLS then specify a language to display the report contents in.
Define the encoding for the report by selecting from the Encoding drop-down list.
Specify the DB user and password with which to connect to the data source. You can either use the default ones defined in the catalog or specify another DB user and password.
Select Add TaskListener to be Invoked to call a Java application before/after Server runs the report to obtain information about the report task (for more information, see Applying TaskListener).
If you are in a cluster environment, you can also directly specify an active server in the cluster to perform the schedule task via the Specify a preferred server to run the task option.
If you want to enable task recovery, select Enable Auto Recover Task, then specify the maximum number of times in which to retry running the task in order to recover it, the time interval between the retries, and whether to recreate all or just the failed results when you publish the task to multiple formats.
The default on-screen filter values you have saved in the report will be automatically used to run the report. If you do not want to apply the filter conditions, clear Use User Defined Default On-screen Filter Values.
- In the Parameter tab, specify the parameter values if the report has parameters.
- In the Publish tab, specify the types of the task.
Six task types are provided by Logi Report Server: To Version, To Disk (unavailable to organization users), To E-mail, To Printer, To Fax and To FTP. Choose the types you want to publish, select the result formats for each task type and set the other settings as required. For more information about each task type, see the examples in Examples of Scheduling Reports.
- In the Conditions tab,
- In the Time tab, specify the time zone and the time for when the task is to be performed.
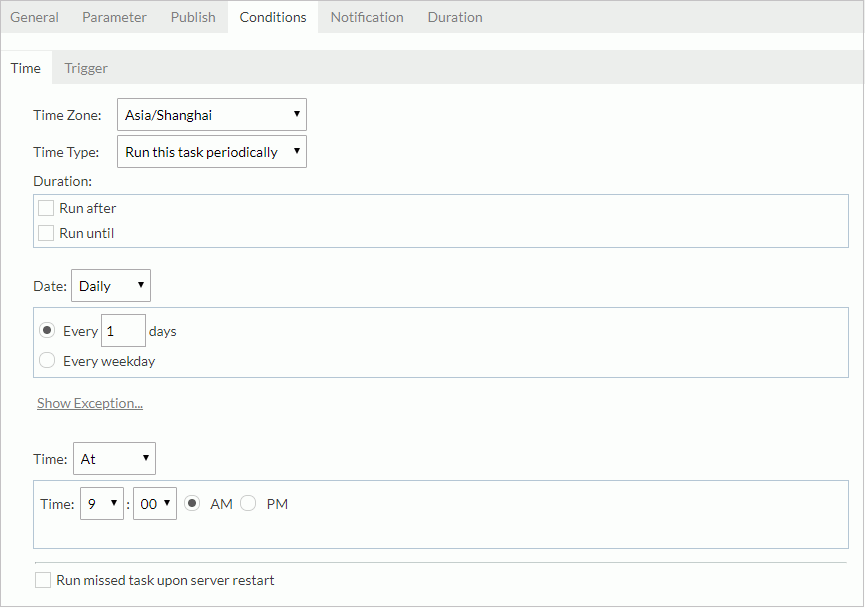
- To run the task as soon as you submit it, select Run this task immediately from the Time Type drop-down list.
- To run the task at a specified time, select Run this task at, then specify the date and time according to your requirement.
- If you want to run the task repeatedly, select Run this task periodically, then specify the duration, date, and time accordingly. To add an exception date on which you do not want to run the task, select Show Exception, then select the Add button and in the Select Condition dialog box select the date as required. You can add several exception dates as you want. To remove an exception date, select it in the exception date box and select Remove.

When you select to run the task at a specified time or repeatedly, you can select Run missed task upon server restart so as to run the missed tasks when you restart the server.
- If you want to bind a trigger to the task, select Trigger. You need to be an administrator to fire triggers. For more information, see Managing Triggers.
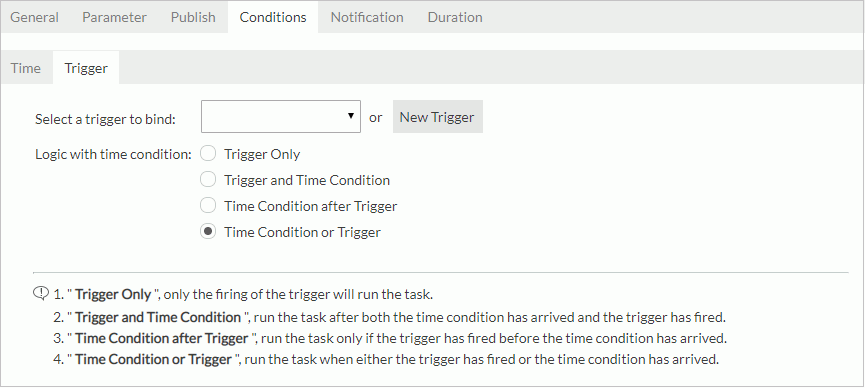
From the Select a trigger to bind drop-down list, select the required trigger or select the New Trigger button to create a new trigger in the New Trigger dialog box (the button is not available to organization users), then specify the trigger logic with time condition.
- Trigger Only
Performs the task only when the trigger is fired. - Trigger and Time Condition
Performs the task when both time is up and the trigger is fired. When you selected this logic:
 - No matter which condition is ready, Server performs the task only when its counterpart is ready.
- If you specify to perform the task at a specific time, you must select the option Run missed task upon server restart, otherwise Server regards the task as expired and deletes it when the time condition is ready before the trigger condition.
- Time Condition after Trigger
Performs a task when time is up after the trigger is fired. If the time condition is ready before the trigger condition, the task will be regarded as expired and will be deleted. - Time Condition or Trigger
Performs the task when either time is up or the trigger is fired.
- Trigger Only
- In the Time tab, specify the time zone and the time for when the task is to be performed.
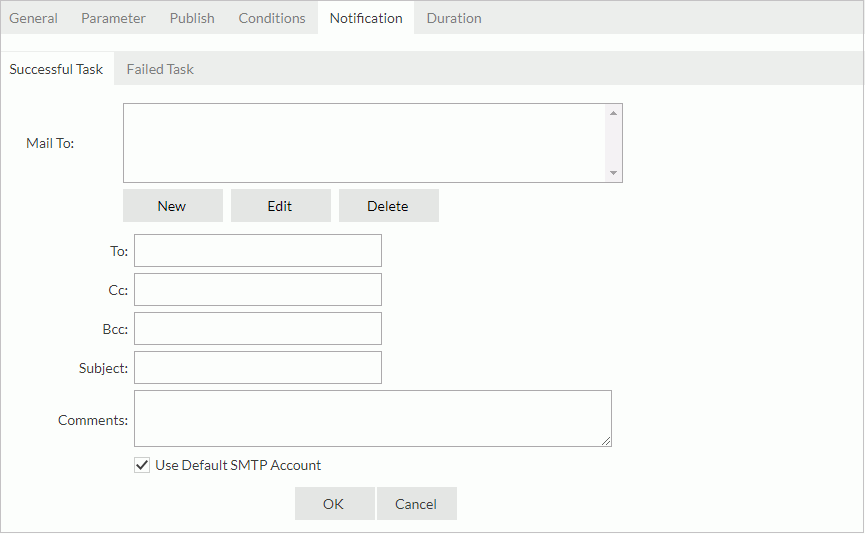
- In the Notification tab, select an email address from the Mail To box to notify someone via email of when the task finishes or when it fails. If you have not sent any mail notification before, the Mail To box is empty. Select the New button to create an email address. To send out mail notification, an email server must have been predefined by the administrator.
- If the Duration tab is available, specify a time duration for the task, and ask Server to cancel the task or to notify you or someone else of the task status via email if the task has not yet finished running when the task duration is up. For more information, see Task-Level Timeout for Advanced Run and Schedule Tasks.
- Select Finish. Server starts to perform the task.
 Back to top