Examples of Scheduling Reports
This topic provides examples of creating schedule tasks to publish reports to different destinations: the Versioning System, disk, email, printer, fax, and an FTP site.
This topic contains the following sections:
- Example 1: Scheduling to Publish a Report to the Versioning System
- Example 2: Scheduling to Publish a Report to Disk
- Example 3: Scheduling to Publish a Report to Email
- Example 4: Scheduling to Publish a Report to Printer
- Example 5: Scheduling to Publish a Report to Fax
- Example 6: Scheduling to Publish a Report to an FTP Site
Example 1: Scheduling to Publish a Report to the Versioning System
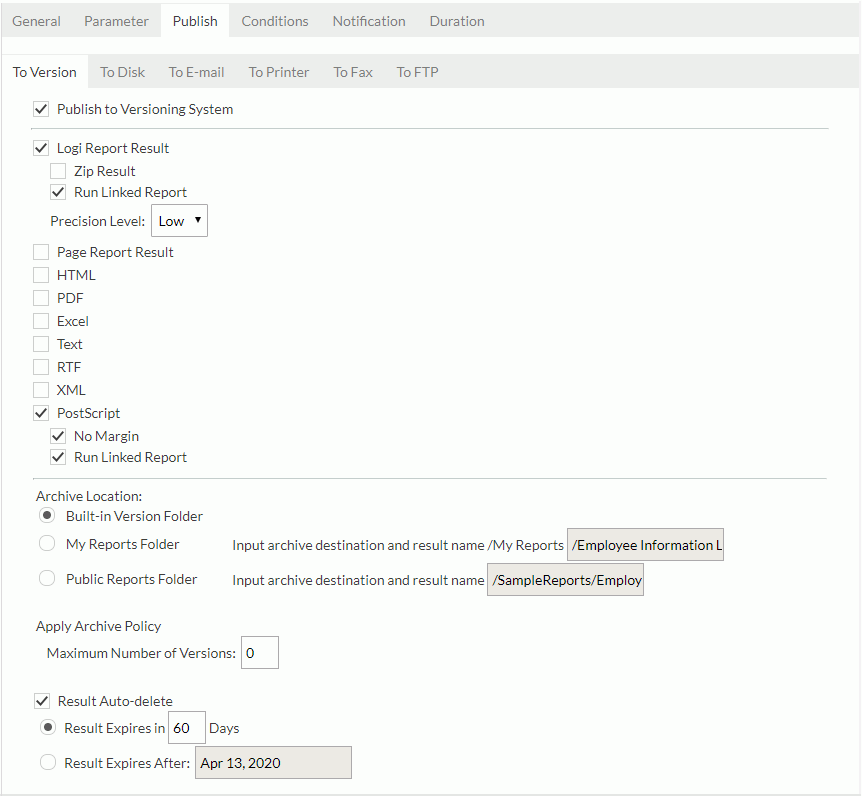
In this example, you will create a schedule task to publish a page report to the versioning system in the Logi Report Result and PostScript file formats immediately. You will put the generated result to the built-in version table of the report and keep the result for 60 days.
- Located the report in the server resource tree, then put the mouse pointer over the report row and select the Schedule button
 on the floating toolbar to open the Schedule dialog box.
- In the General tab, specify the general report settings.
- In the Parameter tab, specify the parameter values as required if the report has parameters.
- In the Publish tab,
- Select the To Version tab, then select Publish to Versioning System.
- Select the Logi Report Result and PostScript formats and set the format settings.
- Keep the default Archive Location to be Built-in Version Folder to save the report result version in the built-in version folder of the report.
- Select Result Auto-delete and define the result to expire in 60 days.
- In the Conditions tab, select the Time tab, define the time zone from the Time Zone drop-down list, then from the Time Type drop-down list, choose Run this task immediately.
- Go to the Notification tab and then set the settings if you want to notify someone of when the task is finished by sending an email.
- Select Finish to submit the task.
- Select My Tasks on the system toolbar. You can see a record of the task in the Running table when the task is being performed. Logi Report Server will put it into the Completed table once it is completed.
![]() The Logi Report Result and Page Report Result formats for page reports are based on the report level. Therefore, when you schedule to run a page report to the versioning system, Server outputs the page report with all selected report tabs to a single file no matter whether you selected Export to One File in the General tab.
The Logi Report Result and Page Report Result formats for page reports are based on the report level. Therefore, when you schedule to run a page report to the versioning system, Server outputs the page report with all selected report tabs to a single file no matter whether you selected Export to One File in the General tab.
Tip: There is another way to publish the result of a report to version.
- Set the server.version.from.temp property to true in the server.properties file in
<install_root>\bin, or select the Enable "Publish to Versioning System" for Background Tasks View option in the Administration > Configuration > Advanced page on the Server Console. - Run a report in the Advanced mode.
- Select a format other than Page Report or Web Report in the Format tab.
- Specify other settings.
- Select Finish.
- In the view page, you will see a link Publish to Versioning System at the upper-left corner. Select the link to publish the report to version in the current format.
Example 2: Scheduling to Publish a Report to Disk
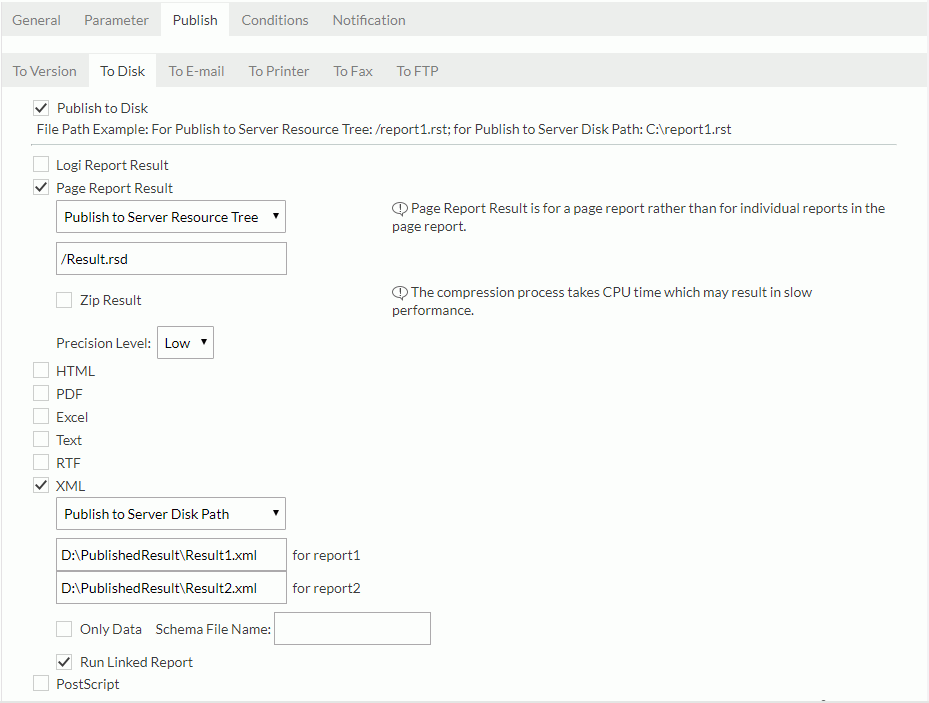
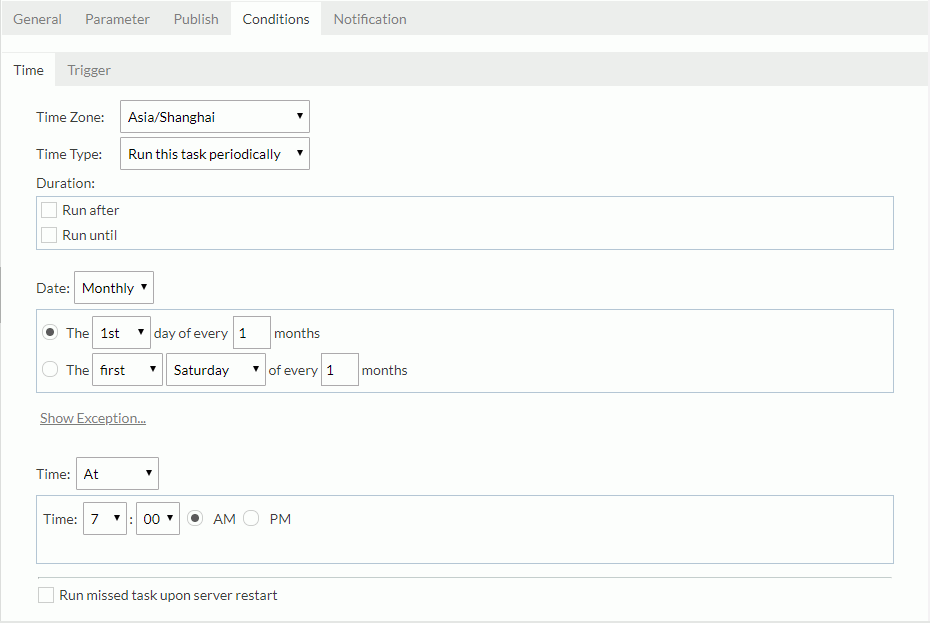
In this example, you will create a schedule task to publish a page report to the file system in the Page Report Result and XML file formats repeatedly at the start of each month at 7:00 AM. You will save the page report result file in the Public Reports folder in the server resource tree, and save the XML result file in the local directory D:\PublishedResult on the server computer.
- Located the report in the server resource tree, then put the mouse pointer over the report row and select the Schedule button
 on the floating toolbar to open the Schedule dialog box.
 - In the General tab, specify the general report settings. Suppose the page report contains two report tabs. By default, both report tabs are selected to run by the schedule task.
- In the Parameter tab, specify the parameter values as required if the report has parameters.
- In the Publish tab,
- Select the To Disk tab, then select Publish to Disk.
- Select Page Report Result, keep the default result location as Publish to Server Resource Tree, in the location text box specify the server resource tree path and file name of the result as /PublishedResult.rsd.
- Select XML, select Publish to Server Disk Path, specify the disk path and file name of the result, then set the other format settings as required. In this example, the page report contains two report tabs but Export to One File is not selected in the General tab, so we need to provide the disk path and file name for each of the report tab. Type D:\PublishedResult\Result1.xml for report1 and D:\PublishedResult\Result2.xml for report 2.
- In the Conditions tab,
- In the Time tab, define the time zone from the Time Zone drop-down list, then from the Time Type drop-down list, choose Run this task periodically.
- In the Duration box, you can specify a period for when the task will be performed.
- Select Monthly from the Date drop-down list and keep the default to run on the first day of every 1 month.
- Edit the Time settings to 7:00 AM.
- Go to the Notification tab and set the settings if you want to notify someone of when the task is finished by sending an email.
- Select Finish to submit the task.
- Select My Tasks on the system toolbar. You can see that the task has been recorded in the Scheduled table. Since you have not specified a duration to run the task until a certain time, Logi Report Server will not stop performing it until you delete or disable it from the Scheduled table.
The following shows more about the To Disk publish type. You should be aware of them when you schedule to publish a report to disk.
- Organization users cannot use the To Disk publish type. You are not able to use this publish type when you schedule to run multiple reports either.
- The Logi Report Result and Page Report Result formats for page reports are based on the report level. Therefore Logi Report Server will output the page report with all selected report tabs to a single file when you schedule to run a page report no matter whether you select Export to One File in the General tab or not.
- For each of the selected format, you need to provide the correct server resource tree path/disk path and file name with correct format type as the suffix for the corresponding result file. In addition, for a page report, except for the Logi Report Result and Page Report Result formats, you need to specify the path and file name for the result file of each specified report tab in the report if you do not select the Export to One File option in the General tab. You can apply dynamic names in the file name of the result.
- To save the result in the My Reports folder in the server resource tree, the path is "/USERFOLDERPATH/username/" (change username to the real username with which you sign in to Logi Report Server).
Example: /USERFOLDERPATH/admin/report1.pdf
- To save the result in the Public Reports folder in the server resource tree, the path is "/".
Example: /report2.html.
- To save the result in the My Reports folder in the server resource tree, the path is "/USERFOLDERPATH/username/" (change username to the real username with which you sign in to Logi Report Server).
- When you specify to publish the report result to the server resource tree, Logi Report Server will put the result to the real path if the specified folder has a real path. Otherwise Logi Report Server will put the result to the default disk location where server resources are saved, that is
<install_root>\jreportswhich is the mapped disk path of the root node "/" on the server resource tree. - If you specify to publish the report result to a non-existent folder on disk, Logi Report Server will automatically create it.
Example 3: Scheduling to Publish a Report to Email
The server administrator must have configured an email server before you can email the report result.
In this example, you will create a schedule task to send the result of a report by email.
- Located the report in the server resource tree, then put the mouse pointer over the report row and select the Schedule button
 on the floating toolbar to open the Schedule dialog box.
 - In the General tab, specify the general report settings.
- In the Parameter tab, specify the parameter values as required if the report has parameters.
- In the Publish tab, select To E-mail.
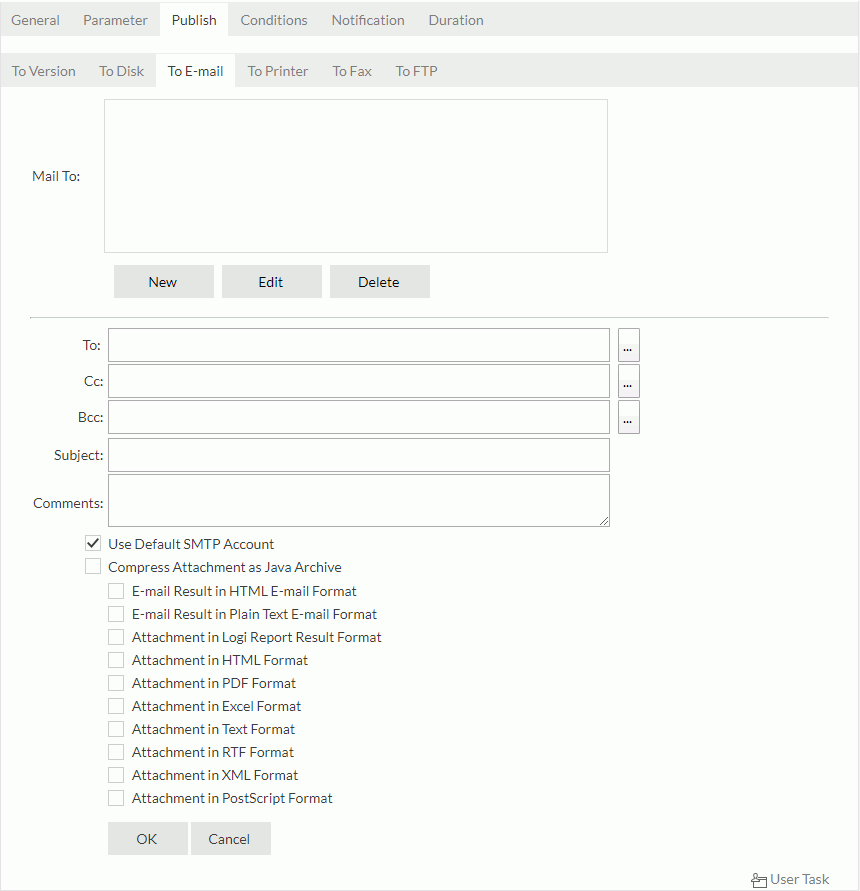
From the Mail To list, select to whom the report result will be sent. You can select the Edit button to edit the specified email. If you want to create another email, select the New button, then fill in every field, select the formats in which you want to send the report result and set the settings accordingly. When you choose to send the result as an attachment, you need to specify a file name for the attachment. You can apply dynamic names for the result file.
When you create or edit an email, you can select the ellipsis button
 next to the To, Cc, and Bcc text boxes to access the Select Role, Group and User dialog box to select the users, groups, and roles in the Logi Report Server security system to use their mail addresses to send the email. Administrators can customize the scheduling recipients that are available to you.
 - Specify the time for when to perform the task in the Conditions tab.
- Go to the Notification tab and set the settings if you want to notify someone of when the task is finished by sending an email.
- Specify the settings in the Duration tab if you want to specify a timeout for the task.
- Select Finish to have the task performed.
- Select My Tasks on the system toolbar. You can see a record of the task in the Running table when the task is being performed. Logi Report Server will put it into the Completed table once it is completed.
Example 4: Scheduling to Publish a Report to Printer
In this example, you will create a schedule task to send the result of a report to a printer.
- Located the report in the server resource tree, then put the mouse pointer over the report row and select the Schedule button
 on the floating toolbar to open the Schedule dialog box.
 - In the General tab, specify the general report settings.
- In the Parameter tab, specify the parameter values as required if the report has parameters.
- In the Publish tab,
- Select the To Printer tab and then select Publish to Printer.
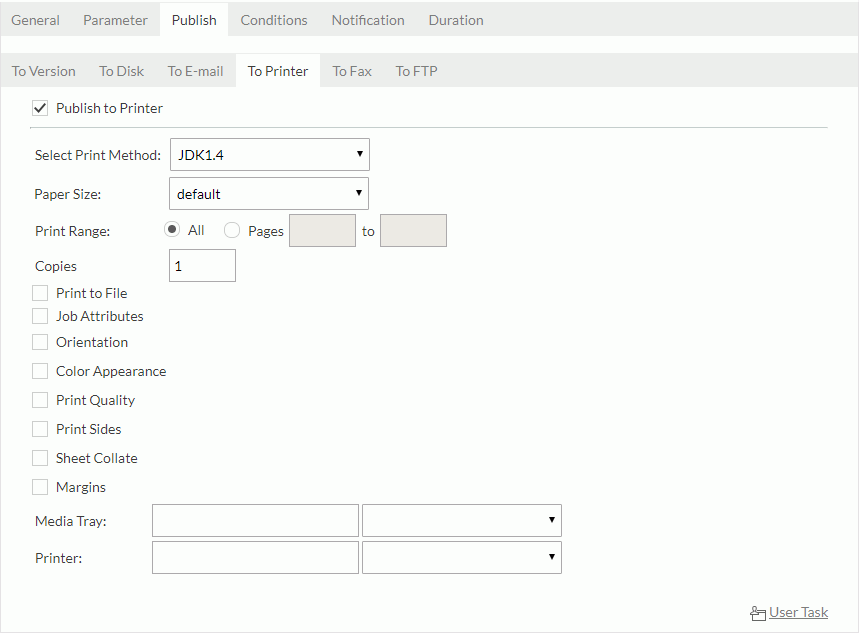
- Select a print method from the Select Print Method drop-down list.
- Type a name with the path of the printer in the Printer text box or select it from the drop-down list that follows.
- Specify other options if you select to use the JDK1.4 print method, such as the paper size, print range, and print quality.
- Select the To Printer tab and then select Publish to Printer.
- Specify the time for when to perform the task in the Conditions tab.
- Go to the Notification tab and set the settings if you want to notify someone of when the task is finished by sending an email.
- Specify the settings in the Duration tab if you want to specify a timeout for the task.
- Select Finish to have the task performed.
- Select My Tasks on the system toolbar. You can see a record of the task in the Running table when the task is being performed. Logi Report Server puts it into the Completed table once it is completed.
![]()
- When there is no printer connected with Server, and you schedule to publish a report to a printer, the server might stop responding or throw an exception.
- Server cannot obtain information on which options are supported and which are not from your printer and reflect it in the To Printer tab. You should configure the setting according to your printer carefully.
Example 5: Scheduling to Publish a Report to Fax
The server administrator must have configured the fax settings before you can fax the report result.
In this example, you will create a schedule task to publish the result of a report to fax.
- Located the report in the server resource tree, then put the mouse pointer over the report row and select the Schedule button
 on the floating toolbar to open the Schedule dialog box.
 - In the General tab, specify the general report settings.
- In the Parameter tab, specify the parameter values as required if the report has parameters.
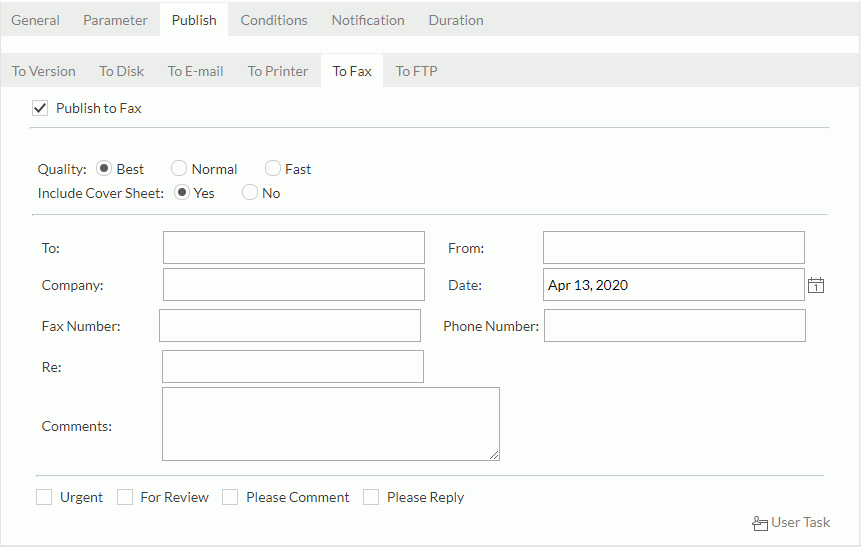
- In the Publish tab, select the To Fax tab, select the Publish to Fax option and then fill in every field and set the settings according to your requirements.
- Specify the time for when to perform the task in the Conditions tab.
- Go to the Notification tab and set the settings if you want to notify someone of when the task is finished by sending an email.
- Specify the settings in the Duration tab if you want to specify a timeout for the task.
- Select Finish to have the task performed.
- Select My Tasks on the system toolbar. You can see a record of the task in the Running table when the task is being performed. Logi Report Server will put it into the Completed table once it is completed.
Example 6: Scheduling to Publish a Report to an FTP Site
In this example, you will create a schedule task to publish the result of a report to an FTP site.
- Located the report in the server resource tree, then put the mouse pointer over the report row and select the Schedule button
 on the floating toolbar to open the Schedule dialog box.
 - In the General tab, specify the general report settings.
- In the Parameter tab, specify the parameter values as required if the report has parameters.
- In the Publish tab,
- Select the To FTP tab.
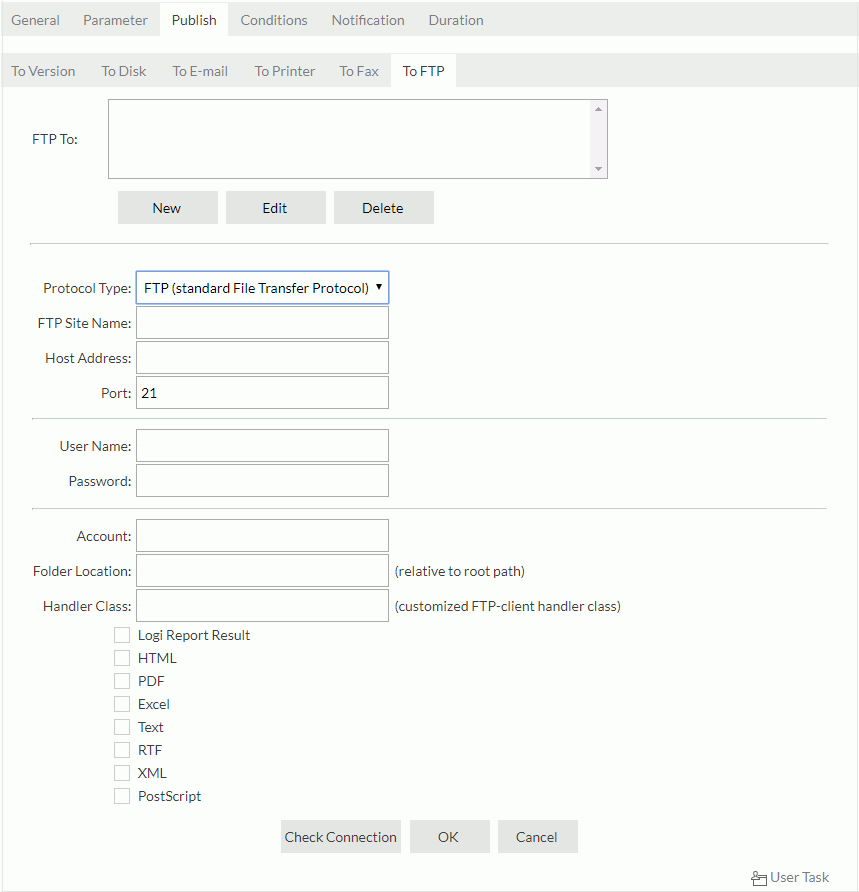
- Select the New button to set up a new FTP site or select the Edit button to edit a specified FTP site in the FTP To list.
- Fill in every field, select the formats in which you want to send the report result and then set the settings according to your requirements.
- Select the To FTP tab.
- Specify the time for when to perform the task in the Conditions tab.
- Go to the Notification tab and set the settings if you want to notify someone of when the task is finished by sending an email.
- Specify the settings in the Duration tab if you want to specify a timeout for the task.
- Select Finish to have the task performed.
- Select My Tasks on the system toolbar. You can see a record of the task in the Running table when the task is being performed. Logi Report Server will put it into the Completed table once it is completed.
 Previous Topic
 Back to top