 Previous Topic
Advanced Run Dialog Box Properties
Use the Advanced Run dialog box to run a report in the Advanced mode. This topic describes how you can specify advanced settings for running a report.
This topic contains the following sections:
- General Tab Properties
- Parameter Tab Properties
- Format Tab Properties
- Archive Tab Properties
- Duration Tab Properties
You see these elements on all the tabs:
Back
Select to go back to the left tab.
Next
Select to go to the right tab.
Finish
Select to run the report with the settings you specified here.
Cancel
Select to close the dialog box without running the report.
Help
Select to view information about the Advanced Run dialog box.
General Tab Properties
Use the General tab to specify the report and catalog information and task priority.

Select Report Tabs
Server displays this section for page reports only. Select the report tabs you want to run in the page report. Server runs the selected report tabs in the order you submit. If the page report has only one report tab, Server selects it by default.
-
 Move Up button
Select to move the specified report tab higher in the list. -
 Move Down button
Select to move the specified report tab lower in the list.
Select Dynamic Connection
Server displays this section when there are multiple dynamic connections for your catalog. You can specify a dynamic connection.
- Data Source
Data source name in the catalog. - Connection Name
Dynamic connection name. - Connection
Select a dynamic connection from the list. - Connection Properties
Information of the selected dynamic connection, which is read only.
Report Information
Report and catalog information.
- Report
Report name and path in the server resource tree. - Catalog
Catalog name and path in the server resource tree. Unavailable to shared reports.Select Select Another Catalog if you want to choose another catalog for the report in the Select Another Catalog dialog box.
- Report Version
Select the report version. Unavailable to shared reports. - Catalog Version
Select the catalog version. Unavailable to shared reports. - Priority
This property is available to administrators. Specify the priority level of the scheduled task. The priority levels are from 1 to 10 in ascending order of lowest priority to highest priority. By default, Server ignores this property unless you modify server.properties in<install_root>\binto set queue.policy not equal to 0.
 Back to top
Parameter Tab Properties
Use the Parameter tab to specify the parameter values if any to run the report.
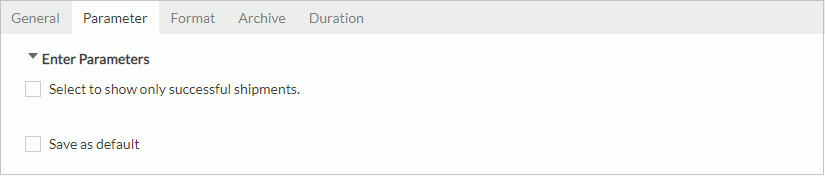
Enter Parameters
Server displays the parameters that the report uses. Edit the values according to your requirement.
If the report does not use any parameters, Server displays "No Parameter Needed" here.
 Use Saved Values icon
If you see this icon, you can select the previously saved parameter values to apply to the report and save parameter values for reuse later.
Save as default
Select if you want to save current parameter values as the default parameter values for the report. Server displays this property when you did not clear Enable Setting Default Parameter Values For the corresponding report type in the server profile.
This property is a user-report level setting. It is an action and takes effect after you select Finish in the dialog box. Its initial status is always cleared.
Format Tab Properties
Use the Format tab to specify the format in which you would like to run the report and set the format properties.
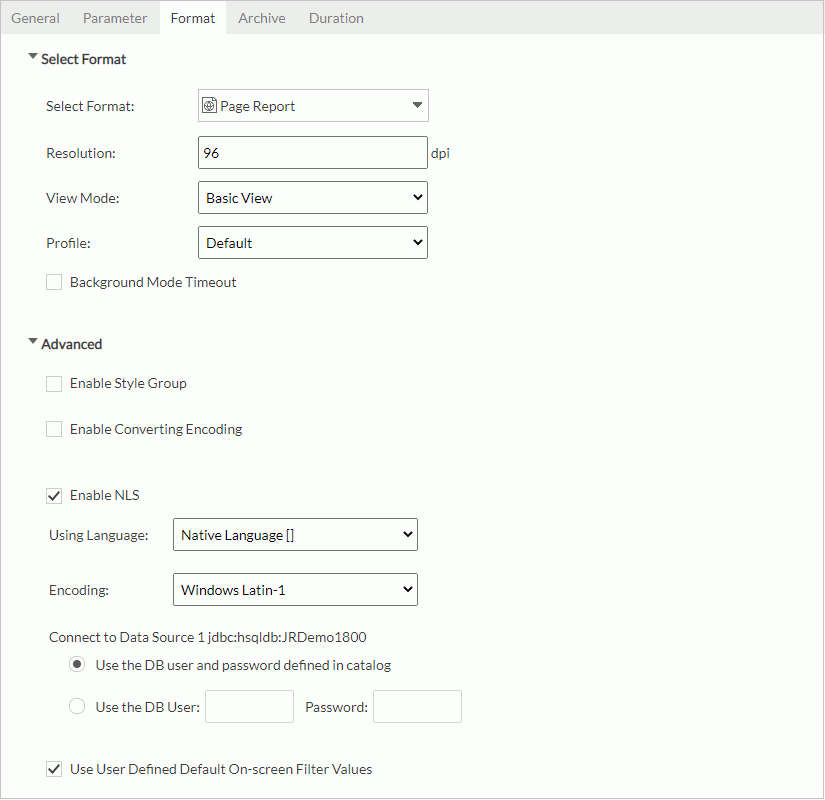
Select Format
Select the format in which you want to open the report.
- Select Format
Select the format in which you want to open the report and the properties of the format. The format can be one of the following:
Advanced
Advanced format settings.
- Enable Style Group
If you have specified a default style group via the Override Style Group property in the server profile, Server selects this property and displays the default style group in the Style Group box by default. You can also choose another style group from the Style Group list for the selected page report tabs or web report.When the <No Style> item displays in the Override Style Group box, Server clears this property by default and uses the style group property of the page report tab or web report for this format that you predefined in Logi Report Designer.
- Enable Converting Encoding
Select to enable the conversion of encoding. Then, Server activates the Before Converting and After Converting properties. Select the encoding from the two lists. - Enable NLS
Select to enable NLS for the report. Then, Server enables the Using Language list for you to choose a language. If you haven't defined any NLS resource for the report, you can only run the report using the default language. - Encoding
Select the encoding for the report. - Connect to [Data Source Name] [Connection Name]
Specify the DB user and password for connecting to the data source that the report uses. For the default connection, Server does not display [Connection Name].- Use the DB user and password defined in catalog
Select if you want to use the DB user and password defined in the catalog. - Use the DB User
Select this property and you can then specify another DB user and password instead of the one defined in the catalog.
- Use the DB user and password defined in catalog
- Use User Defined Default On-screen Filter Values
Select to apply the default on-screen filter values that you have specified to the report. Server displays the property when you did not clear Enable Setting Default On-screen Filter Values For the corresponding report type in the server profile. - Add TaskListener to be Invoked
Select to call a Java application before/after the task runs to obtain information about the task. Server enables the property only when the format is not Page Report or Web Report.
Archive Tab Properties
You see the following properties when the view format is NOT Page Report or Web Report in the Format tab.
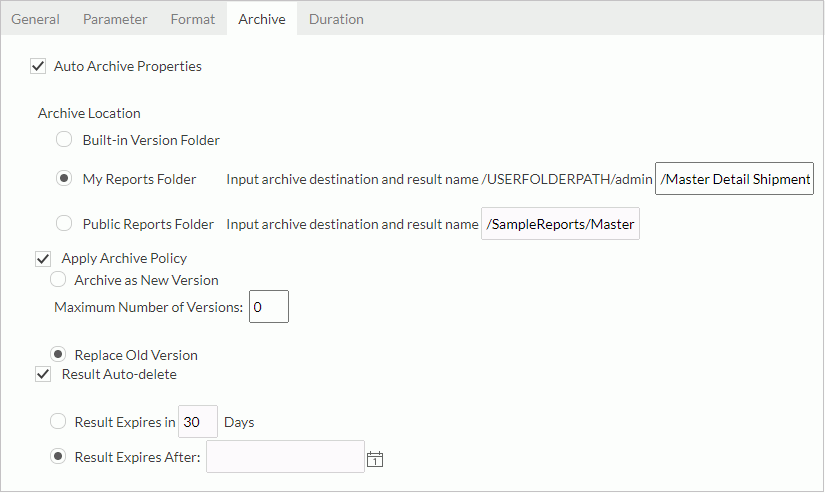
Auto Archive Properties
Select to archive the result version automatically after the report finishes running.
Archive Location
Location where you want to archive the report result version.
- Built-in Version Folder
Select to save the report result version to the built-in version folder. Server does not display the property to organization users when the report is in the Public Reports folder, and to shared reports either. - My Reports Folder
Select to save the report result version to the My Reports folder. - Public Reports Folder
Select to save the report result version to the Public Reports folder. Server does not display the property to organization users. - Organization Reports Folder
Select to save the report result version to the Organization Reports folder. Server displays the property to organization users only.
Input archive destination and result name
Type the name and location with which you want to archive the result.
Apply Archive Policy
Select to apply an archive policy to the report result version.
- Archive as New Version
Select to enable multiple versions for the report result. Then, type the maximum number of versions you want to display in the version table of the report result. The default value 0 means unlimited version number. - Replace Old Version
Select to replace the old version when Server generates a new version.
Result Auto-delete
Select if you want Server to delete the result. Then specify when you want to delete it. If the time you specified to delete the result exceeds one hundred years, Server keeps the result forever.
- Result Expires in N Days
Type the number of days you want to keep the report result before Server deletes it. - Result Expires After
Select this property, and then select a date after which you want to delete the report result.
Set Permissions
Available only when the Archive Location is a public folder and when you have the Grant permission on the report. Select Set Permissions to set user permissions on the report in the Set Permissions dialog box.
Duration Tab Properties
Server displays the Duration tab only when you have enabled the task-level timeout mechanism. In this tab, you can specify a time duration for a task, and ask Server to cancel the task or to notify you or someone else of the task status via email if the task has not finished running when the task duration is up.
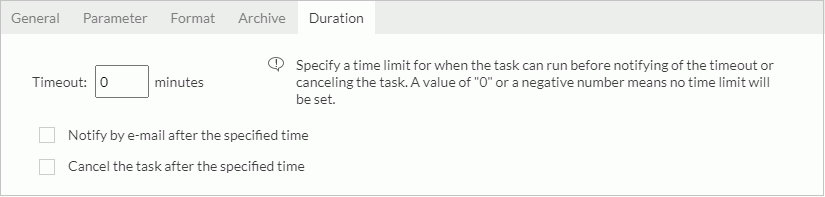
Timeout
Type the time duration for the task.
Notify by e-mail after the specified time
Select to send an email about the task information when the specified time is up.
- Mail To
Type the email address of the recipient.
Cancel the task after the specified time
Select to cancel the running task when the specified time is up.
Web Report
Select to run the web report in Web Report Studio.
Resolution
Resolution of the result to zoom in/out, in DPI. Server obtains the default value from the operation system, which is the resolution of your monitor, for example, 72 DPI on UNIX or 96 on Windows. You can set a higher/lower value to zoom in/out.
View Mode
Select the Web Report Studio mode to run the report.
- View Mode
Select if you want Web Report Studio to run in the View Mode by default. You can switch to Edit Mode if it is available. - View Mode Only
Select if you want Web Report Studio to run in the View Mode only. You are not able to switch to Edit Mode. - Edit Mode
Select if you want Web Report Studio to run in the Edit Mode by default. You can switch to View Mode if it is available. This item is available only when you have the Edit permission on the report.
Page Report
Select to run the page report in Page Report Studio.
Resolution
Resolution of the result to zoom in/out, in DPI. Server obtains the default value from the operation system, which is the resolution of your monitor, for example, 72 DPI on UNIX or 96 on Windows. You can set a higher/lower value to zoom in/out.
Select the Page Report Studio mode to run the report.
- Basic View
Select if you want Page Report Studio to run in the Basic View by default. You can switch to Interactive View if it is available. - Basic View Only
Select if you want Page Report Studio to run in the Basic View only. You are not able to switch to Interactive View. - Interactive View
Select if you want Page Report Studio to run in the Interactive View by default. You can switch to Basic View if it is available. This item is available only when you have the Edit permission on the report.
Profile
Select the Page Report Studio profile you want to apply to run the report, which contains a set of Page Report Studio settings.
Background Mode Timeout
Select and then specify the time after which Server will continue to run the report in the background. When it runs a page report and has not generated the result yet after the specified time, Server will automatically run the report in the background mode. Once the report is complete you can find the result in the My Tasks > Background Tasks table.
This property takes effect when you have selected Enable Background Task for Reports in the server profile.
HTML
No Margin
Select if you want to remove the margins you originally set while designing the report.
Multiple Files
Select if you want to generate the report result to multiple HTML files. Server designates a serial number for each HTML page. For example, if you name a 3-page report as "sales", Server will create three files called sales_1.html, sales_2.html, and sales_3.html.
- Embedded CSS
Select if you want to embed the cascading style sheet (CSS) in the HTML files; otherwise, Server generates the .css file individually.
Single File
Select if you want to generate the report result to a single HTML file.
- No Hyperlink
Select if you do not want to see hyperlinks for navigating previous and next pages on the navigation bar of the HTML output. - No Page Number
Select if you do not want to see page number information showing the current page number and the total page number on the navigation bar of the HTML output.
Drilldown
Select to enable the Drilldown feature in the HTML output so that you can inspect certain items for further detailed data.
Section 508 Compliant Output
Select if you want to add the accessibility attributes you defined for the report elements via the Designer Report Inspector to the HTML output which is Section 508 compliant. For more information, select Making HTML and PDF Report Results and Server Console Accessible.
When you select Section 508 Compliant Output, Server selects and disables the Use HTML Data Table and Relative Font Size properties. The output will be Section 508 compliant including HTML data table, accessible attributes, and relative font feature.
Use HTML Data Table
Select if you want to output the table and crosstab components to table objects in the HTML output.
Absolute Font Size
Select if you want to generate the report result using the fixed font size that you cannot adjust according to the font size settings in the web browser.
Relative Font Size
Select if you want to generate the report result using a relative font size that you can adjust according to the font size settings in the web browser.
Image Chart
Select the image type with which you want to display charts:
- Auto-select
Select if you want Server to automatically detect the image format: GIF if the image colors are less than 256 colors or else JPEG. - GIF
Select GIF, a lossless compression technique that supports only 256 colors, for images with only a few distinct colors, such as line drawings, black and white images, and small text that is only a few pixels high. - JPEG
Select JPEG, a lossy compression technique that is designed to compress color and grayscale continuous-tone images. JPG images support 16 million colors, are best suited for photographs and complex graphics, and are supported on the Web. - PNG
Select PNG, which provides a portable, legally unencumbered, well-compressed (effectively 100 percent lossless compression), well-specified standard for lossless bitmapped image file. PNG supports indexed-color images of up to 256 colors and shows a more interchangeable, flexible, and robust function than GIF.
Resolution
Resolution of the result to zoom in/out, in DPI. Server obtains the default value from the operation system, which is the resolution of your monitor, for example, 72 DPI on UNIX or 96 on Windows. You can set a higher/lower value to zoom in/out.
Web Browser
Select IE or Firefox as the web browser for which the HTML output adapts.
Text Overflow
Choose whether to make the text overflow is visible or hidden.
Run Linked Report
Select if you want to generate the linked reports (excluding the detail reports) in the output when the report is linked with other reports. Generating linked reports at the same time will cause performance issue, especially when the linked reports contain a large amount of data. If you are only interested in the primary report, leave this property cleared.
No Margin
Select to remove the margins you originally set while designing the report.
Compress Image
Select to compress the images in the report by the percentage you type in the box.
Generate charts and barcodes using images (recommended)
Select if you want to take the whole report result as a graphic to transform the report by the method of simulated printer.
Generate charts and barcodes using vector graphics
Select if you want to take the whole report result as a dataset to transform the report by sequence.
TOC
Select to generate a Table of Contents in the PDF output. Not supported for web reports.
Drilldown
Select to enable the Drilldown feature in the HTML output so that you can inspect certain items for further detailed data.
Encrypt
Select if you want to encrypt the PDF output. Server displays the Encrypt dialog box for you to configure the encrypt settings.
Sign
Select if you want to add the digital sign to the PDF output. Server displays the Sign dialog box for you to configure the sign settings.
Run Linked Report
Select if you want to generate the linked reports (excluding the detail reports) in the output when the report is linked with other reports. Generating linked reports at the same time will cause performance issue, especially when the linked reports contain a large amount of data. If you are only interested in the primary report, leave this property cleared.
Accessible PDF
Select to generate the report result as an accessible PDF file. For more information, select Making HTML and PDF Report Results and Server Console Accessible.
Zoom
Specify the zooming of the report content in the PDF output. You can select an item from the list or type a percentage with or without the percent sign in the text box. A valid percentage is greater than 0 and no larger than 6400%. Server treats any invalid input as Default.
- Default
It means no zoom setting. After you open the PDF file in the Adobe Acrobat, the zoom setting follows that in the Adobe. - Actual Size
The report content remains its original size. It is same as 100%. - Fit Page
The report content in a page fills the entire page within the window both horizontally and vertically. If the required horizontal and vertical scale ratios are different, the smaller of the two applies. - Fit Width
The report content in a page fills the page width within the window. - Fit Height
The report content in a page fills the page height within the window. - Fit Visible
The report content in a page fills the width of its bounding box within the window.
Excel
Excel Version
Select an Excel version.
- Excel 97-2003 Workbook (*.xls)
Select to run the file in the .xls format. - Excel Workbook (*.xlsx)
Select to run the file in the .xlsx format.
Format
Select the format of the Excel output.
- Auto Format
Select if you want Server to define the format according to the objects in the report. Server uses Column Format when the report contains crosstabs or tables, or else Report Format. Server selects Auto Format by default. - Report Format
Select if you want the formatting of the report in Excel to match the format as you designed in the template. Use this format if you just want to view the report in Excel. - Column Format
Select if you want to calculate all components' row/column values in the report using the Columned property value of the report when exporting. Choose this format if you want to actively use the result in Excel such as filtering and sorting. - Data Format
Select if you want to only generate the report data without any format. Data Format is only available for the Excel version of Excel 97-2003 Workbook (*.xls).
More/Less Options
Select to show/hide the additional settings for running the report to Excel. When you have selected Data Format as Format, only Word Wrap and Run Linked Report are available here.
- Include Shapes in Export
Select to include the drawing objects in the Excel output, such as lines, ovals, and boxes. - Print Page Header
Type the page header text for the printed file. - Print Page Footer
Type the page footer text for the printed file. - Word Wrap
Word-wrap settings.- All Keep Existing
Select to keep all the settings of each object's Word Wrap property originally specified in the report. - All Disabled
Select to disable the Word Wrap property for all objects. That is, the Word Wrap property is false for all objects. - All Enabled
Select to enable the Word Wrap property for all objects. That is, the Word Wrap property is true for all objects.
- All Keep Existing
- Print Gridlines
Select to include gridlines when printing the Excel result. -
Run Linked Report
Select if you want to generate the linked reports (excluding the detail reports) in the output when the report is linked with other reports. Generating linked reports at the same time will cause performance issue, especially when the linked reports contain a large amount of data. If you are only interested in the primary report, leave this property cleared.
Text
Delimited Format
Select to generate the report result to a standard text file, using a delimiter to separate the fields.
- CSV Format
Select to use a comma to separate the fields. - Tab Delimited
Select to use a Tab delimiter to separate the fields. - Custom Delimiter
Select if you want to separate the fields by a user defined delimiter. Then, type your own delimiter in the Delimiter box. - Use Quote Mark
Select to use quote marks in the Text output. - Repeat Last Column Value If Null
Select if you want a cell that has no value in the Text output to use the value of the previous cell in the same column.  Trim Blank Spaces
Select if you want to remove the blank spaces at the beginning and end of field values, instead of keeping them.
Horizontal Density
Type an integer value for each unit of the horizontal density between the columns. The resulting density is a direct ratio of the value you specify. That is, the greater the value, the smaller the width between the columns. By default, Logi Report defines the density.
Vertical Density
Type an integer value for each unit of the vertical density between the columns. The resulting density is a direct ratio of the value you specify. That is, the greater the value, the smaller the height between the columns. By default, Logi Report defines the density.

- When using user defined densities, if you do not set the densities appropriately, the fields in the report may overlap each other, so you should not use this way to run the report result to Text.
- When setting the value of Horizontal/Vertical Density, you need to pay attention to the following:
- The value of Horizontal/Vertical Density must be greater than the character's width/height of the smallest field in the report (smallest field is the field with the smallest font size), otherwise, Logi Report does not apply the value you set.
- If one of the values of Horizontal/Vertical Density is greater than 0 and the other one is less than 0, Logi Report applies the value greater than 0 and defines the other value.
- If the values of Vertical Density and Horizontal Density are both greater than 0 and the value of Horizontal Density is less than 1, Logi Report applies the specified value of the two densities. Otherwise, Logi Report defines the two values.
- If the values of Vertical Density and Horizontal Density are both less than 1, Logi Report defines the two values.
Compress
Select to generate the report result to Text in a compressed size. There will be no clearance between the columns.
Header and Footer
Select if you want the Text output to contain all headers and footers in the report, including Report Header/Footer, Page Header/Footer, and Group Header/Footer. Otherwise, the Text output will only contain the data in the Detail panel.
Windows End-of-line (CR-LF)
Select to use Windows end-of-line characters to indicate the start of a new line. Logi Report will use two characters <cr> and <lf> at the end of the line.
Unix End-of-line (LF)
Select to use UNIX End-of-line characters to indicate the start of a new line. Logi Report will only use the UNIX character <lf> at the end of the line.
Run Linked Report
Select if you want to generate the linked reports (excluding the detail reports) in the output when the report is linked with other reports. Generating linked reports at the same time will cause performance issue, especially when the linked reports contain a large amount of data. If you are only interested in the primary report, leave this property cleared.
RTF
Best Editing
Select to apply flow layout to the RTF output.
No Margin
Select to remove the margins you originally set while designing the report.
Run Linked Report
Select if you want to generate the linked reports (excluding the detail reports) in the output when the report is linked with other reports. Generating linked reports at the same time will cause performance issue, especially when the linked reports contain a large amount of data. If you are only interested in the primary report, leave this property cleared.
Tip: Microsoft Word Document limits the maximum page size in Word Print Layout to 22 inches. Therefore, when you export a report with many columns in RTF and then view it in Microsoft Word Document, the columns on the right might get lost. If this happens, you can switch to Web Layout. If still not working, try the latest version of Microsoft Word Document.
XML
Only Data
Select if you want to only contain the database column information in the generated XML file and to only contain the structure information of the report in the generated XML schema file.
Clear this property if you want to also contain elements controlled by formulas in the generated XML file and to contain all the detailed information from the report, including all the property values of each report object, in the generated XML schema file.
Schema File Name
Type the path of an existing XML schema file (.xsd). Server generates the XML file based on it. Otherwise, Server generates a new XML schema file to the folder where the XML file is. The new XML schema file and the XML file will have the same name but with different extensions.
To prevent SSRF vulnerability, you can add a white list of URLs so that Server proceeds the schema file URL that you specified here only when it matches one of the URL patterns in the white list.
To add a while list of URLs, add a Java system property -Dlogireport.ssrf.whitelist in the startup file of Server, and set the property value to a string that contains a list of URL patterns separated by semicolon. The URL pattern obeys the Java regular expression rule.
Run Linked Report
Select if you want to generate the linked reports (excluding the detail reports) in the output when the report is linked with other reports. Generating linked reports at the same time will cause performance issue, especially when the linked reports contain a large amount of data. If you are only interested in the primary report, leave this property cleared.
PostScript
No Margin
Select to remove the margins you originally set while designing the report.
Run Linked Report
Select if you want to generate the linked reports (excluding the detail reports) in the output when the report is linked with other reports. Generating linked reports at the same time will cause performance issue, especially when the linked reports contain a large amount of data. If you are only interested in the primary report, leave this property cleared.