 Previous Topic
General Operations in Page Report
When you open a page report in Page Report Studio, you can perform general operations such as manage report tab, turn report pages, navigate through report data using TOC, apply a style, change report parameter values, configure Page Report Studio options, Quick schedule report tasks, and more. This topic describes how you can perform the general operations on page report.
This topic contains the following sections:
- Managing Page Report Tabs
- Turning Page Report Pages
- Navigating Through Page Report Data
- Refreshing Page Report Result
- Switching Page Report Data Mode
- Applying a Style in Page Report
- Changing Page Report Parameter Values
- Opening Links in Page Report
- Customizing Page Report Studio Skin and Toolbars
- Zooming in and out the Page Report Page
- Setting Up the Report Page
- Adding and Removing Page Breaks
- Undoing and Redoing Actions
- Keeping the Page Report as a Background Task
- Scheduling Page Report Tasks Using Quick Schedule
- Showing or Hiding Editing Marks
- Showing or Hiding User Information
- Asking for Help
- Exiting the Page Report
Managing Page Report Tabs
A page report can include one or more report tabs. The Go To drop-down list on the toolbar panel or the tabs on the top of the report list the display names of all the open report tabs in the current report. Selecting the display name of an inactive report tab will make it active. You can manage report tabs in a page report easily:
- Opening and closing a report tab
In a page report, a report tab can be shown or not. To close (hide) the active report tab, select Menu > File > Close Report Tab. If there are one or more report tabs open other than the active report tab, the close action will hide the active report tab; in the case that the active report tab is the only report tab open, the close action will prompt you whether to close the report. - To open (show) a hidden report tab, select Menu > File > Open or the Open button
 on the toolbar to display the Open Report Tabs dialog box, in which the report tabs open in the current report are marked with a check symbol. Select the report tabs you want to open, clear the ones you want to close, and then select OK.
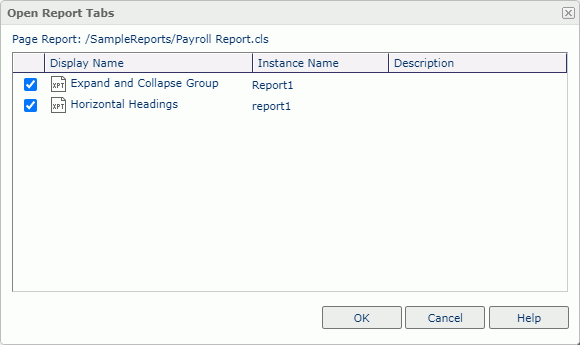
 If the report designer specifies the Work as Subreport property of a report tab to "true", even though you select the report tab in the Open Report Tabs dialog box, you cannot open the report tab from the Go To drop-down list or by switching the tabs on the top of the report.
 - Renaming a report tab
To rename a report tab, first activate it, then select Menu > File > Rename Report Tab. In the Rename Report Tab dialog box, specify a new display name for the report tab. - Deleting a report tab
To delete a report tab, first activate it, then select Menu > File > Delete Report Tab. The only report tab open cannot be deleted. You need a Logi Report Live license for Server to delete page report tabs. If you do not have the license, contact your Logi Analytics account manager to obtain it.
Tip: You can configure the Page Report Studio profile to enable switching report tabs using tabs. With report tabs you can easily activate a report tab in a report by selecting the tab representing the report tab on the report tab bar, and closing, renaming and deleting a report tab can also be accomplished by right-clicking the report tab and choosing the corresponding command from the shortcut menu.
 Back to top
Turning Page Report Pages
If a report tab includes more than one page, to turn between the report pages, you can:
- Select the First Page button
 , Previous Topic button
  , Next Topic button
  , or Last Page button
  on the View toolbar.
 - Type a number into the page box
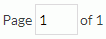 and press Enter to go to that page.
 - Select Menu > View > Turn To and then select the corresponding command on the submenu. When the Page command is selected, Server displays the Turn to Page dialog box for you to input the page number.
- Use the scrollbar or mouse wheel to scroll up/down the report tab.
Navigating Through Page Report Data
You can use the TOC Browser to navigate through a report tab. To show the TOC Browser, select Menu > View > TOC Browser.
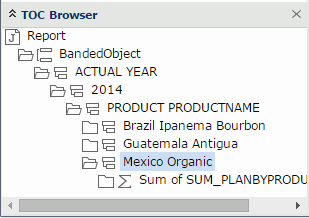
In the TOC Browser, expand the Report node, select a component or a node with the group value that you want to browse to. The page that contains the component or the matching data will then be shown.
The table of contents in the TOC Browser is organized into a tree structure. The root node represents the report tab that you are currently viewing. The component names indicate components in the report tab. The group values show hierarchical groups.
For report tabs designed in Logi Report Designer, the nodes displayed on their TOC tree as well as the format of the TOC tree can be customized.
Refreshing Page Report Result
To fetch the data of the current report again, you can select Menu > View > Refresh.
Switching Page Report Data Mode
If you are making a lot of changes to the report, it may be faster to limit the number of records to 1 page while you make the changes and then change it back to full data mode to view the final result.
When the Partial Report Result feature is enabled in the server profile, you can switch the report data mode to view full data or only a specified number of data in a report. To show a certain number of data, select Partial Data from the data mode drop-down list on the toolbar and set a positive integer in the text box that follows, then press Enter or select outside the text box. By default, the number is 5000, which means the first 5000 records will retrieved. To show all data records, select Full Data.
Applying a Style in Page Report
You can apply a style to a report to change its appearance and characteristics. You can create and set up your own styles in Designer. Then when you publish your reports to Server, you can include these custom styles with the published reports. When you run a report, Server enables the style feature and you can select a style to apply to the report.
- Applying a style to a report
To apply a style to a report, make sure nothing is selected in the report, then select Menu > Report > Style and select the required one from the submenu, or select the required style from the style drop-down list on the toolbar. When a style is applied to the whole report, all components in the report will take a uniform appearance.
 - Applying a style to a data component
The data component (banded objects, crosstabs, charts, and tables) in a report can take a different style of its own. To apply a style to a data component, select it, and then select the required one from the Menu > Report > Style menu, or select the required style from the style list on the toolbar, or right-click the component and select Apply Style from the shortcut menu to select the required style in the Apply Style dialog box. If the data component is contained in a banded object (for a chart, in a table also), you can also select the Inherit Style option to make it inherit the style of its parent data component.
However, if there is only one style available to the report, this style will be applied to the report by default, in which case, you will find that all these style related commands are hidden.
Changing Page Report Parameter Values
If there are parameters in the current report, you can change the parameter values. To do this, select Menu > Report > Change Parameters, then in the Enter Parameter Values dialog box, specify the value for each parameter and select OK to run the report with the specified parameter values.
You can also use parameter web controls to dynamically change the parameter values of a report. For more information, see Applying Web Controls.
Opening Links in Page Report
When a page report is developed with links in Designer, which refer to locations specified by URLs, email addresses or other reports, you can select the links' trigger objects in Page Report Studio to open the links. However, if the report designer did not give the Link action the highest Click Priority at report design time, you have to right-click on the trigger objects and select the corresponding link item on the shortcut menu to open the links. For example, if a trigger object is linked with a detail report, you need to right-click the object and select Detail Report from the shortcut menu to open the detail report. Meanwhile, when opening the detail report, you may be prompted with the Encoding dialog box, asking you to provide encoding and DB security information before the report result is produced. Select OK in the dialog box if you want to run a detail report using the same encoding and DB security settings as that of the master report.
After opening a linked report, you can select the Back button  or Next button
  button on the toolbar to return back to the previous report or go forward to the next report, or select the Visited Reports button
  and then select a report to switch to that report directly. When opening a detail report in the current window, you can also select the Visited Reports button and then select a report to open that report directly.
Customizing Page Report Studio Skin and Toolbars
You can set the skin for Page Report Studio, and customize toolbars in the Interactive View and Basic View.
To set the skin for Page Report Studio:
- Select Menu > View > Options. Server displays the Options dialog box.
- In the Option tab, select a skin.
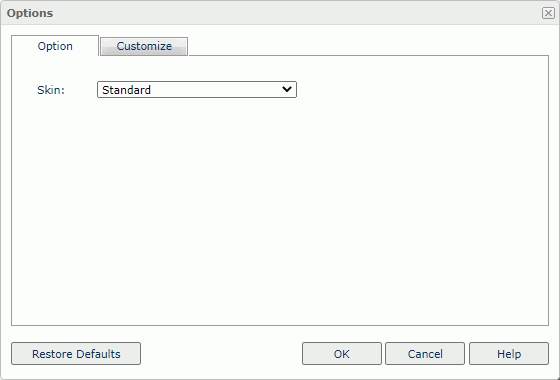
- Select OK.
To customize toolbars in the Interactive View:
- Select Menu > View > Options. Server displays the Options dialog box.
- Select the Customize tab.
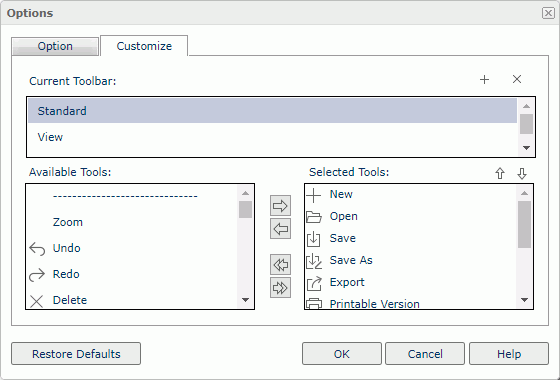
- By default, you can customize the items and their order on the three built-in toolbars - Standard, View, and Analysis. To modify a toolbar, select it in the Current Toolbar box, remove unnecessary items from the Selected Tools box, and add the items you want from the Available Tools box. Select the Move Up button
 or Move Down button
 to adjust the order of the items on the toolbar.
 - To add a toolbar, select the Add New Toolbar button
 . Server displays the New Toolbar Name dialog box. Type the toolbar name, select OK. Then add items to the new toolbar.
 - To delete a toolbar, select it and select the Remove Toolbar button
 .
. - To load the default settings of the skin and the Standard, View, and Analysis toolbars, select Restore Defaults.
- Select OK to apply the settings.
You can close the Standard, View, or Analysis toolbar by clearing the corresponding item on the Menu > View > Toolbar menu.
To customize the toolbar items in the Basic View:
- Select the Customize Toolbar Items button . Server displays a menu.

- For an item that does not display on the toolbar, for example, TOC Browser, you see the closed eye icon
 on its right. Select the icon if you want to add it on the toolbar.
 - To hide an item from the toolbar, select the item, then select the open eye icon
 .
. - To adjust the order of an item on the toolbar, drag it to another position in the menu.
- To exit the menu, select outside the menu box.
The toolbar in the Basic View and Customize Toolbar Items menu restores to the default status once you clear browsing data from your browser, discarding any of your changes.
Zooming in and out the Page Report Page
You can zoom in or out the report page by selecting a magnification from the Zoom list  on the View toolbar. You can also select Menu > View > Zoom to show the Zoom dialog box, and then specify the magnification.
Setting Up the Report Page
- Select Menu > File > Page Setup. Server displays the Page Properties dialog box.
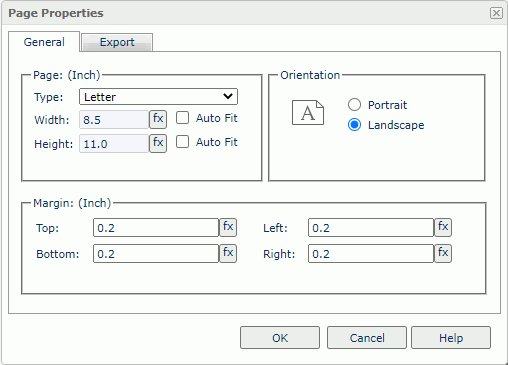
- In the General tab, specify the page size, orientation, and margin of the report page. You can select Auto Fit to calculate the page width/height according to the width/height of the content within the page dynamically, which is useful when the width/height of the content is unpredictable and when the report to export is not huge.
- In the Export tab, specify the page properties for the output of the report tab when you export the report tab.
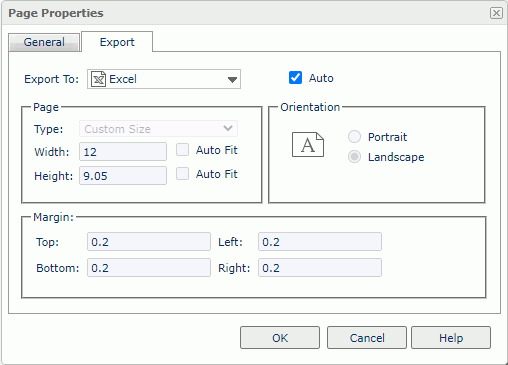
By default, Server applies the page properties that you define for the report tab in the General tab to the output of all export formats. You can customize the page properties for each export format respectively: select a format from the Export To drop-down list, clear Auto, and then edit the properties.
After you customize the page properties for an export format, Server also applies these properties when you advanced run and schedule to run the report tab in this format.
- Select OK to accept the changes and close the dialog box.
Adding and Removing Page Breaks
A new page will be generated in a report tab only when the space in a page has been fully occupied or there exists a break control in this page, for example, a page break that is inserted in the page.
To insert a page break, select Menu > Insert > Page Break, then select the mouse button on the destination where you want the page break to be inserted.
To remove a page break, right-click on the report body, then on the shortcut menu, select Remove Page Breaks and then the corresponding page break from the submenu.
- You can insert page breaks into the report body.
- You can insert page breaks into banded objects only when you meet the following conditions:
- The parent of the banded object is the report body.
- There is not any existing page panel in the report body.
- Its Position property of the banded object is static.
Undoing and Redoing Actions
You can undo or redo some actions by selecting Menu > Edit > Undo or Redo (or the Undo button  or Redo button
  on the toolbar).
Keeping the Page Report as a Background Task
When you have selected the option Enable Background Task for Reports in the server profile, you can make the page reports that you have opened in Page Report Studio as background tasks so as to access them the next time directly without running them again.
To keep an opened page report as a background task, select the Keep as Background Task button  on the toolbar, the report will then be added in the Background Tasks table of the My Reports page on the Server Console. You can open it there when needed.
Scheduling Page Report Tasks Using Quick Schedule
If you have enabled the option Quick Schedule from Web/Page Studio in the server profile, you can schedule tasks to publish page reports to email, FTP sites, or the Logi Report Server versioning system in Page Report Studio. However, the Quick Schedule feature inside Page Report Studio does not provide the full functionalities. If you want to use the full schedule system of Logi Report Server, go to the Server Console to submit the schedule tasks.
- Make sure you are in the Basic View of Page Report Studio.
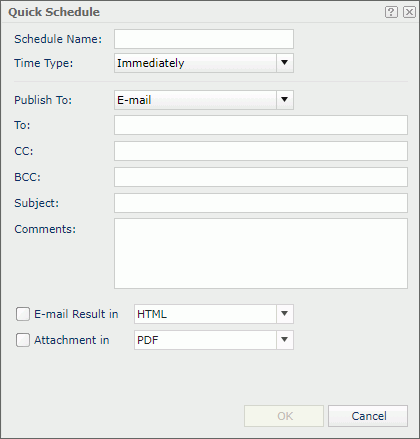
- Select the page report tab on which the schedule task is based, then select the Quick Schedule button
 on the toolbar. Server displays the Quick Schedule dialog box.
If the page report has not been saved, you will be prompted to save the report.
- Specify the name for the task in the Schedule Name text box.
- From the Time Type drop-down list specify the time for when the task is to be performed.
- To perform the task as soon as you submit it, select Immediately.
- If you want to run the task repeatedly, select Periodically, then specify to run it daily, weekly, or monthly at a specific time of a day.
- From the Publish To drop-down list, select where you want to publish the report result and
specify the settings of the publish type.
- To publish the report result to email, select E-mail. Then specify the email information such as addresses, subject and comments respectively; if you want to send the report result in the mail body, select E-mail Result in and select a format for the result: HTML or Text (when HTML is selected the comments you input for the email will be overwritten by the report result; if Text is selected the comments will be positioned in front of the report result); select Attachment in to send the report result as an attachment and specify the format of the attachment file.
- To publish the report result to the Logi Report Server versioning system, select Version System. Then choose a format in which to send the report result.
- To publish the report result to an FTP site, select FTP. Then specify the information for the FTP site and select a format in which to send the report result.
- Select OK to submit the task.
When the task is finished, you can go to the My Tasks page on the Server Console to view the scheduled report result.
Showing or Hiding Editing Marks
In Page Report Studio, you can use editing marks (dashed outlines of objects) for purposes such as aligning, moving, and resizing. By default, the editing marks are shown only when you create a new blank report in Page Report Studio. You can select Menu > View > Editing Marks to switch the status of the editing marks as required.
Showing or Hiding User Information
The User Information bar shows the current username, catalog path and name, and report path and name. You can select Menu > View > User Information Bar to show or hide the bar.
Asking for Help
At any time, you can select Menu > Help > User's Guide to open the Page Report Studio user documentation. Furthermore, you can select the Help button in any dialog box to show the help about the dialog box. You can also use the Help menu to open the documentation and access Logi Report website for more information.
Exiting the Page Report
If you want to close the current report and release the resources, just select Menu > File > Exit (or the Exit button  which is always at the upper right corner of the Page Report Studio window, or the close button of the browser window).
When you close the only report tab in a page report, Server asks whether you want to close the report. In case that you have modified the report without saving it, Server prompts you to save the report.