 Previous Topic
Making Simple Modifications to Page Report Objects
You can make simple modifications to report objects, such as move an object to a new position, resize an object, and delete an object from the report. This topic describes how you can edit objects in Page Report.
Except for the Show/Hide Object feature, you need a Logi Report Live license for Server to use all the other features that this topic introduces. If you do not have the license, contact your Logi Analytics account manager to obtain it.
This topic contains the following sections:
- Moving an Object
- Resizing an Object
- Hiding/Showing an Object
- Splitting and Merging Cells in a Tabular
- Modifying Object Properties
- Deleting an Object
Moving an Object
You can easily move a table, banded object, chart, crosstab, tabular, or image to a new position. What you need to do is select anywhere in the object, then drag the icon  appearing at its upper left corner to the destination. After Page Report Studio has finished processing, the object will be redrawn in the new location.
For other objects, select it and move it to the new position.
 For page reports created in Logi Report Designer, you can only move the objects in Page Report Studio whose Position property value is absolute, and the DBFields or labels which have been defined as view elements.
 Back to top
Resizing an Object
To resize an object, select anywhere in the object, when the icon appears at its upper left corner, select the icon to select the object, then you will see that it is surrounded by a rectangle with three resizing handles. Hover over a handle, when the mouse pointer turns to a double-headed arrow, you can drag the handle to resize the object.
To resize a panel in a banded object, select it and drag the resizing handle to the desired position.
To adjust the width/height of a column/row in a table, hover over the right/lower boundary of the column/row, when the mouse pointer becomes a horizontal/vertical double-headed arrow, drag the handle and the width/height of the column/row will change. This will also resize all cells in the column or row.
For a crosstab, you can resize its rows and columns the same as you do with a table.
For a tabular, Hover over the boundary between two cells. The mouse pointer becomes a double-headed arrow. You can then drag the boundary to adjust the size of the related cells.
To change the width and height of a field, select any value of this field to select it, then drag the right or lower resizing handle on its borders to a new position, and the width or height of the field will change. You can also do this for any label.
- When resizing table rows:
- If you resize the table header, Server only changes the height of the header. However, when you resize any row except the header, Server changes the height of all rows in the table at the same time.
- If there are some groups in a table and you changed the height of one group row, Server does not resize the other group rows .
- When resizing crosstab columns/rows:
- If you resize the horizontal/vertical header of a crosstab, other rows/columns are not affected.
- If you resize the total column/row of a crosstab, other columns/rows are not affected.
Hiding/Showing an Object
To hide a table, banded object, chart, crosstab, or tabular, select on the object, when the icon appears at its upper left corner, right-click on the icon and then select Hide from the shortcut menu. For other objects such as text boxes, drop-down lists, fields, and labels, right-click it and then select Hide to hide it.
To show a hidden object, right-click the object containing it, then on the shortcut menu, select the object name from the Show submenu.
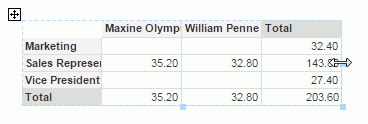
Splitting and Merging Cells in a Tabular
You can merge adjacent cells in a tabular which forms a rectangle into one cell.
To merge adjacent cells, select them one by one while holding the Ctrl key, then select Menu > Report > Merge, and these cells will be merged into one cell.
To split a cell:
- Select the cell and select Menu > Report > Split.
- In the Split dialog box, specify the number of rows and columns.
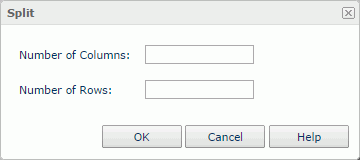
- Select OK and the cell will be split.
Modifying Object Properties
Page Report Studio enables you to modify object properties with the corresponding properties dialog box. However, for some objects, you must be an advanced user in order to edit their properties.
- To edit the properties of any object in a report, right-click on the object and select Properties. If it is a table, crosstab, chart, banded object, or tabular, select anywhere on it, when the icon appears at its upper left corner, right-click on the icon and select Properties on the shortcut menu. In the corresponding properties dialog box, specify the settings as required. For a table, you can also right-click any object in it and select Table, Table Cell or Table Row from the shortcut menu to edit properties of the table or its cell or row). For more information about the properties dialog boxes, see the specific topics in Page Report Studio Dialog Boxes.
- You can right-click a group header/footer panel in a banded object, and then select Group to show the Group Properties dialog box in order to define the group properties.
- To edit the properties of a report tab, right-click the blank part of the report tab and select Report from the shortcut menu, then in the Report Tab Properties dialog box, configure the properties as required.
Tip: If you just want to modify the text related properties for a field or label, for example, you want to change the text alignment or make the text bold, you can achieve it by simply selecting the field or label, then selecting the corresponding buttons on the toolbar.
Deleting an Object
An object can be removed from the report if it is no longer required. However, objects that are in a subreport cannot be deleted.
- To delete a table, banded object, chart, crosstab, tabular, or image, select on the object, when the icon appears at its upper left corner, right-click on the icon and select Delete from the shortcut menu, or you can drag the icon outside the report page. Then, a message box will prompt, asking for your confirmation. Select OK in the message box so as to remove the component.
- For a field, you can drag any value of the field outside the report page to remove it. You can also drag any label outside the report page to remove it. Right-clicking and then selecting Delete is another way to achieve this.