Exporting Report Result
This topic introduces how you can export page and web reports to different formats. It also describes the two useful configuration methods for customizing the page properties and layout precision of each export format.
You can export the result of a page or web report to the following file formats:
Customizing the Page Properties for Each Export Format
Before exporting a report, you can customize the page properties for the output of each export format.
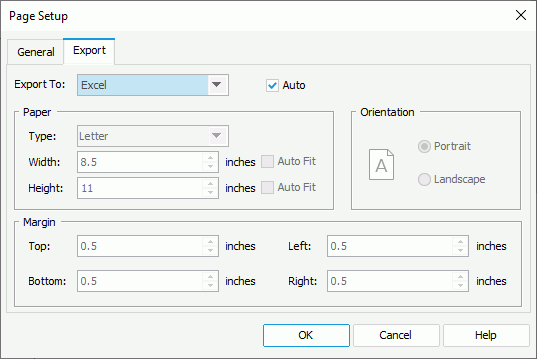
- Select File > Page Setup. Designer displays the Page Setup dialog box.
- Select the Export tab.

- By default, Designer applies the properties that you define for the report page in the General tab of the dialog box to the output of all export formats. You can customize the page properties for each export format respectively: select a format from the Export To drop-down list, clear Auto and then edit the properties.
- Select OK to accept the settings.
When you clear the Auto option for an export format and select OK in the Page Setup dialog box, Designer adds a corresponding export page setting object to the report structure tree in the Report Inspector. You can edit the page properties for the output of the export format there too. When you select the Auto option for this export format and select OK in the dialog box again, Designer removes its export page setting object automatically from the report structure tree.
![]() Server also applies the page properties you specify for any export format when users advanced run and schedule to run the report in this format at runtime.
Server also applies the page properties you specify for any export format when users advanced run and schedule to run the report in this format at runtime.
Customizing the Layout Precision
You can customize the layout precision to apply when exporting reports in Designer. However for page reports, the customized precision can take effect only in report tabs whose Precision Sensitive property is "true".
- Select File > Options.
- In the Options dialog box, select Export to in the Category box.
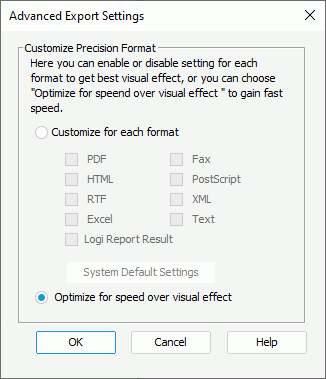
- Select the Layout Precision. Designer displays the Advanced Export Settings dialog box.

- Select Customize for each format.
By default, Designer selects Optimize for speed over visual effect, meaning, Designer decides the precision level which is oriented towards speed more than visualization.
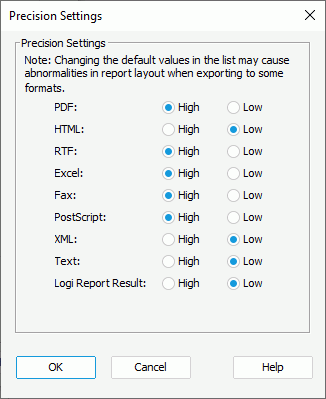
- Select System Default Settings, then in the Precision Settings dialog box, edit the precision level for each format and select OK.

Designer provides two precision levels: High and Low. High precision provides better layout but slower efficiency, while low precision brings higher performance but maybe poorer visual effect. If low precision can give reports well looks, it is reasonable to apply low precision because faster performance is guaranteed at the same time. By default, when you export a report to formats such as PDF, RTF, Excel, Fax, or PostScript, Designer exports the text with high precision, thus the report result layouts of these formats are different from the other formats such as HTML, Logi Report Result, XML, and Text.
- In the Advanced Export Settings dialog box, select the checkbox for the required formats to apply the defined precision level and select OK. For formats that you do not select, Designer decides their precision.
- Select OK in the Options dialog box to apply the settings.
![]() You can export the report result in either design or view mode; however, if you modify the report after opening it, you should use view mode to export the report result. To do this, select the View tab, and then select Refresh Data
You can export the report result in either design or view mode; however, if you modify the report after opening it, you should use view mode to export the report result. To do this, select the View tab, and then select Refresh Data  on the toolbar. Designer then refetches data in the report from the database. After that, you can export the report result to the required format.
 Previous Topic
 Back to top