Page Setup Dialog Box
You can use the Page Setup dialog box to specify the general and export page properties for the current report tab in a page report, or for the current web report or library component. This topic describes the options in the dialog box.
Designer displays the Page Setup dialog box when you select File > Page Setup, or Page Setup in the Style screen of the component wizard.
The dialog box contains the following tabs:
You see these buttons in the tabs:
OK
Select to apply your settings and close the dialog box.
Cancel
Select to close the dialog box without saving any changes.
Help
Select to view information about the dialog box.
General Tab
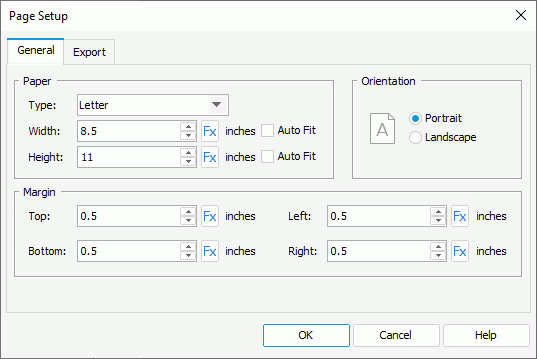
Use this tab to specify the general properties of the page. You can use constant level formulas to control some page properties for a page report tab, if you have bound a data resource to its report body.

You can specify the page size in this box.
- Type
Select the paper type. Select the size you want from the drop-down list, or select Custom Size to define the paper width and height by yourself. - Width
Specify the width of the page, in inches.- Auto Fit
Select to dynamically calculate the page width according to the width of the contents within the page.
- Auto Fit
- Height
Specify the height of the page, in inches.- Auto Fit
Select to dynamically calculate the page height according to the height of the contents within the page.
- Auto Fit
![]() After you select a paper type and then edit either Width or Height, Designer changes the paper type to Custom Size in the Type drop-down list automatically.
After you select a paper type and then edit either Width or Height, Designer changes the paper type to Custom Size in the Type drop-down list automatically.
Orientation
You can specify the page orientation in this box. Designer disables the Orientation option if you select a formula to control either Width or Height.
- Portrait
Select to display the page vertically. - Landscape
Select to display the page horizontally.
Margin
You can specify the distance of the report data to the top, bottom, left, and right edge of the page in this box.
- Top
Specify the top margin of the page. - Bottom
Specify the bottom margin of the page. - Left
Specify the left margin of the page. - Right
Specify the right margin of the page.
Export Tab
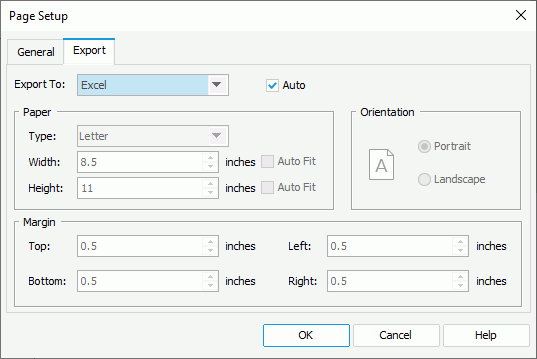
Use this tab to specify the page properties for the output of the report tab/web report/library component.

Export To
Select the export format to customize the page properties of its output.
Auto
If you select the option, Designer applies the page properties that you define in the General tab of this dialog box to the output of the selected export format. Clear the option to customize the page properties for the selected format.
When you clear the Auto option for an export format and select OK in the dialog box, Designer adds a corresponding Export Page Setting object to the report structure tree in the Report Inspector. You can edit the export page properties there too. When you select the Auto option for this export format and select OK in the dialog box again, Designer automatically removes its Export Page Setting object from the report structure tree.
Paper
You can specify the paper size for the output of the selected format in this box.
- Type
Select the paper type. Select the size you want from the drop-down list, or select Custom Size to define the paper width and height. - Width
Specify the width of the page, in inches.- Auto Fit
Select to dynamically calculate the page width according to the width of the contents within the page. The default behavior for exporting a report is to enable content pagination (the option is unselected), which greatly improves the performance of the exporting process, especially for a huge report.
- Auto Fit
- Height
Specify the height of the page, in inches.- Auto Fit
Select to dynamically calculate the page height according to the height of the contents within the page. The default behavior for exporting a report is to enable content pagination (the option is unselected), which greatly improves the performance of the exporting process, especially for a huge report.
- Auto Fit
![]() After you select a paper type and then edit either Width or Height, Designer changes the paper type to Custom Size in the Type drop-down list automatically.
After you select a paper type and then edit either Width or Height, Designer changes the paper type to Custom Size in the Type drop-down list automatically.
Orientation
Select the page orientation for the output of the specified format: Portrait (vertically) or Landscape (horizontally).
Margin
You can specify the distance of the report data to the top, bottom, left, and right edge of the page for the output of the selected format in this box.
 Previous Topic
 Back to top