 Previous Topic
Exporting to Excel
This topic describes how you can export the result of a page or web report to an Excel file.
- Open the report that you want to export.
- Select File > Export > To Excel. Designer displays the Export to Excel dialog box.
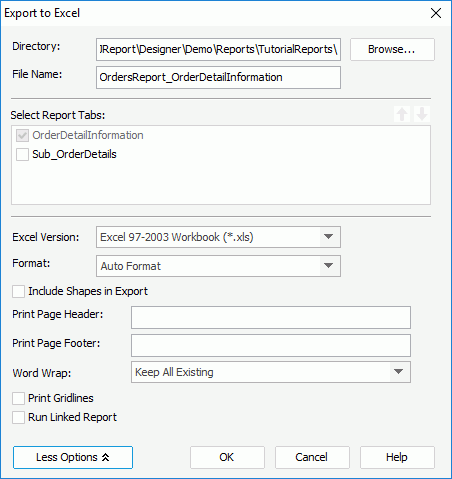
- Select Browse to specify the destination directory where to save the Excel and its file name. You can also type the location and file name manually in the Directory and File Name text boxes (make sure that the folder you specify does exist; otherwise, Designer displays an error message). If you do not type a name, Designer uses the report name as the Excel file name by default.
- If you are exporting a page report, in the Select Report Tabs box, select the report tabs in the page report you want to export. Designer exports the selected report tabs into multiple sheets of the Excel file in the list order. You can select a report tab and select Move Up
 or Move Down
  to change the order of the report tabs.
 - From the Excel Version drop-down list, select the version for the Excel file.
- Select the format of the Excel file from the Format drop-down list.
- To let Designer choose which format is the most appropriate, select Auto Format (the default behavior), then Designer determines whether to use Report Format or Column Format according to the objects in the report. If the report contains crosstabs or tables, Designer uses Column Format; otherwise, it uses Report Format. If you do not know which format is better, select this option.
- To make the format of the Excel output match the format as designed in the template, select Report Format, and then specify the available settings according to your requirements. Usually, you should use this format if you just want to view the report in Excel.
- To export the report result to a general Excel file, select Column Format. Using this format, you can set the Columned property for the report tab or web report in the Report Inspector to specify the calculation method for the coordinates of the report objects in the Excel output (due to the particularity of mailing label report, do not set the Columned property to "true" if you want to export it to this format).
- To export only the report data without format, select Data Format. This option is only available for Excel 97-2003 Workbook (*.xls). When you select Data Format, Designer cannot support formulas, barcodes, images, hyperlink property, charts, and all drawing objects such as lines, ovals, and boxes in the report.
- Select More Options to customize other properties for the Excel file.
- If you have selected the format other than Data Format, select Include Shapes in Export to include the drawing objects in the Excel output, and specify the page header and footer text to display and whether to include gridlines when printing the exported Excel file.
- From the Word Wrap drop-down list, specify the word wrap setting for the report components in the Excel output.
- All Keep Existing
Select to keep all settings of each component's Word Wrap property as what you have specified in the report. - All Disabled
Select to disable the Word Wrap property for all components, meaning, Designer applies "false" to the Word Wrap property of all components. - All Enabled
Select to enable the Word Wrap property for all components, meaning, Designer applies "true" to the Word Wrap property of all components.
- All Keep Existing
- Select Run Linked Report if you want to generate the reports that you link with the report (not including the detail reports) in the Excel output. If you are only interested in the primary report, leave this option unselected. Generating linked reports at the same time, especially when the linked reports contain a large amount of data, causes performance issue.
- Select OK to start exporting.
You should pay attention to the following when using the Export to Excel feature:
- Designer can export multiple colors and languages in a report to an Excel file, but cannot export multiple pie charts and the Arc drawing object. For example, Excel only supports 56 kinds of colors; therefore, if there are more than 56 kinds of colors in a report, some colors are merged in the Excel output.
- Designer exports paragraphs and texts in a report as objects.
- If the report contains the Drop-down List object, Designer only exports the value selected in the list.
- If you set an object's Export to Excel property to "false", Designer does not export the object and other objects contained in it.
- Designer exports gauge and surface charts in a report as bar chart, and stock chart as image.
- Designer does not export the minor tick marks on a chart.
- If the data type of the field on the category axis of a chart is Date, Time, or DateTime whose format confirms to the Date format of Excel, Designer exports the axis as a date axis, vice versa.
- If the field on the category axis of a chart is of the Number type and you use a constant interval to customize the tick marks on the axis, the settings cannot take effect.
Designer also provides several properties that you can use to enhance the report appearance in the Excel output, manage data in the Excel worksheet, improve the exporting performance, and so on. These properties include: Merge to Next Panel, Repeat in Detail Panel, Remove Blank Row, On New Sheet, Rows per Sheet, Column Index, Row Index, Bottom Attach Column, Bottom Attach Row, Top Attach Column, Top Attach Row, Column Number, Row Number, Column Width List, and Excel Buffer Size. You can set them according to your requirements appropriately.
 Back to top