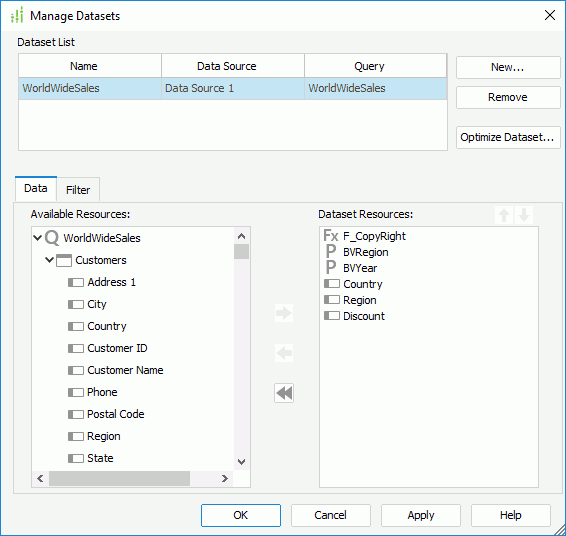
Manage Datasets Dialog Box
You can use the Manage Datasets dialog box to manage the datasets that you have created for the current library component or query-based page report. This topic describes the options in the dialog box.
Designer displays the Manage Datasets dialog box when you select Report > Manage Datasets.

You see the following options in the dialog box:
Dataset List
This box lists all the datasets that you have created for the report.
- Name
This column shows the names of the datasets. You can select in the text box to edit the name. - Data Source
This column shows the catalog data sources in which you have created the datasets. - Query/Business View
This column shows the data resources based on which you have created the datasets.
New
Designer enables this button only when you are managing the datasets in a query-based page report. You can select it to open the New Dataset dialog box to add a new dataset to the report.
Remove
Select to remove the specified dataset from the report. You cannot remove a dataset that is being used by any data component.
Optimize Dataset
Designer enables this button only when you are managing the datasets in a query-based page report. You can select it to optimizes the selected dataset.
Data tab
You can specify the fields to include in the selected dataset in this tab.
- Available Resources
This box lists all the data fields that you can add to the dataset.For a dataset based on a query resource, you can add from all the DBFields in the query resource, and the parameters and valid formulas of these DBFields in the same catalog data source as the query resource; for a dataset based on a business view, you can add from all the view elements of the business view, and the dynamic resources that you have created for the business view in the report.
- Dataset Resources
This box lists the data fields that you add to the dataset. -
 Add button
Select to add the specified fields to the dataset. -
 Remove button
Select to remove the specified fields from the dataset. You can only remove the fields which are not used by any data component that uses the dataset, either directly or indirectly. -
 Remove All button
Select to remove all the data fields from the dataset. When you select this button, Designer only removes the unused data fields actually. When you open the dialog box the next time, you can find that the data fields which are used by data components created on the dataset still display in the Dataset Resources box. -
 Move Up button
Select to move the specified data field higher in the display order. -
 Move Down button
Select to move the specified data field lower in the display order.
Filter tab
You can set filter conditions for the selected dataset in this tab.
Designer displays different options in the Filter tab according to the type of the data resource, on which you have created the selected dataset.
If the dataset is based on a query resource, you see the same options in the tab as those in the Dataset Filter dialog box.
If the dataset is based on a business view, you see the following options in the tab:
- Filter
This drop-down list contains all the predefined filters of the business view on which the dataset is created. Select one from the drop-down list to apply, or select User Defined and define a new filter according to your requirements. - The rest options in the tab are the same as those in the Condition panel of the Predefined Filter dialog box.
OK
Select to apply your settings and close the dialog box.
Cancel
Select to close the dialog box without saving any changes.
Apply
Select to apply all changes and leave the dialog box open.
Help
Select to view information about the dialog box.
 Previous Topic
 Back to top