 Previous Topic
Creating and Managing Datasets
A dataset is the set of data built from the result of a data resource: query, stored procedure, imported SQL, imported APE, user-defined data source, hierarchical data source, or business view, and can optionally have filters applied to it. A dataset built on data resource other than a business view can contain all the DBFields in the data resource, and the parameters and valid formulas of these DBFields in the same catalog data source as the data resource; a dataset created from a business view can contain only view elements and dynamic resources. When you create a data component in a report, you can select the data resource to create a new dataset from it or use an existing dataset in the report. This topic describes how you can create and manage the datasets in a report.
This topic contains the following sections:
- Creating Datasets in a Report
- Managing the Datasets in a Report
- Setting Properties of the Datasets in a Report
- Customizing Field Display Names for Datasets in a Report
Creating Datasets in a Report
You have the following methods to create datasets in a report:
- Creating a dataset from the component wizard
When you create a data component by selecting a data resource in the component wizard, Designer creates a dataset at the same time, either empty or containing some data fields, depending on whether you add data fields to the data component.
- Creating a dataset via the Data panel
(you can use this method for query-based page reports only)
- In the Data panel, choose <Choose Data from...> from the dataset drop-down list.
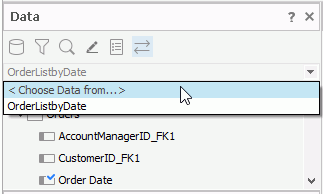
Designer displays the New Dataset dialog box.
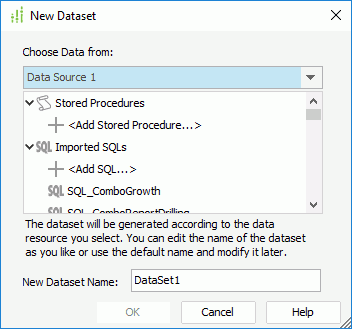
- Select the data resource in the current catalog on which to create the dataset. If the predefined data resources are not what you want, you can select the first item in the corresponding resource node to create one in the current catalog to use.
- In the New Dataset Name text box, type the name of the dataset.
- Select OK. Designer creates an empty dataset.
- In the Data panel, choose <Choose Data from...> from the dataset drop-down list.
- Creating a dataset from the Manage Datasets dialog box

- You should make different data components in the same report share the datasets in the report whenever possible, which has a dramatic effect on the performance of your reports in the runtime environment. This is because Logi Report Engine creates each dataset by running a query against the database, and that is the most expensive part of running a report in terms of execution time. Even when two datasets are based on the same query, Logi Report Engine still runs the query separately for each dataset.
- If you create a dataset on a hierarchical data source, when you use the dataset to create data components, you need to pay attention to the unique features of HDS.
 Back to top
Managing the Datasets in a Report
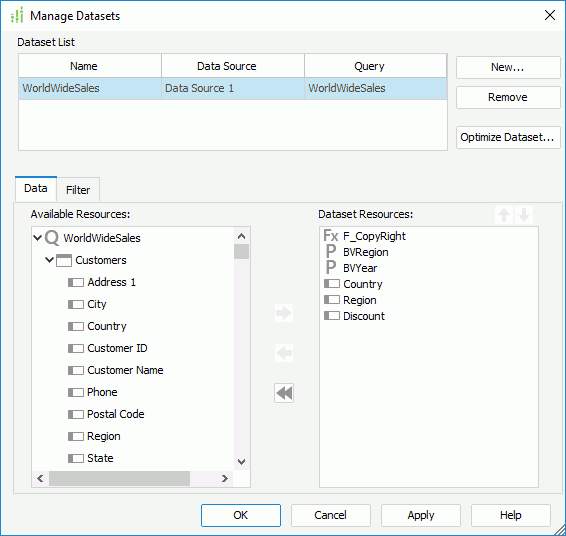
You can manage the datasets in a report with the Manage Datasets dialog box, for example, you can add more data fields to the datasets, filter the datasets, rename the datasets, and so on; however, Designer supports this feature only for query-based page reports and library components.
To manage the datasets in a report, open the report, then select Report > Manage Datasets to display the Manage Datasets dialog box.
- Creating a dataset
- Select New (Designer enables this button for query-based page reports only).
- In the New Dataset dialog box, select the data resource in the current catalog on which to create the dataset. If the predefined data resources are not what you want, you can select the first item in the corresponding resource node to create one in the current catalog to use.
- In the New Dataset Name text box, type the name of the dataset.
- Select OK. Designer creates an empty dataset.
- Add data fields to the dataset as shown below.
- Adding/Removing data fields in a dataset
For any dataset, Designer automatically adds fields to it when you add fields to the data components that use the dataset, and removes the fields from the dataset once you remove them from the data components, therefore, there generally is no need to ever add or remove fields from a dataset specifically. However, in the Manage Datasets dialog box, you can still manually add or remove data fields from a dataset. To do this, in the Dataset List box, select the dataset you want to edit, then in the Data tab:- To add more data fields to the dataset, select the fields in the Available Resource box and select Add
 to add them to the dataset. You can also select a field and drag it to the Dataset box.
 - To remove an unnecessary data field from the dataset, select it in the Dataset box and select Remove
 . You can only remove the fields which are not used by any data component created on the dataset, either directly or indirectly. To remove all the data fields in a dataset, select Remove All
  , however, when you select the button, Designer only removes the unused data fields actually. When you open the dialog box the next time, you can find that the data fields used by data components that apply the dataset still display in the Dataset box.
- To add more data fields to the dataset, select the fields in the Available Resource box and select Add
- Filtering data fields in a dataset
- In the Dataset List box, select the dataset you want to filter.
- Select the Filter tab.
- If the dataset is created on a business view, Designer displays the Filter drop-down list, which contains all the predefined filters of the business view. You can select one from the drop-down list to apply to the dataset, or select User Defined in the list to define a new filter.
- Add the filter conditions. Based on the data resource type from which the dataset is created, a business view or a query resource, the way to create a filter for the dataset varies.
If the dataset is created on a business view, you can add filter condition for it in the same way as you add conditions for a predefined filter in the business view.
To add filter conditions for a dataset created from a query resource:
- Select Add Condition to add a condition line.
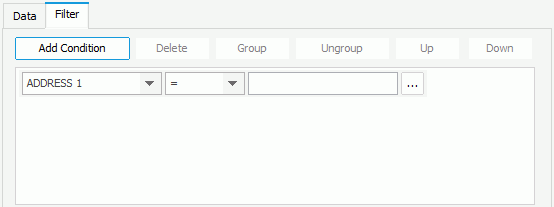
- From the field drop-down list, select the field to be filtered. The field can be any DBField in the query resource, or a parameter or valid formula of these DBFields in the same catalog data source as the query resource.
- From the operator drop-down list, select the operator with which to compose the filter expression.
- Select the ellipsis
 to specify the value of how to filter the field in the Expressions dialog box or type the value in the value text box manually. You can also use the special field "User Name" or a parameter to filter the dataset dynamically. For the usage of parameters in filter conditions, see the example in Dynamically filtering queries.
When you type the value, if multiple values are required, you should separate them with ","; if a value contains the character "," or "\", type the character as "\," or "\\".
You can specify an empty string as the value for a field of String type, by simply leaving the text box blank (value length=0). If you would like to filter space string (one or more spaces) and empty string, create a formula with the statement
Trim(@Field)which transforms the spaces into empty string, then use the formula to replace the field itself on which the condition is based. - Repeat the above steps to add more condition lines and define the logic relationship between the condition lines: "And" or "Or".
To group some condition lines, select them and select Group, Designer then adds the selected condition lines in one group and applies them as one line of filter expression (you can also group conditions and groups together); to take out any condition or group from a group, select it and select Ungroup; to adjust the priority of the condition lines, select it and select Up or Down; to delete a condition line, select it and select Delete.
- Select Add Condition to add a condition line.
- A dataset is created based on another data resource and the data resource itself can also be applied with a filter. You may want to know the differences between the filters. Select here for more information.
- You can also add/remove the data fields in a dataset or filter a dataset while creating a data component using a query resource with the component wizard. To do this, select More Options and select Existing Dataset in the Data screen of the wizard, then select an existing dataset and select Edit. In the Dataset Editor dialog box, edit the dataset as required.
- You can also filter a dataset created from a query resource by selecting the Dataset Filter button
 on the toolbar of the Data panel.
 - You cannot filter the following SQL type of data: Db.SQL_BINARY, Db.SQL_BLOB, Db.SQL_CLOB, Db.SQL_LONGVARCHAR, Db.SQL_LONGVARBINARY, Db.SQL_VARBINARY, and Db.SQL_OTHER.
- Optimizing a dataset
You can enlarge or decrease the scope of retrieved data for a dataset, and therefore make a balanceable decision between better performance and special usage cases/demands. However, you cannot apply this feature to datasets created from business views; for these datasets, you can use the Prefetch property on the business views for similar purpose.- In the Dataset List box, select the dataset that you want to optimize.
- Select Optimize Dataset. Designer displays the Optimize Dataset dialog box.
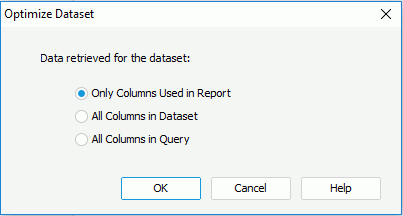
- Choose a retrieved data scope for the dataset.
- Only Columns Used in Report
Select it if you only want to retrieve data columns used in the current report at runtime. This way ensures the best performance since the least data is retrieved. This is always the default for page reports. - All Columns in Dataset
Select it if you want to retrieve all data columns defined in the dataset at runtime. Unless you manually added columns to the dataset, this is the same as Only Columns Used in Report. - All Columns in Query
Select it if you want to retrieve all data columns in the query on which the dataset is based at runtime. This usually leads to lower performance and is not of any benefit unless you expect the users to often need to add more columns to the report.
- Only Columns Used in Report
- Select OK to optimize the dataset.
- Renaming a dataset
- In the Dataset List box, select the dataset that you want to modify.
- Double-click in the Name text box of the dataset.
- Type a new name in the text box and select Enter on the keyboard to apply the change.
- Removing a dataset
- In the Dataset List box, select the dataset that you want to remove.
- Select Remove.
- Select Yes in the prompted message box to confirm the removal.
You cannot remove any dataset that is used by a data component; if you want to do this, you need to first remove the data component which references this dataset.
Setting Properties of the Datasets in a Report
Each dataset in a query-based page report and library component has its own node in the Report Inspector. You can edit the properties there to make the dataset better serve the data components created on it.
To edit properties of a dataset in a report:
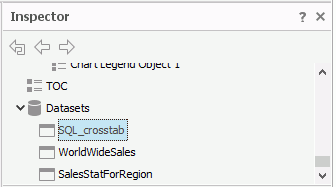
- In the Report Inspector, select the name of the dataset under the Datasets node for a page report or Data Source node for a library component.
- In the Properties sheet, edit the properties of the dataset as required.
For example, you can apply a cached query result file to the dataset, specify the data buffer size for the dataset to improve performance, and apply Record Level Security for the data components using the dataset.
Customizing Field Display Names for Datasets in a Report
For datasets created on query resources in a page report, Designer enables you to customize the display names of the data fields in the datasets, so that when users run the page report in Page Report Studio and perform operations such as Sort and Filter on data components in the page report, they will be able to work with intuitive field names. You can also specify the actions in which the customized display names will participate for each data component in the page report.
- Open the query-based page report.
- Select Report > Edit Display Name. Designer displays the Edit Display Name dialog box.
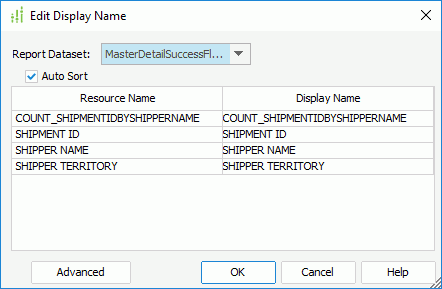
- From the Report Dataset drop-down list, which contains all datasets used in the page report, select a dataset and Designer displays all the data fields in the dataset in the mapping name box.
- To make the resource names sort automatically, select Auto Sort.
- Specify the display names for the data fields in the Display Name column. You can also select a formula as the display name of the data field.
- Select another dataset and repeat the above steps to edit the display names of data fields in it.
- You can select Advanced to further customize the display names for data components in the page report using the Edit Display Name for Component dialog box.
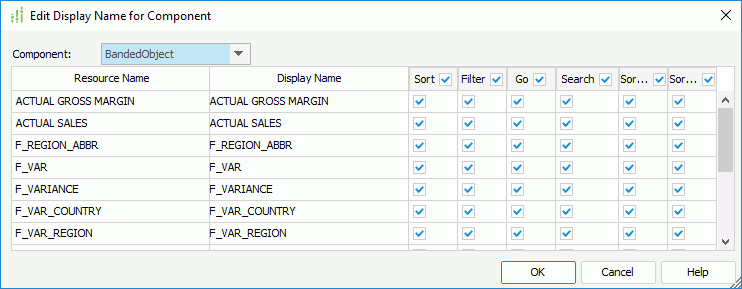
- From the Component drop-down list, select the data component in the page report that you want to customize.
You can also right-click a data component that uses a query resource in a page report and then select Edit Display Name from the shortcut menu to display the Edit Display Name for Component dialog box (if you open the dialog box in this way, Designer only lists the component that you right-click on in the Component drop-down list).
- In the action columns, select the corresponding checkboxes to indicate whether the actions are enabled for the data fields. Select the checkbox on the action column header if you want the corresponding action to be enabled for all data fields. If any action is not supported on the selected data component, Designer disables the corresponding column.
When you select an action for a data field, the field's display name instead of mapping name will be shown in the corresponding dialog box or submenu in Page Report Studio. If you clear the box for any field in any action column, the field will not be available for the action. Moreover, if you set the display name of any field to be blank in the Edit Display Name dialog box, all actions will be disabled for the field, which means users will not be able to perform all these actions on the field in Page Report Studio.
- Select OK to accept the changes.
If you set the display name of any data field to be blank, the field will not be shown in the lists where display names are used in Page Report Studio.