Parameter Application Cases
In Logi Report, you can apply parameters in many situations. The usage of parameters can greatly facilitate your reporting work. This topic shows some typical parameter application cases.
This topic contains the following sections:
- Filtering a Parameter with Another Parameter
- Controlling Multiple Parameters in a Report
- Applying RLS to Parameters
- Supplementing WHERE Portions
Dynamically Filtering Queries
You can use a parameter in a WHERE clause, so that the query result can vary each time according to the entered parameter value. This is the most common usage of parameters.
The feature works the same for Logi Report queries created using the Query Editor, business views, datasets, imported SQLs, and imported APEs (it is $match stage instead of WHERE clause for APE). When using imported SQL, simply put @Parameter or :Parameter Name directly into the SQL statement; for imported APE, put @Parameter or ?Parameter Name in the JSON file to be imported. Designer provides the default values when you import the file so the database recognizes the syntax.
The following example shows using a parameter to filter a Logi Report query dynamically.
- Make sure SampleReports.cat is the currently open catalog file. If not, select File > Open Catalog to open it from
<install_root>\Demo\Reports\SampleReports. - In the Catalog Manager, expand the desired data source and create a type-in parameter named IDSet of the Integer type with the default values 1, 10, and 20, and enable the Allow Multiple Values option.
- In the same data source, create a query CustomersInfo on the table Customers. Select all the fields contained in the table.
- In the Query Editor dialog box, select Menu > Query > Filter.
- Filter the records of the query by adding a condition as follows in the Search Condition dialog box (for more information, see Filtering with the Filter Format):

- Create a page report with a table in it based on the query, which displays the fields Customer ID, Customer Name, City, and Phone and applies the Commercial style.
- Select the View tab to preview the report.
- In the Enter Parameter Values dialog box, select
 next to the value text box of IDSet.
 - In the Enter Values dialog box, clear All Values, add the listed values 1, 10, and 20 to the Selected Values box, and then select OK.
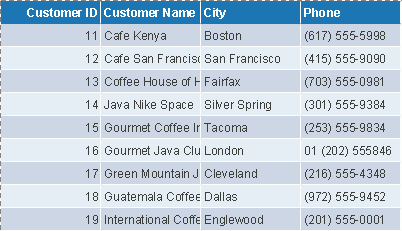
- Select OK in the Enter Parameter Values dialog box. Designer retrieves the records with Customer IDs equal to 1, 10, and 20 for the table.

- Preview the report again. This time, in the Enter Values dialog box, remove 1, 10, and 20 from the Selected Values box first, then type the values 3, 7, 9, 11, 15, and 25 in the Enter Values text box and add them into the Selected Values box one by one.
- After you submit the parameter values, the table now displays the records for the specified Customer IDs.
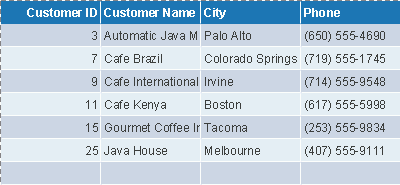
If you want to view the table with full data, select All Values in the Enter Values dialog box.
![]()
- You need to specify the parameter's data type according to the field type and the manner in which you use the parameter. For example, if the field is a number, define a parameter to be the Number type too.
- When specifying the value for a parameter used in a filter condition, if the parameter is of String type:
- When you use the parameter for a Logi Report query, imported SQL, business view, or dataset:
- If you reference it in the format :ParameterName, the parameter value you type should be with single quotation marks, for example, 'USA'.
- If you reference it in the format @ParameterName, the parameter value should be without single quotation marks, for example, USA. Once you type in a parameter value with single quotation marks, Logi Report regards the quotation marks as a part of the parameter value.
- When you use the parameter for an imported APE, the parameter value should be with double quotation marks, for example, "USA".
If the parameter is not of String type, you can type the parameter value directly, for example, 1234.
- When you use the parameter for a Logi Report query, imported SQL, business view, or dataset:
Dynamically Grouping/Sorting Report Data
An important usage of parameters is to use them to dynamically group and sort data in a report, which enables users to specify the grouping and sorting conditions at runtime.
The Dynamic Group and Dynamic Sort features only apply to tables and banded objects that use query resources in page reports.
Grouping Data Dynamically
You can make a multilevel group report by selecting a field as grouping criterion for the report. However, because the grouping criteria are definite, if you want to group several times according to different grouping criteria but based on the same query, it is cumbersome. For example, you want to make three employee list reports with different grouping criteria: the first one is grouped by their first name, the second one is by the hire date, and the third one is by their salary, then you have to repeat the steps of setting query, selecting fields as grouping criteria, and so on, which is not efficient. In cases like this, you can use the Dynamic Group feature of Designer, which means grouping criteria is a dynamic process. You do not need to repeat the same steps to make multiple reports with different grouping criteria. You can just predefine a parameter using String value type and add it to the group list. Then at runtime, when Logi Report prompts users to select a field to group by, users can get all the acceptable group-by fields from the parameter's value drop-down list. They can select any of them as the grouping criterion.
The following example shows how you can create a table in a page report to achieve the goal:
- Make sure SampleReports.cat is the currently open catalog file. If not, select File > Open Catalog to open it from
<install_root>\Demo\Reports\SampleReports. - Select File > New > Page Report.
- In the Select Component for Page Report dialog box, select the Table (Group Left Above) component type and select OK.
- In the Data screen of the Table Wizard, select the query EmployeeInformation in Data Source 1. Select Next.
- In the Display screen, add the following fields in the selected query to the table: Hire Date, Name, Home Phone, and Salary. Select Next.
- In the Resources box of the Group screen, select <New Parameter...> in the Parameters node to create a type-in parameter named pGroupBy of String type (leave the other settings to their default).
- Specify to group the report on the just created parameter pGroupBy and use Ascend as the sorting order.
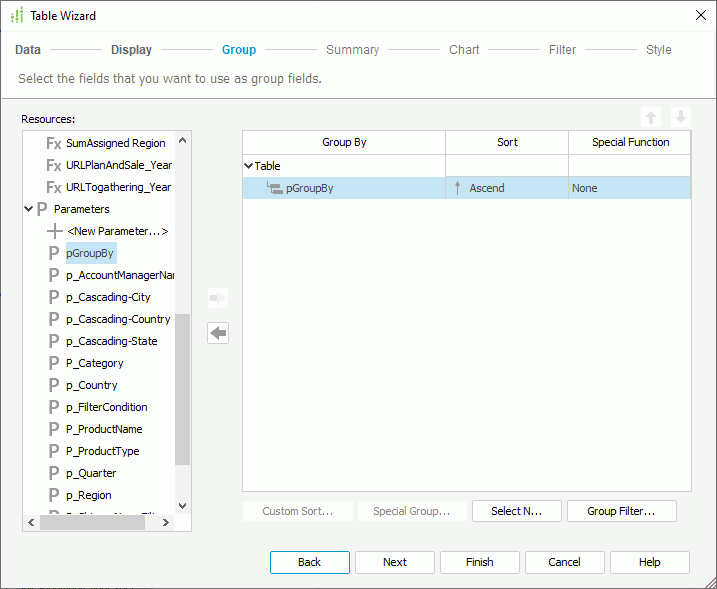
- Select Finish in the Table Wizard to create the table.
- Select the View tab to preview the report. Designer displays the Enter Parameter Values dialog box for you to specify the grouping criterion.
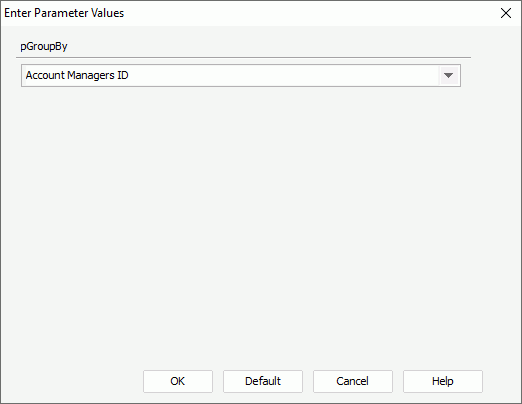
The value drop-down list contains all the DBFields in the query the table uses and the valid formulas for these DBFields. Select a field by which you want to group data in the table.
- Select Employee Position as the parameter value. Designer then groups data in the table by positions of the employees.
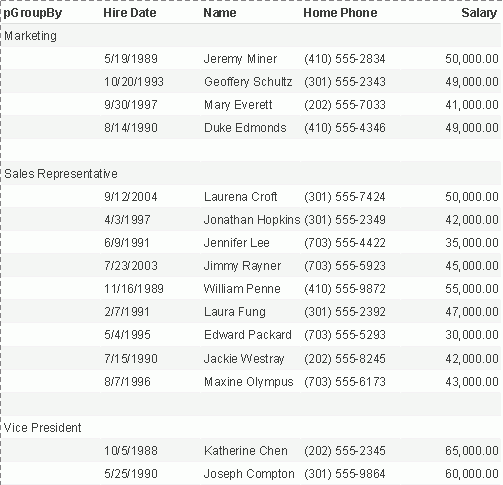
- To group the data by hire date or salary, select Hire Date or Salary from the value drop-down list of pGroupBy.
Sorting Data Dynamically
The following example shows how you can use the Dynamic Sort feature.
- Make sure SampleReports.cat is the currently open catalog file. If not, select File > Open Catalog to open it from
<install_root>\Demo\Reports\SampleReports. - Select File > New > Page Report.
- In the Select Component for Page Report dialog box, select the Table (Group Above) component type and select OK.
- In the Data screen of the Table Wizard, select the query EmployeeInformation in Data Source 1. Select Next.
- In the Display screen, add the following fields in the selected query to the table: Hire Date, Name, Home Phone, and Salary.
- Select Sort Fields By.
- In the Sort Fields By dialog box, select <New Parameter...> in the Parameters node in the Resources box to create a type-in parameter named pSortBy of String type (leave the other settings to their default).
- Add the just created parameter pSortBy as the sort-by field.
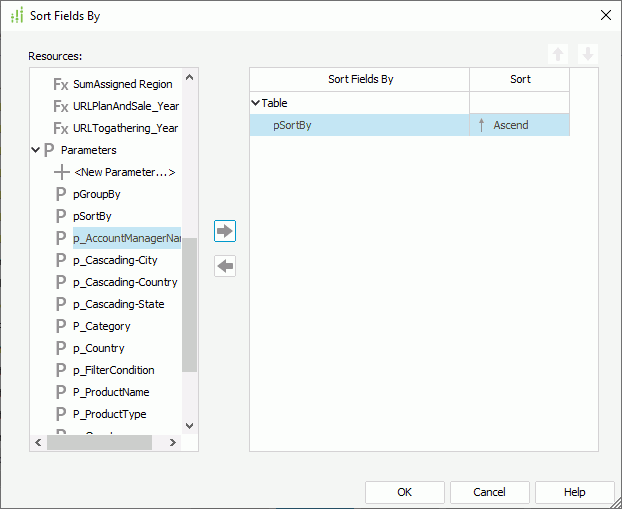
- Select Dynamic Sort from the sort order drop-down list in the Sort column.
- In the Specify Sort Order for dialog box, type SortBy Order, then select OK to close the dialog box.
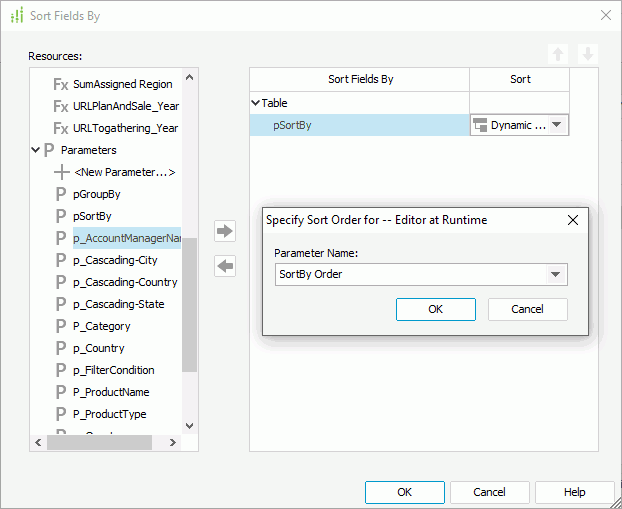
- Select OK in the Sort Fields By dialog box to accept the changes.
- Select Finish in the Create Table wizard to create the table.
- Select the View tab to preview the table. Designer displays the Enter Parameter Values dialog box for you to specify the sort manner.
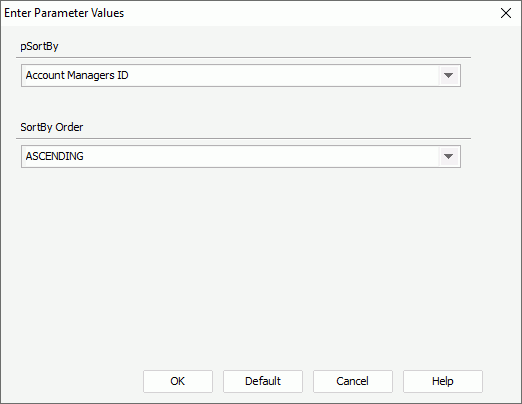
- The value drop-down list of the pSortBy parameter contains all the DBFields in the query the table uses and the valid formulas for these DBFields . You can select a field by which to sort the data and then specify the sort order in the SortBy Order drop-down list.
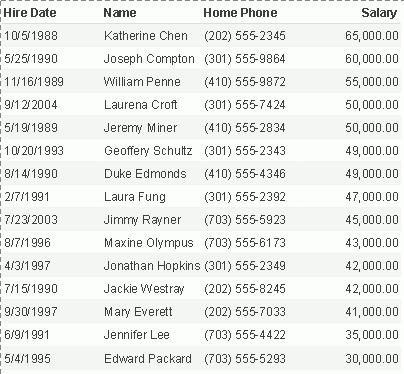
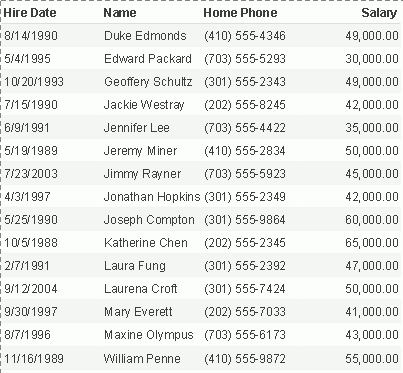
Here, we choose Salary from the pSortBy list and DESCENDING from the SortBy Order list. Designer displays the records within each group in descending order according to their salary values.
-
Preview the table again and this time select Name from the pSortBy list and ASCENDING from the SortBy Order list. The table displays like this:
Filtering a Parameter with Another Parameter
You can use the value of one parameter to filter another one. In this way, you can create your own cascading parameters such as using pCountry to filter the values returned by a parameter listing available states.
The following examples show you the two methods that you can use to achieve this purpose.
Method 1 (Use this method when the SQL needed to select the parameter values is very simple.)
- Make sure SampleReports.cat is the currently open catalog file. If not, select File > Open Catalog to open it from
<install_root>\Demo\Reports\SampleReports. - In the Catalog Manager, expand the desired data source node.
- Right-click the Parameters node and then select New Parameter.
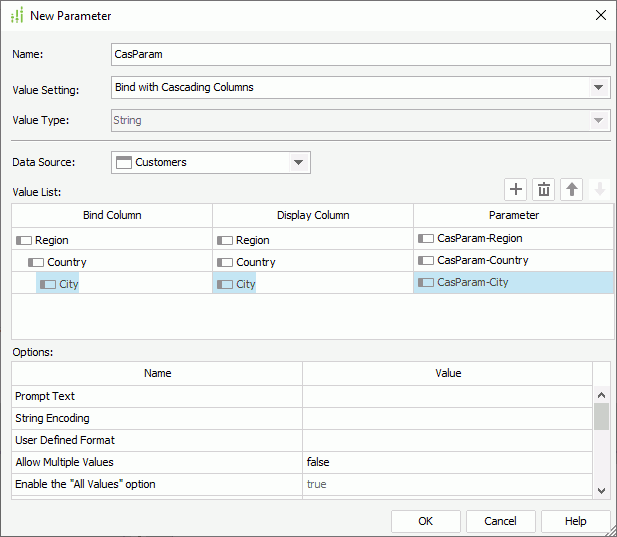
- In the New Parameter dialog box, type CasParam in the Name text box, select Bind with Cascading Columns from the Value Setting drop-down list, and then select Customers of the Tables type from the Data Source drop-down list.
- Select Add
 to add a parameter line, select Region as the Bind Column and Display Column, and then select in the Parameter cell to create the parameter in the cascading group.
 - Add another parameter line, select Country as the Bind Column and Display Column, and then select in the Parameter cell.
- Add one more parameter line, select City as the Bind Column and Display Column, select in the Parameter cell, and then select OK in the dialog box.
- In the same data source, create a query CustomersInfo on the table Customers and select all the fields in the table.
- Filter the records of the query by adding a condition as follows in the Search Condition dialog box (for more information, see Filtering with the Filter Format):

- Create a page report with a table in it based on the query, which displays the fields Customer Name, City, Country, and Region.
- Select the View tab to preview the report.
- In the Enter Parameter Values dialog box, select a region from the region drop-down list, Designer then only lists the countries in the selected region in the country drop-down list. Choose a country from the list, and you get the cities in the selected country in the city drop-down list only.

- Select OK to apply the parameter values. You can find that the report only displays the specified records.
Method 2 (Use this method when you need more customized SQL to show the correct values.)
- Make sure SampleReports.cat is the currently open catalog file. If not, select File > Open Catalog to open it from
<install_root>\Demo\Reports\SampleReports. - In the Catalog Manager, expand the desired data source node.
- Right-click the Parameters node and then select New Parameter.
- Create a parameter named ParamRegion, select Bind with Single Column from the Value Setting drop-down list, select Tables and Views from the Source drop-down list, select Region as the Bind Column and Display Column. Then in the value cell of the Import SQL option, you can see the following statement:
Select DISTINCT CUSTOMERS.REGION FROM CUSTOMERS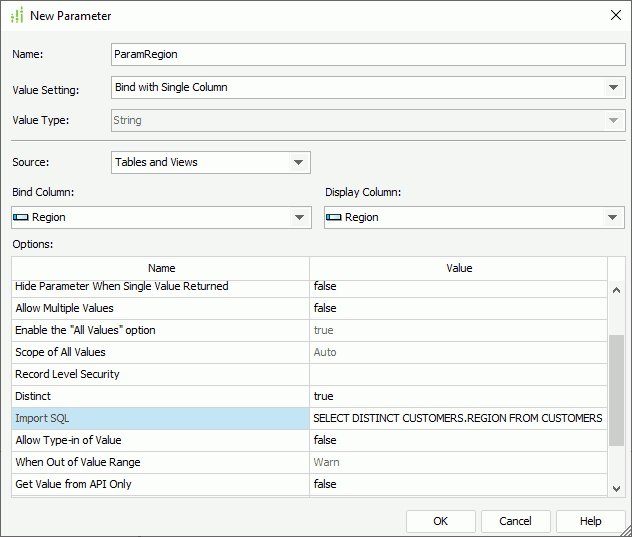
- Create another parameter named ParamCountry. Bind it with the column Country, then select the ellipsis
 in the value cell of Import SQL and edit its SQL statement to:
Select DISTINCT CUSTOMERS.COUNTRY FROM CUSTOMERS WHERE (Customers.Region=@ParamRegion and Customers.YTDSALES > 0 ) - Create one more parameter named ParamCity. Bind it with the column City, and then edit its SQL statement to:
Select DISTINCT CUSTOMERS.City FROM CUSTOMERS WHERE (Customers.Country=@ParamCountry and Customers.YTDSALES > 0 ) - In the same data source, create a query CustomersInfo on the table Customers, select all the fields in the table, and filter the records of the query by adding the following condition.
CUSTOMERS.CITY=@ParamCity - Create a page report with a table in it based on the query, which displays the fields Customer Name, City, Country, and Region.
- Preview the report. In the Enter Parameter Values dialog box, you can use the value of ParamRegion to filter the value of ParamCounty, and use the value of ParamCounty to filter the value of ParamCity. You cannot see any countries and cities where there are no sales.
Controlling Multiple Parameters in a Report
When you use multiple parameters in a report, but you only want to show some of them when running it, you can group them and then select the parameter you want for the report. Logi Report automatically applies the default values for the parameters the values of which you do not specify. See the example below:
- Make sure SampleReports.cat is the currently open catalog file. If not, select File > Open Catalog to open it from
<install_root>\Demo\Reports\SampleReports. - In the Catalog Manager, expand Data Source 1, then right-click the Parameters node and select New Parameter.
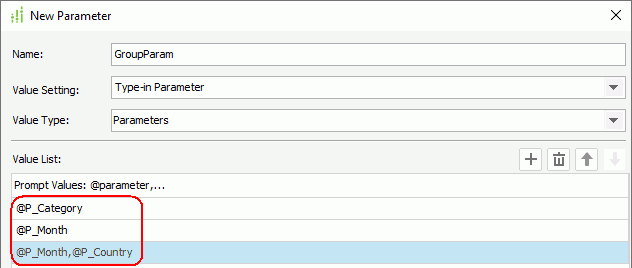
- In the New Parameter dialog box, type GroupParam in the Name text box, select Parameters from the Value Type drop-down list, then add three parameters as the default values of GroupParam as shown in the following image:
- Open an existing page report. Insert the parameters P_Category, P_Month, P_Country, and GroupParam into a report tab of the report.
- Select the View tab to preview the report.
- In the Enter Parameter Values dialog box, you can select the parameter you want from the GroupParam drop-down list.
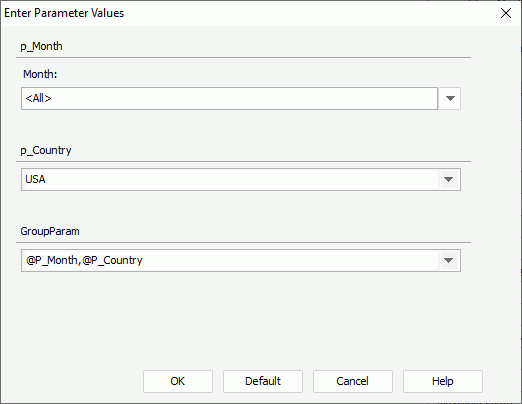
Select @P_Category, Designer displays the P_Category parameter in the dialog box and you can select or type in a value for the parameter. If you select @P_Month,@P_Country, Designer displays both the parameters P_Month and P_Country for you to specify values with which to run the report.
Applying RLS to Parameters
For parameters bound with DBFields, you can apply Record Level Security of data source scope to them. Logi Report applies the security policy to the DBField that is bound with the parameter. At runtime, users will only see parameter values which the security identifier is allowed to view in the value drop-down list of the parameter.
The following example explains how you can apply RLS to the value drop-down list of a parameter.
- Make sure SampleReports.cat is the currently open catalog file. If not, select File > Open Catalog to open it from
<install_root>\Demo\Reports\SampleReports. - In the Catalog Manager, expand the data source where you want to create the parameter.
- Right-click Security Entry in the Security node, select New Security Entry on the shortcut menu, then name the security policy CusCountry.
- In the Security dialog box, make sure Valid RLS is selected at the bottom left.
- Select Add
 and select Add User. In the Add User dialog box, type John in the User text box and select OK.
 - In the Record Level Security tab, edit the security condition as below to grant John the permission to view records in Canada only (for more information about how to compose a security condition, select here).
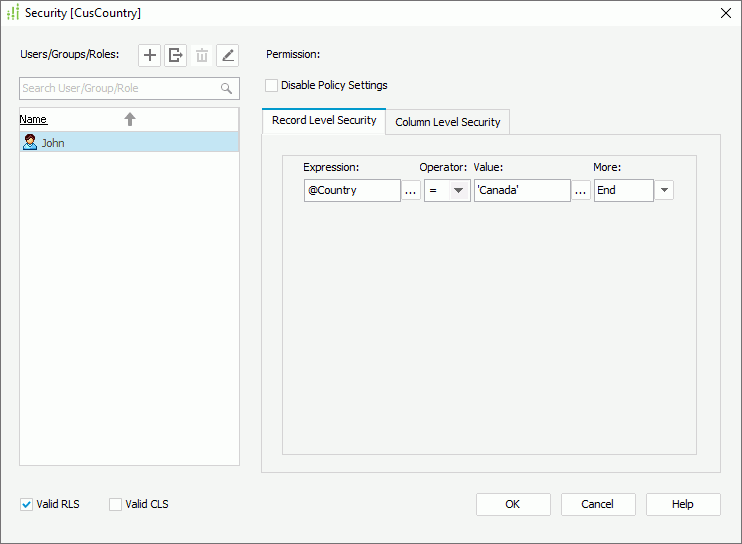
- Add another user David which has the permission to view records in the United Kingdom only.
- Select OK to exit the Security dialog box.
- In the same data source, right-click the Parameters node and select New Parameter on the shortcut menu.
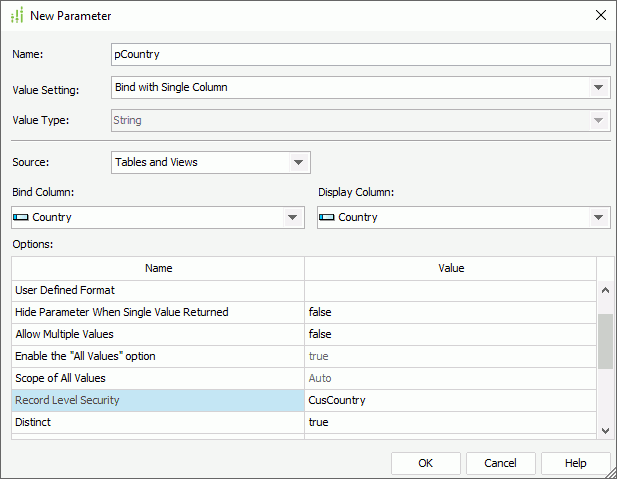
- In the New Parameter dialog box, type pCountry in the Name text box, select Bind with Single Column from the Value Setting drop-down list, and bind the parameter with the Country column. In the Options box, select CusCountry as value of Record Level Security, and then set Distinct to true. Select OK to create the parameter.
- Create a query CustomersInfo on the table Customers. Select all the fields contained in the table.
- Create a page report with a standard banded object in it based on the query, which displays the fields Customer ID, Customer Name, Country, and Phone.
- In the Data panel, right-click the node that represents the query, and then select Edit Query from the shortcut menu.
- In the Query Editor dialog box, select Menu > Query > Filter.
- In the Search Condition dialog box, add a condition for the query (for more information, see Filtering with the Filter Format):

- Select OK to apply the changes to the query.
- Select File > Options. Designer displays the Options dialog box.
- In the General category of the dialog box, set User Name as John.
- Select the View tab to preview the report.
- In the Enter Parameter Values dialog box, select the parameter value drop-down list. You can see that only Canada is available for the user name.
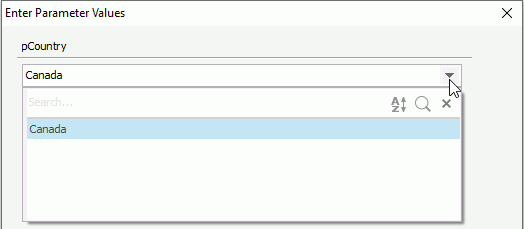
- Set the user name as David in the Options dialog box and preview the report again. This time, only the value United Kingdom is available in the parameter's value drop-down list.
![]()
- When applying an RLS policy to a parameter bound with a column, you must make sure the parameter's bound column and the column used to set conditions in the RLS policy are in the same table. In addition, if the RLS policy also contains conditions defined on other columns, all the columns must be in the same table, and the RLS policy cannot contain parameters and formulas; otherwise, when you apply the RLS to the parameter, the RLS would not work properly.
- When you have applied an RLS policy to a parameter and then you edit the SQL statement of the parameter via the Import SQL option in the parameter dialog box, the parameter value drop-down list may be Null because the changed SQL statement may not match the permissions of the RLS.
- When previewing a report that contains parameters applied with RLS in the Page Report Result or Web Report Result format in Designer, you need to make sure your RLS policy contains the user Jinfonet. That is because the user Jinfonet is the default and only user of the preview Server. The preview Server cannot recognize any other users in the RLS policy.
Supplementing WHERE Portions
Logi Report enables you to change a query at runtime using API. To do this, you can call the method setWherePortion() from your Java application. However, by calling this method, Logi Report replaces the original WHERE portion of the query. If you want to append the runtime WHERE portion to the original one instead of replacing it/them, you can do it in the following way without using the Java API:
- Make sure SampleReports.cat is the currently open catalog file. If not, select File > Open Catalog to open it from
<install_root>\Demo\Reports\SampleReports. - In the Catalog Manager, expand the desired data source and create a type-in parameter named p_Portion of String type (leave the other settings to their default).
- In the same data source, create a query CustomersInfo on the table Customers. Select all the fields contained in the table.
- Create a page report with a table in it based on the query, which displays the fields Customer ID, Customer Name, City, and Phone, and applies the Commercial style.
- In the Data panel, right-click the node that represents the query, and then select Edit Query from the shortcut menu.
- In the Query Editor dialog box, select Menu > Query > Filter.
- In the Search Condition dialog box, add two condition lines (WHERE portions) for the query (for more information, see Filtering with the Filter Format):

The colon is used to append the parameter value (of String type) to the first condition line instead of replacing it.
- Select OK to apply the change to the query.
- Select the View tab to preview the report.
- In the Enter Parameter Values dialog box, write a WHERE portion in standard SQL syntax as value of p_Portion, for example, CUSTOMERID<20, then select OK. Designer applies both of the two WHERE portions to filter the query.
 Previous Topic
 Back to top