 Previous Topic
Edit Gradient Color Dialog Box
You can use the Edit Gradient Color dialog box to specify a gradient color for the markers or areas in a geographic map. This topic describes the options in the dialog box.
Designer displays the Edit Gradient Color dialog box when you select  beside the Color By or Fill By text box after adding an aggregation object to the text box in the Display screen of the Create Geographic Map dialog box or Geographic Map Wizard dialog box.
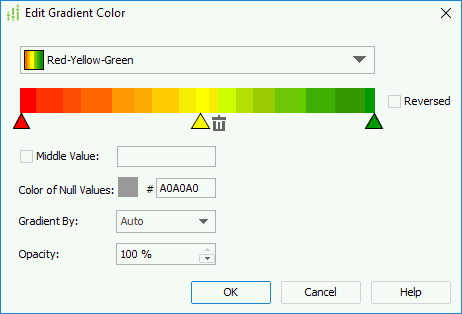
You see the following options in the dialog box:
Gradient color drop-down list
This drop-down list contains the gradient colors that you can apply to the markers or areas of the geographic map. Select the gradient color you need.
Color bar
The bar displays the colors in the selected gradient color.
You can customize the gradient start color, middle color, and end color. Select the corresponding triangle below the color bar to select a color from the color palette. Select the trash can icon ![]() to delete the middle color or start color if not needed. If you delete the start color, Designer applies a default start color automatically. Select the plus sign icon + to specify the start color or middle color again. You cannot delete the middle color or add it when there is no start color. After you change a default gradient color, Designer saves it as a customized gradient color and you can find its name changed to Customize in the color drop-down list.
to delete the middle color or start color if not needed. If you delete the start color, Designer applies a default start color automatically. Select the plus sign icon + to specify the start color or middle color again. You cannot delete the middle color or add it when there is no start color. After you change a default gradient color, Designer saves it as a customized gradient color and you can find its name changed to Customize in the color drop-down list.
Reversed
Select to reverse the direction of the gradient color.
Middle Value
This option takes effect only when the middle color is not null. When it is unselected by default, Designer maps the center value between the start value and end value to the middle color. You can select it and customize the value you want to map to the middle color (Designer ignores the value you specify if it is not between the start value and end value).
- Auto Expand Start/End Value
Designer displays the option when you set Middle Value to 0. Select it if you want to expand the start value and end value automatically. When you select the option, it means 0 is the separator of positive values and negative values. Designer maps the negative and positive values of the maximum absolute value to the start color and end color, and 0 is always in the center of the data range.
Color of Null Values
Specify the color for null values. To edit the color, select the color indicator and select a color from the color palette or type the hexadecimal value of a color (for example, 0xff0000) in the text box.
Gradient By
This drop-down list contains the gradient color algorithms that you can apply between two colors. Select the algorithm you want to use.
- Auto
Select to use the default algorithm according to different kinds of gradient colors automatically. For single color, Designer applies the RGB linear algorithm; for start-end color, Designer applies the HSL linear algorithm; for start-middle-end color, Designer applies the HSL linear algorithm separately between the start-middle color and middle-end color. - RGB
Select to use the RGB linear algorithm, which uses red, green, and blue as the algorithm parameters. - HSL
Select to use the HSL linear algorithm, which uses hue, saturation, and lightness as the algorithm parameters.
Opacity
Specify the opacity of the gradient color.
OK
Select to apply your settings and close the dialog box.
Cancel
Select to close the dialog box without saving any changes.
Help
Select to view information about the dialog box.
 Back to top