Adding Links in Reports
You can add links in a report to link the report with other reports, locations specified by URLs, email addresses, or Blob data type fields. In this way, the users of the report can gain access to the linked targets by selecting the corresponding trigger objects in the report. The links can either be simple links or conditional links. Using conditional links, you can make different targets loaded based on different conditions. This topic describes the methods you can use to add links in a report.
You can use the following objects as the trigger objects of links: labels, data fields (DBFields, summary fields, formula fields, parameter fields), special fields, images, areas in shape maps, and the category/series axis, legend, and data markers in charts.
This topic contains the following sections:
Adding Links in a Report
To add a simple link in a report:
- Right-click the object used as the trigger object of the link and select Link on the shortcut menu.
- In the Insert Link dialog box, select the target to which the trigger object is linked: Report, Master/Detail Report, URL, E-mail, or Content from the Link Type drop-down list.
- Specify the options for the link target.
- Select OK to create the link.
To add a conditional link in a report:
- Right-click the object used as the trigger object of the link and select Link on the shortcut menu.
- In the Insert Link dialog box, select Conditional Link.
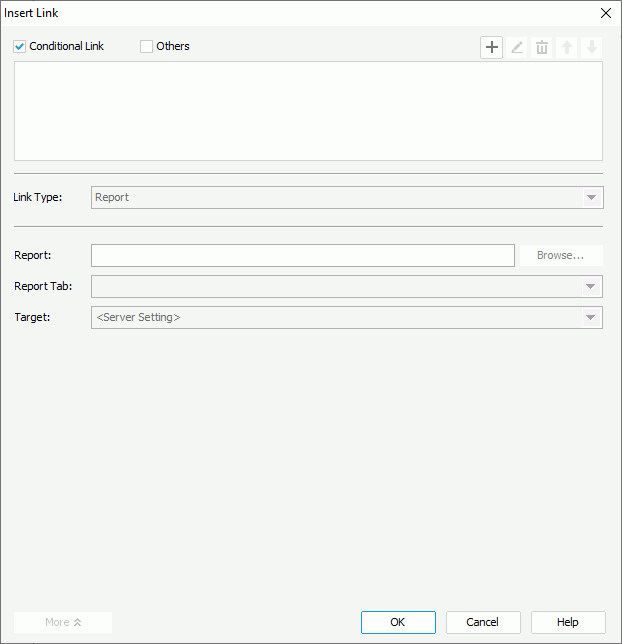
- Select Add
 . Designer displays the Edit Conditions dialog box.
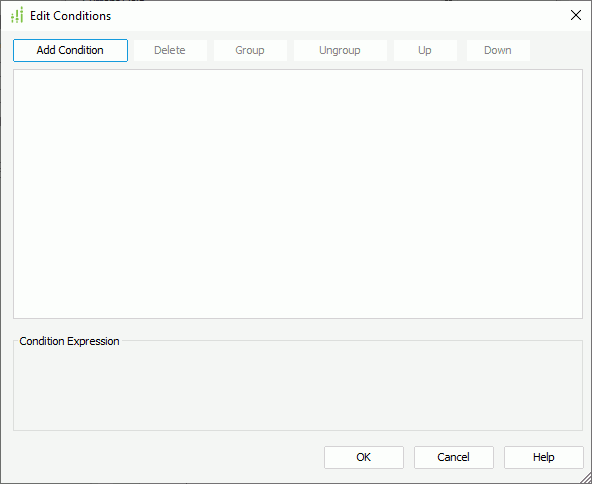
- Select Add Condition to add a condition line.
- From the field drop-down list, select the field on which the condition is based.
- Choose the operator with which to compose the condition expression from the operator drop-down list.
- From the value drop-down list, specify the value of how to build the condition. You can also type in the value manually.
You can specify an empty string as the value for a field of String type, by simply leaving the text box blank (value length=0). If you would like to filter space string (one or more spaces) and empty string, create a formula with the statement
Trim(@Field)which transforms the spaces into empty string, then use the formula to replace the field itself on which the condition is based. - Repeat steps 4 to 7 to add more condition lines and define the logic relationship between the condition lines: "And", "Or", "And Not", or "Or Not".
To group some condition lines, select them and select Group, Designer then adds the selected condition lines in one group and applies them as one line of filter expression (you can also group conditions and groups together); to take out any condition or group from a group, select it and select Ungroup; to adjust the priority of the condition lines, select it and select Up or Down; to delete a condition line, select it and select Delete.
- Select OK to save the condition.
Designer displays the condition and highlights it in the conditions box in the Insert Link dialog box.
- From the Link Type drop-down, select the target to which the trigger object is linked under this condition: Report, Master/Detail Report, URL, E-mail, or Content, then specify the options for the link target.
- Repeat the above steps to add more conditions and define the target for each condition.
To edit a condition, select the condition and select Edit
 , then edit it in the Edit Conditions dialog box.
To adjust the priority of the conditions, select a condition and select Move Up
 or Move Down
  .
.To delete a condition, select the condition and select Remove
 .
. -
Select Others and define a target to link to the trigger object when none of the conditions you have specified are met.
- Select OK to create the conditional link. See Example of Binding a Conditional Link for more information.
![]()
- You cannot add conditional links on objects the parents of which are not bound with datasets.
- Users can select the trigger objects to open the specified links at runtime only when you give the link action the highest Click Priority (the link action has the highest priority by default).
Linking to Another Report
In most cases, your reports are affiliated with one another, with each report emphasizing one or more aspects of a bigger picture. You can set up relationships for users to browse from one report to another through the relationship "channels", thus you can achieve an inter-report relationship network by setting up the link conditions between two reports in the same catalog.
To link a report to another report:
- In the Insert Link dialog box, select Report as the link type.
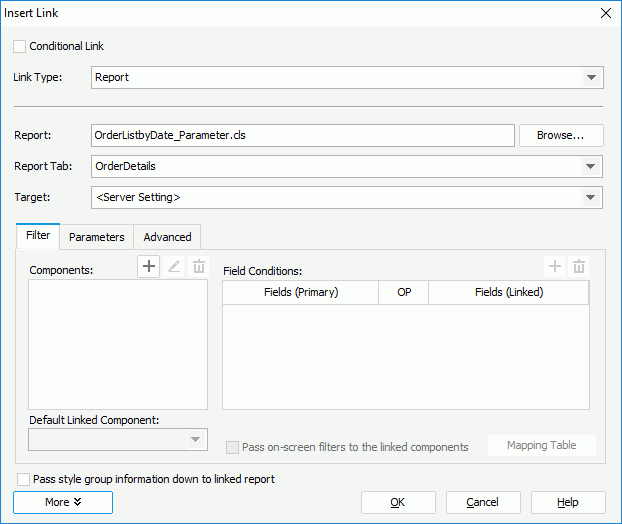
- If the primary report is a page report, select Browse to specify the page report in the same catalog that contains the report tab you want as the linked report, then select the report tab name from the Report Tab drop-down list.
If the primary report is a web report or a library component, select Browse to specify the web report in the same catalog that you want as the linked report.
- From the Target drop-down list, select where you want to load the linked report at runtime.
Server applies the specified target only when users trigger the link in Page Report Studio or Web Report Studio; when users trigger the link in JDashboard, except for Same Frame, Server treats all the other targets as New Window.
- Select More to display more options for setting the link.
- In the Filter tab, select Add
 above the Components box.
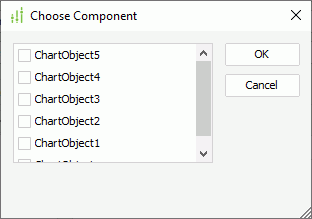
 - In the Choose Component dialog box, add the data components in the linked report that you want to interlink with the primary report. If the required data components use different datasets, you need to add them respectively; however, you can add them all at a time if the data components are based on the same dataset.
- Specify the filter conditions based on which to set up the link relationship between the primary report and the selected data components in the linked report (linked data components). However, depending on where the trigger object is in the primary report, you are not able to define filter conditions under some circumstances. For example, if the trigger object is a label in the report body, you can find that Designer does not enable the Add button
 above the Field Conditions box.
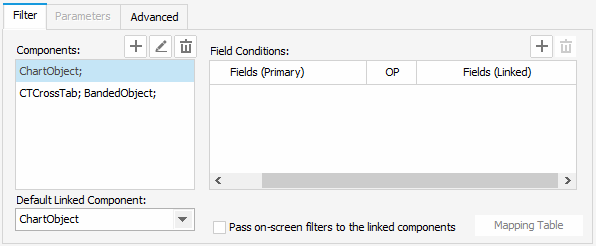
- From the Components box, select a linked data component.
- Select Add
 above the Field Conditions box to add a condition line.
 - Select the primary field from the field drop-down list in the Fields (Primary) column. You can select from all the data fields in the current catalog which are valid to the data resource used by the data component that contains the trigger object.
When the trigger object is one of the following, Designer displays Current Field in the Fields (Primary) drop-down list. Select it if you want to use the data field that is related to the trigger object in the filter condition.
- A data field in a crosstab.
- A DBField, formula field, summary field, or the special field Group Name in a banded object or table.
- The chart legend which is bound with the category/series field of a chart, or the category/series axis of a chart.
- Choose an operator from the drop-down list in the OP column.
- Select the linked field from the field drop-down list in the Fields (Linked) column, which contains data fields in the current catalog that are valid to the data resource used by the linked data component and are of the same data type as the selected primary field.
When you select Current Field in the Fields (Primary) drop-down list, if the dataset of the linked data component contains the data field, which is of the same data type and the same name as the data field that is related to the trigger object in the primary report, Designer displays Corresponding Field in the Fields (Linked) drop-down list. You can select it to use this corresponding field in the linked data component in the filter condition.
When you define a filter condition as Current Field = Corresponding Field, users are able to set up dynamic links with filters automatically generated from the drilling path at runtime. For example, if the data field related to the trigger object in the primary report is the group object Country, which is contained in a hierarchy and its one-level-lower group is City, after users drill from Country down to City in the primary report and trigger the link on any city, they get data of the specified city in the linked data component.
- You can add as many link conditions as you need between the primary report and the linked data component. The relationship between these conditions is "AND", meaning, Logi Report Engine fetches data for the linked data component which meets all of the conditions.
- Repeat the above steps to set link conditions between the primary report and other linked data components.
- Specify whether to apply the on-screen filters (filters created via filter controls) in the primary report to the selected data components of the linked report (linked data components).

- From the Components box, select a linked data component.
- Select Pass on-screen filters to the linked components.
- If the data component containing the trigger object in the primary report and the linked data component use different data resources, Designer enables the Mapping Table button. In this case, you need to select the button to define the mapping relationship based on which to pass the on-screen filters in the primary report to the linked data component using the Mapping Table dialog box.
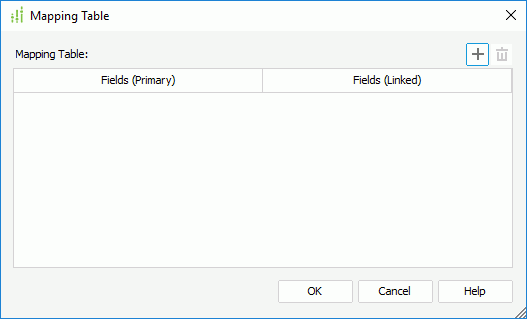
- Select Add
 to add a mapping line.
 - From the drop-down list in the Fields (Primary) column, select the field that is bound with a filter control in the primary report.
- In the drop-down list in the Fields (Linked) column, Designer then lists the available fields in the data resource used by the linked data component which are of the same data type as the selected filter control field. Select a field whose values are the same as those of the filter control field.
A mapping relationship is now set up. When the link is triggered at runtime, Server applies the corresponding on-screen filter in the primary report to the selected linked field in the linked data component.
- Add more mapping lines and define the mapping relationship between the filter control fields in the primary report with appropriate fields in the linked data component.
- Select OK to go back to the Insert Link dialog box.
- Repeat the above steps to apply the on-screen filters in the primary report to other linked data components.
- From the Default Linked Component drop-down list, select the data component that displays by default in the linked report when the link is triggered in the report outputs.
For example, a linked report contains a chart and a table and you select the table as the default linked component. When you export the primary report to PDF with linked report and trigger the link in the PDF output, the page that contains the table displays by default. You can scroll to view the chart.
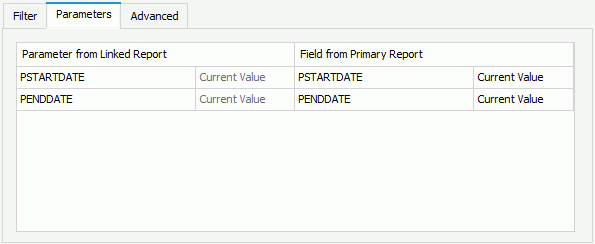
- Designer enables the Parameters tab if the linked report contains one or more parameters. In this tab, you can assign fields of the primary report to parameters of the linked report to use the field values for the parameters automatically when running the linked report from the link. If you select a parameter field, you can choose Current Value to use its most recently specified value or Initial Value to use its original value for the parameter in the linked report.
- If you would like to pass the values of the filter objects like filter controls in the primary report to filter objects in the linked report, go to the Advanced tab to set up the relationship between the filter objects as follows (Designer disables the Advanced tab if you are adding link in a library component):
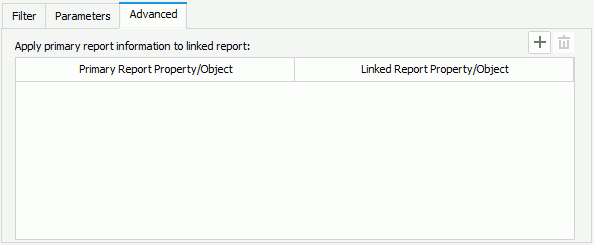
- Select Add
 to add a mapping line.
 - Select the ellipsis
 in the Primary Report Property/Object column, then in the Select Value dialog box, select a filter object in the primary report and select OK.
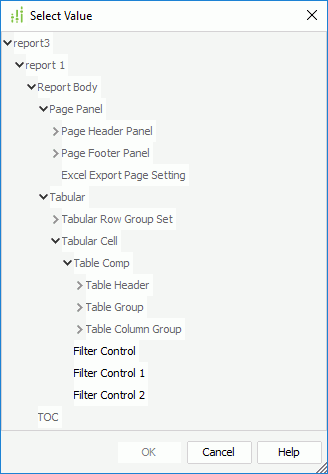
Designer lists all the objects in the primary report in the Select Value dialog box but you can only select filter controls from the object tree.
- In the Linked Report Property/Object column, select the ellipsis
 to select a filter object in the linked report. You need to make sure that values of the filter object in the primary report can be applied to the filter object in the linked report in the same line.
 - Repeat the above steps to set up the relationship between more filter objects in the primary report and the linked report.
- Select Add
- Select Pass style group information down to the linked report to transfer style information from the primary report to the linked report, so as to apply the style of the primary report to the linked report.
- Select OK to apply the settings.
Then, when users run the primary report on Server and select the trigger object, they can get the linked report which displays according to the specified link conditions. Users can also trigger the link when viewing the report in HTML, PDF, or Excel, if they select the Run Linked Report option while specifying settings of the format (when the trigger object is a data field, label, or special field, to access the link in the HTML, PDF, or Excel output of the report, the Enable Hyperlink in <format> property of the object should be "true").
![]()
- You can only link a page report with another page report, and a web report with another web report. For a library component, you can link it with a web report only.
- When linking reports, you need to avoid link loops. For example, if you have linked report A to report B, you cannot link report B back to report A again.
- The conditions specified in the Filter tab are used for filtering when the link is triggered at runtime, that is, the linked report only displays the data that meet the conditions; however, when the link is triggered in the HTML, PDF, or Excel output, the conditions are used for setting up search criteria between the two linked reports, which means after you select the trigger object in the primary report, the linked report displays the page that contain the data satisfying the conditions.
- If you specify the filter condition between the primary report and linked report as Current Field = Corresponding Field, at runtime, Server ignores the condition if there isn't a matched corresponding field in the linked report, which means after users trigger the link, they get a linked report which is not filtered. In the meantime, Server adds an error message into log to record the issue.
Linking to a Detail Report
You can join reports in the same catalog together in order to create a master/detail report group. Usually, the master report holds comprehensive data, while the detail reports hold related detail information. You can gain access to the detail reports by selecting triggers. A detail report can also be the master report of another report. In this way, you can set up more pairs of master/detail reports, where many reports are joined together, eventually leading to the formation of a report chain. However, in a master/detail report group, you cannot use crosstab reports as the master.
The main advantage of using a master/detail relationship is users can browse through the details by selecting next detail and previous detail without going back to the master report. If users do go back to the master report, they see the master report based on the last detail report that they have viewed. The detail report supports all the page report operations, such as Sort, Filter, Drill, and Search.
You can only apply the Master/Detail Report link type in page reports that use query resources.
To make a report linked to a detail report:
- In the Insert Link dialog box, select Master/Detail Report as the link type.
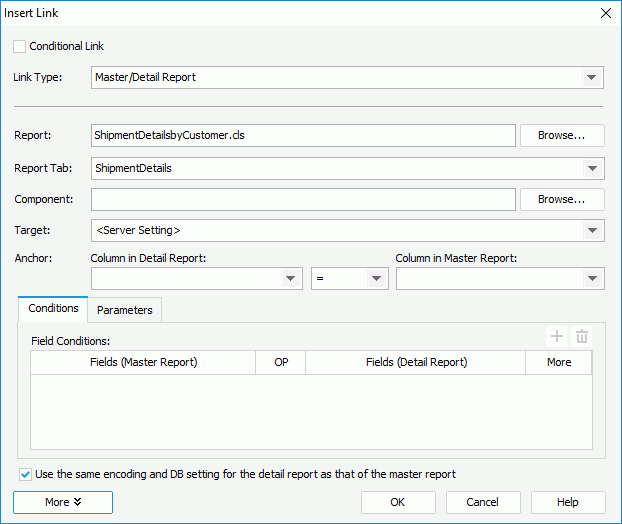
- Select Browse next to the Report text box to specify the report in the same catalog which contains the report tab you want for the detail report, and then select the report tab name from the Report Tab drop-down list.
- Select Browse beside the Component text box. In the Choose Component dialog box, specify which data component in the detail report (detail data component) you want to interlink with the master report with conditions. You can select more than one detail data component if the data components are based on the same dataset.
- From the Target drop-down list, select where to load the detail report.
- In the Anchor section, specify the join relationship between the master report and detail report. The join can only have one condition. For example, the join can be: (Detail Report) Product ID = (Master Report) Product ID. The join condition should be as:
(Detail Report) expression1 operator (Master Report) expresion2
To create a meaningful join, "expression1" should be a DBField or record level pass oneformula in the GROUP panel of the selected data component in the detail report, and "expression2" a DBField or record level pass one formula in the DETAIL panel of the data component that contains the trigger object in the master report. This is because generally the master report is used to present comprehensive data, and the detail report to present more detailed information. Therefore, based on this prerequisite, Designer only lists the qualified fields in the field drop-down lists of the Anchor section.
To specify the join condition:
- Select a field from the Column in Detail Report drop-down list. If this list does not offer the required field, you need to select the detail data component the query used by which contains the specific field (to do this, specify the component by selecting Browse besides the Component text box again).
- Choose the operator from the operator drop-down list.
- Specify the field of the master report from the Column in Master Report drop-down list. This field should be of the same data type as the selected detail report field.
- Select More to display more options for setting the link.
- In the Conditions tab, specify the filter conditions between the master report and the selected data components in the detail report. However, depending on where the trigger object is in the master report, you are not able to define filter conditions under some circumstances. For example, if the trigger object is a label in the report body, you can find that Designer does not enable the Add button
 .
.- Select Add
 to add a condition line.
 - Select the master report field from the Fields (Master Report) drop-down list. The provided field list contains the fields that satisfy the same conditions as for the Anchor section.
When the trigger object is one of the following, Designer displays Current Field in the Fields (Master Report) drop-down list. Select it if you want to use the data field that is related to the trigger object in the filter condition.
- A data field in a crosstab.
- A DBField, formula field, summary field, or the special field Group Name in a banded object or table.
- The chart legend which is bound with the category/series field of a chart, or the category/series axis of a chart.
- Choose an operator from the drop-down list in the OP column.
- Specify the detail report field from the drop-down list in the Fields (Detail Report) column. The available fields are those that satisfy the same conditions as for the Anchor section and at the same time are of the same data type as the selected master report field.
When you select Current Field in the Fields (Master Report) drop-down list, if the dataset of the detail data component contains the data field which is of the same data type and the same name as the data field that is related to the trigger object in the master report, Designer displays Corresponding Field in the Fields (Detail Report) drop-down list. You can select it to use this corresponding field in the detail data component in the filter condition.
- Repeat the above steps to add more filter conditions and specify the relationship between the conditions in the More column as "AND" or "OR".
- Select Add
- Designer enables the Parameters tab if there is at least one parameter applied in the filters of the queries that the detail report uses. In this tab, you can assign fields of the master report to parameters of the detail report to use the field values for the parameters automatically when running the detail report from the link.

- If both reports use the same encoding and DB settings, you should select the option Use the same encoding and DB settings for the detail report as that of the master report. If you do not select this option, when the detail report is triggered at runtime, Server prompts users to specify the encoding and DB settings for the detail report.
- Select OK to confirm.
Then, when users run the master report on Server, they can select the trigger object to open the detail report.
![]()
- The join and filter conditions work together. If you want to set a single condition, you can use join (anchor); if you want to set a group of conditions, you can use the filter conditions together with a join condition. The relationship between the join and filter conditions is "join condition AND (filter conditions)".
- When you specify the filter condition between the master report and detail report as Current Field = Corresponding Field, at runtime, Server ignores the condition if there isn't a matched corresponding field in the detail report, which means after users trigger the link, they get a detail report which is not filtered. In the meantime, Server adds an error message into log to record the issue.
- If you specify to load the detail report in a new browser window, at runtime, Server loads the detail report independently when users select the trigger, meaning, Server does not apply the join and filter conditions you have set between the master report and detail report.
Linking to a URL
- In the Insert Link dialog box, select URL as the link type.
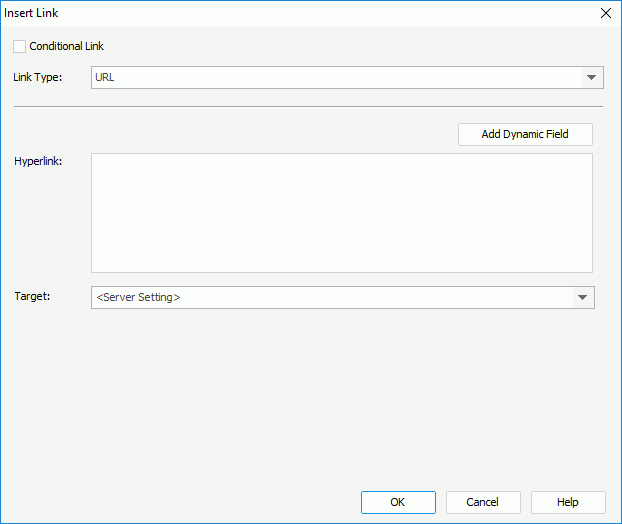
- In the Hyperlink text box, type the URL of the location to link with the object.
- Select Add Dynamic Field if you want to insert a field into the URL to compose a dynamic URL. Designer displays the Select Field dialog box.
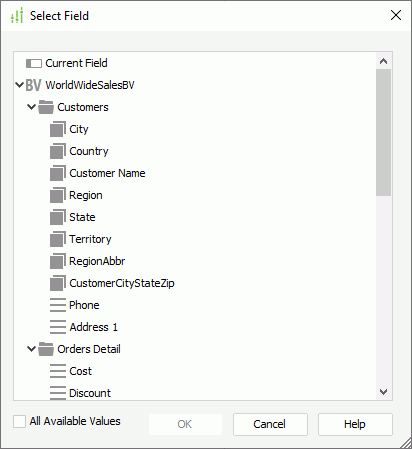
- Select a field from the resource tree. You can select from all the data fields in the data resource that the data component containing the object uses. You should make sure the field you select contains the appropriate data to compose the URL.
When the trigger object is one of the following, Designer displays the item Current Field in the resource tree. Select it if you want to use the data field that is related to the trigger object to compose the URL.
- A data field in a crosstab.
- A DBField, formula field, summary field, or the special field Group Name in a banded object or table.
- The chart legend which is bound with the category/series field of a chart, or the category/series axis of a chart.
For example, you can compose a URL as follows: type http://www.google.com/search?q= in the Hyperlink text box, then select Add Dynamic Field to insert the field Country at the end of the URL. You can then select the trigger object to open a specific URL that directs to a specific country.
- If the trigger object is in a crosstab, table, banded object, or table, Designer displays the All Available Values option. You can select it if you want to display in the URL all the runtime values of the selected field instead of only one value (you cannot select the option if the trigger object is an aggregate field in the crosstab). In the URL result, Server quotes each field value with a pair of single quotes and separates multiple values by a comma, and always applies the date format "yyyy-MM-dd" instead of the customized format to keep high data precision.
 When you select a field that is the same as the field related to the trigger object or as one of the trigger object's parent group fields, the value in the URL is always one value which is related to the value you select to open the URL.
 - Select OK to close the Select Field dialog box.
- From the Target drop-down list, select where you want to load the URL at runtime.
Server applies the specified target only when users trigger the link in Page Report Studio or Web Report Studio; when users trigger the link in JDashboard, except for Same Frame, Server treats all the other targets as New Window.
- If the trigger object is in a web report table, Designer displays the IE Navigate2 Flags button. You can select it to use the IE Navigate2 flags to control the behavior of IE when loading the URL in Internet Explorer at runtime. You can select multiple flags at a time, while some of them may conflict with each other. The conflict relationship between the flags strictly follows the Microsoft MSDN specification. Server loyally delivers the user state to the Microsoft interface and does not present or check the conflict.
When you link the object to a URL without selecting any of the Navigate2 flags, Server opens the location specified by the URL in the designated window if you provide a window name by selecting "Other Frame" from the Target drop-down list; if you do not provide the window name, Server opens the location in a new window.
 To make sure the Navigate2 flags work well, you need to clear Enable Protected Mode in the Internet Options dialog box > Security tab of the Internet Explorer browser, then select Custom level and in the Security Settings dialog box, enable all ActiveX relative options under the ActiveX controls and plug-ins.
 - Select OK to set up the link.
Then, when users run the report on Server, or view it in HTML, PDF, or Excel, they can select the trigger object to open the location specified by the URL (when the trigger object is a data field, label, or special field, to access the link in the HTML, PDF, or Excel output of the report, the Enable Hyperlink in <format> property of the object should be "true").
Linking to an Email
- In the Insert Link dialog box, select E-mail as the link type.
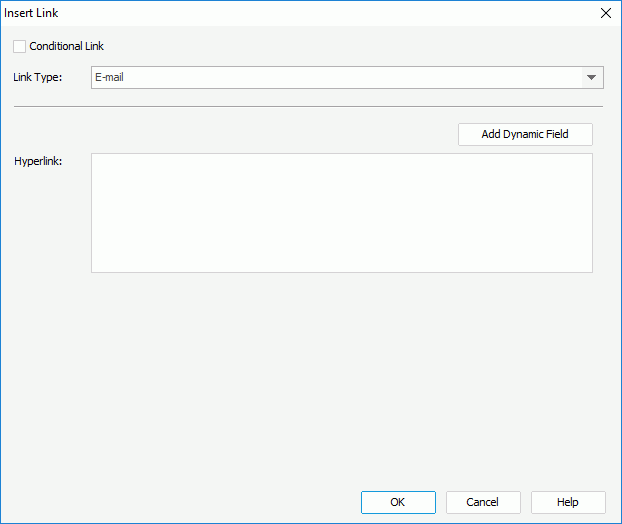
- Type the email address in the Hyperlink text box.
- Select Add Dynamic Field to insert a field into the email address using the Select Field dialog box if you want to compose a dynamic email address.
When the trigger object is one of the following, Designer displays Current Field in the resource tree in the Select Field dialog box. You can select it to use the data field that is related to the trigger object of the link to compose the email address.
- A data field in a crosstab.
- A DBField, formula field, summary field, or the special field Group Name in a banded object or table.
- The chart legend which is bound with the category/series field of a chart, or the category/series axis of a chart.
- Select OK to set up the link.
Then, when users run the report on Server, or view it in HTML, PDF, or Excel, they can select the trigger object to open the email with the information that you specify here (when the trigger object is a data field, label, or special field, to access the link in the HTML, PDF, or Excel output of the report, the Enable Hyperlink in <format> property of the object should be "true"). They can further customize the email and send it.
When composing the email address, you need to follow the syntax: sAddress[sHeaders]. See the details about the syntax below.
- sAddress
One or more valid email addresses separated by a semicolon. You must use Internet-safe characters, such as %20 for the space character. - sHeaders
Optional. One or more name-value pairs. The first pair should be prefixed by a "?" and any additional pairs should be prefixed by a "&". The name can be one of the following strings:- CC
Addresses to include in the "cc" (carbon copy) section of the message. - BCC
Addresses to include in the "bcc" (blind carbon copy) section of the message. - subject
Text to appear in the subject line of the message. - body
Text to appear in the body of the message.
- CC
Hyperlink examples:
user@example.comuser1@example.com;user2@example.comCustomer Name@jinfonet.com, here "Customer Name" is a field name. Note that, fields can work in the hyperlink only when you insert them via the Add Dynamic Field option.salesmanager@Country.jinfonet.com, here Country is a field name.user@example.com?CC=user1@example.com&BCC=user2@example.com&subject=TestLinkToEmail&Body=Version%20x.x%0D%0A%0D%0ATest%20Link%20To%20E-mailHere is the email result:
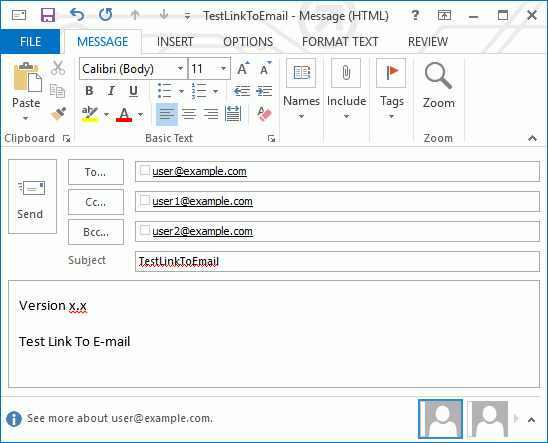
Linking to a Blob Data Type Field
When you link a report with Blob data type fields, Logi Report binds the Blob data type fields to the trigger objects of the links and displays them as hyperlinks, users can then download the Blob content by selecting the hyperlinks in the report.
In Logi Report, Blob can be image, Binary, Blob, Clob, LongBlob, LongClob, Varbinary, Longvarbinary, and so on.
You cannot link page reports that use business views to Blob data type fields.
To make a report linked to a Blob data type field:
- In the Insert Link dialog box, select Content as the link type.
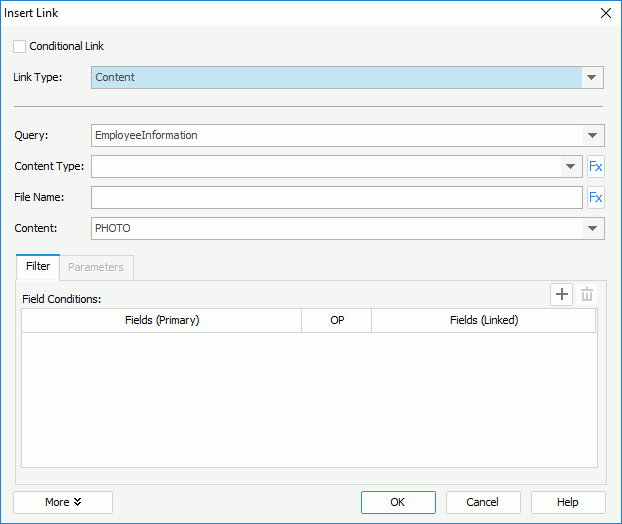
Depending on the location of the trigger object, you are not able to link the report with Blob data type fields under some special circumstances. For example, if the trigger object is a label in the report body, after you choose the Content link type, Designer displays a warning message and disables all the other options in the dialog box.
- From the Query drop-down list, select the data resource which contains the required Blob data type field. The available data resources are those that come from the same data source connection as the data resource the current report uses.
- From the Content Type drop-down list, specify the content type for the Blob type data. You can also select
 to bind the content type with a field in the selected data resource, or use a formula to control the type.
 - In the File Name text box, specify a file name for the linked Blob type data. You can also select
 to specify a field or formula to control the name.
 - From the Content drop-down list, choose a Blob data type field in the selected data resource.
- Select More to display more link options.
- In the Filter tab, specify the filter conditions between the data resource used by the current report and the data resource that contains the linked Blob content.
- Select Add
 to add a condition line.
 - Select the desired data field in the data resource that the current report uses from the Fields (Primary) drop-down list.
When the trigger object is one of the following, Designer displays Current Field in the Fields (Primary) drop-down list. Select it if you want to use the data field that is related to the trigger object in the filter condition.
- A data field in a crosstab.
- A DBField, formula field, summary field, or the special field Group Name in a banded object or table.
- The chart legend which is bound with the category/series field of a chart, or the category/series axis of a chart.
- Choose an operator from the drop-down list in the OP column.
- Select the linked field from the drop-down list in the Fields (Linked) column, which contains the data fields in the data resource containing the linked Blob content that are of the same data type as the selected field in the Fields (Primary) column.
When you select Current Field in the Fields (Primary) drop-down list, if the data resource containing the linked Blob content has the data field which is of the same data type and the same name as the data field that is related to the trigger object, Designer displays Corresponding Field in the Fields (Linked) drop-down list. You can select it to use this corresponding field in the data resource of the Blob content in the filter condition.
- Repeat the above steps to add more filter conditions. The relationship between these conditions is "AND", meaning, Logi Report Engine fetches the linked Blob type data which meets all of the conditions.
- Select Add
- Designer enables the Parameters tab if the data resource that contains the linked Blob content uses parameters. In this tab, you can assign fields of the data resource that the current report uses to the parameters to use the field values for the parameters automatically when accessing the Blob type data from the link.
- Select OK to apply the settings.
Then, when users run the report on Server, or view it in HTML, PDF, or Excel, they can select the trigger object to download the Blob content according to the specified conditions (when the trigger object is a data field, label, or special field, to access the link in the HTML, PDF, or Excel output of the report, the Enable Hyperlink in <format> property of the object should be "true").
Editing the Links in a Report
You can edit the links added in a report at any time. To do this, right-click the trigger object of the link you want to edit and select Edit Link from the shortcut menu. In the Edit Link dialog box, redefine the link.
See also Edit Link Dialog Box for additional information about options in the dialog box.
Removing Links from a Report
To remove a link from a report, right-click the trigger object of the link and select Remove Link from the shortcut menu.
Example of Adding a Conditional Link
This example shows the usage of conditional link and dynamic field.
- Make sure SampleReports.cat is the currently open catalog file. If not, select File > Open Catalog to open it from
<install_root>\Demo\Reports\SampleReports. - Select File > New > Web Report to create a web report.
- Insert a summary table in the web report and define the table as follows:
- Use WorldWideSalesBV in Data Source 1 of the catalog
- Display these columns: Product Name, Total Sales, and Total Cost.
- Apply the Basic style.
- Select the Product Name field in the table detail row (TD), then right-click on it and select Link from the shortcut menu.
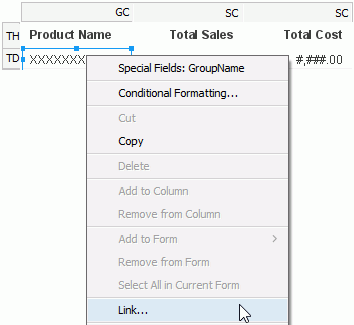
- In the Insert Link dialog box, select Conditional Link.
- Select Add
 to define a condition in the Edit Conditions dialog box.
We want to link the field to a URL target based on the condition.
- From the Link Type drop-down list, select URL, then in the Message dialog box, select Yes.
- In the Hyperlink text box, type http://www.google.com/search?q= and then select Add Dynamic Field to insert the field Product Name at the end of the URL.
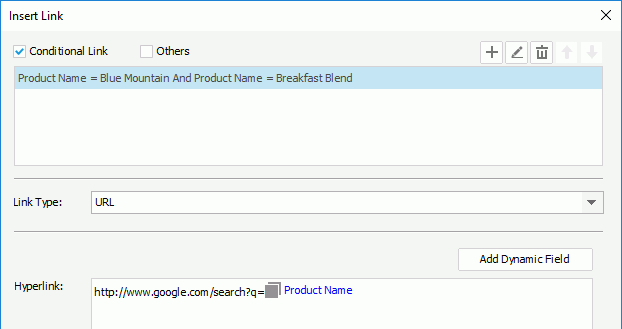
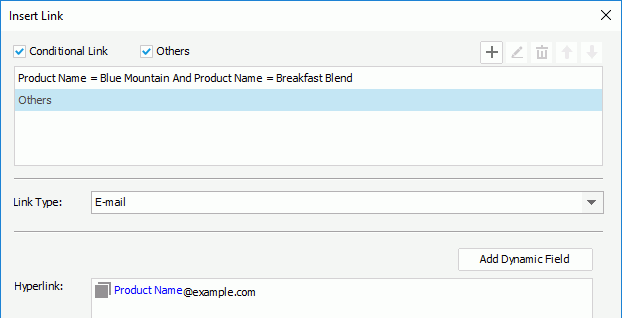
For the product names other than Blue Mountain and Breakfast Blend, we link them to an email target.
Select Others and Designer creates a condition named "Others". - From the Link Type drop-down list, select E-mail. In the Message dialog box, select Yes.
- In the Hyperlink text box, type @example.com and then select Add Dynamic Field to insert the field Product Name right ahead of the "@" symbol.
- Select OK in the Insert Link dialog box.
- Select File > Save to save the report and select View > Preview As > Web Report Result to view the report result in Web Report Studio. We can now select the product names in the table to trigger the link.
- Select Blue Mountain and a Google search result page with the key text Blue Mountain displays.
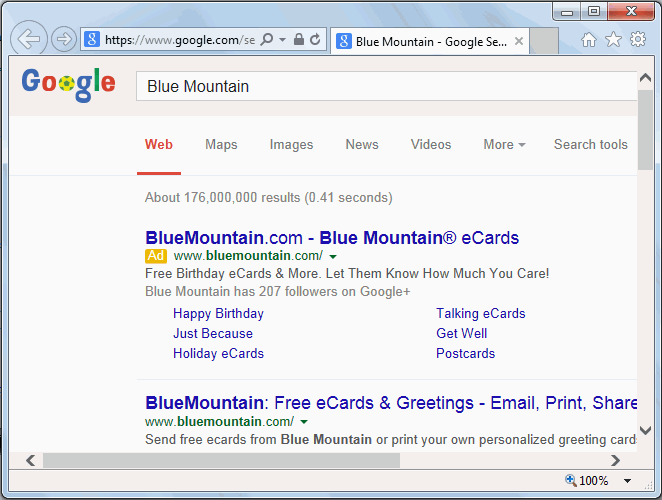
- Select Breakfast Blend and a Google search result page with the key text Breakfast Blend displays.
- Select another product name other than Blue Mountain and Breakfast Blend to send an email.
 Previous Topic
 Back to top