Options Dialog Box
You can use the Options dialog box to configure Designer to your preferences and requirements. This topic describes the options in the dialog box.
Designer displays the Options dialog box when you select File > Options, or select Options on the Catalog Manager toolbar, and divides the options in the dialog box into the following categories:
- General
- Editor
- Panel
- Format
- Dataset
- Component
- Preview
- Catalog
- Export to
- Query Editor
- Security
- Cache
- Server
You see the following buttons for all the categories:
OK
Select to apply your settings and close the dialog box.
Cancel
Select to close the dialog box without saving any changes.
Apply
Select to apply all changes and leave the dialog box open.
Help
Select to view information about the dialog box.
General Category
Use this category to specify the general options of Designer.
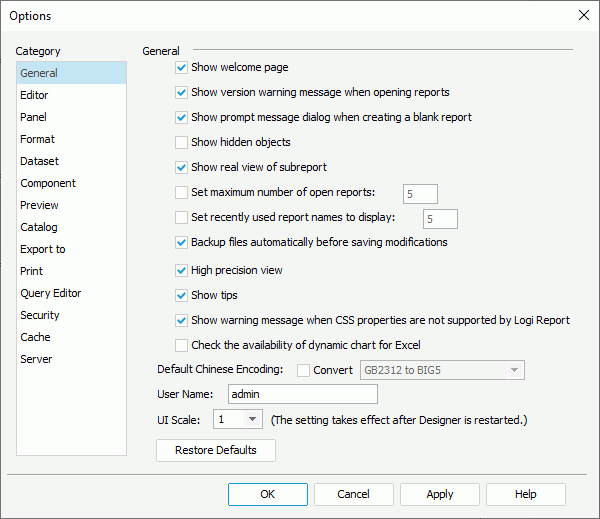
Show welcome page
Select to show the welcome page when you start Designer.
Show version warning message when opening reports
Select to show the version warning message when you open a report of an earlier version using a higher version. The message warns you that you are about to open a report which belongs to an earlier version, and if you save the report using the current version, you may not be able to open it with the earlier version of Designer again.
Show prompt message dialog box when creating a blank report
Select to show the prompt message when you create a blank report. The message prompts you to drag data components from the Components panel and data fields from the Data panel to the blank report.
Show hidden objects
Select to show objects that are hidden in your report. If you select the option, Designer selects Hidden Objects on the View menu tab by default, and vice versa.
Show real view of subreport
Select to show the detailed structure of a subreport in its primary report in the design area.
Set maximum number of open reports
Select to limit the maximum number of the reports that you can open in Designer to the number you specify.
Set recently used report names to display
Select to display the names of the recently used reports in the welcome page. You can set the number of the reports to display.
Backup files automatically before saving modifications
Select to automatically generate the backup files (.cat.bak and .cls.bak ) for the catalog and reports when you save them.
High Precision View
Select to apply high precision view in Designer by default. If you select the option, Designer selects High Precision View on the View menu tab by default, and vice versa.
Show tips
Select to show the tool tip when you hover the mouse over a property in the Report Inspector or Catalog Manager, or some dialog box option.
Show warning message when CSS properties are not supported by Logi Report
Select to show the warning message when the CSS style you apply contains properties that Logi Report does not support.
Check the availability of dynamic chart for Excel
Select to check if a chart can be correctly mapped to a banded object/table when you save the report or export it to Excel.
Default Chinese Encoding
- Convert
Select to enable the converting encoding function, and select the converting rule from the drop-down list, which Designer applies to data stored using the Unicode UTF8 in the database. After you enable the converting encoding function, the changes will only be apparent when you view the report or export it to certain formats.
User Name
Specify the user name which Designer applies in cases when a user name value is required, for example, when you run a report which references the special field "User Name".
UI Scale
Specify the ratio using which to scale the Designer UI. The larger the ratio is, the larger the graphics and text you see on the Designer UI. If you are using JDK 11 or higher, you should specify an appropriate ratio based on your device requirements, in order to display the graphics and text on the Designer UI in the size you expect.
You can also customize the ratio by adding the "-Dsun.java2d.uiScale" parameter in the file JReport.bat stored in <install_root>\bin. Valid values for the parameter are: 1, 1.25, 1.5, 1.75, 2, 2.25, and 2.5. If you specify the scale ratio via the parameter, Designer ignores the ratio that you set in the Options dialog box. The following shows an example of setting the parameter:
...%JAVAHOME%\bin\javaw.exe" @"%REPORTHOME%\bin\java.option" -Xms40m -Xmx1024m "-Dinstall.root=%REPORTHOME%" -classpath "%CLASSPATH%" -Dreporthome="%REPORTHOME%" -Dsun.java2d.uiScale=1.0 -Djreport.url.encoding="UTF-8" -Dlogireport.url.encoding="UTF-8" -Djavac_path="%JAVAHOME%\bin\javac.exe" ...
Restore Defaults
Select to restore all the options to their default values.
Editor
Use this category to specify the properties of the report editor, that is the Design tab in the main window.
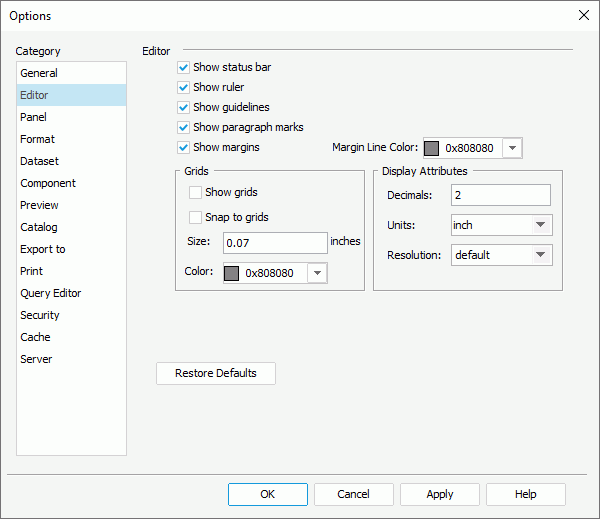
Show status bar
Select to show the status bar at the bottom of the Designer main window when you preview a report. If you select the option, Designer select Status Bar on the View menu tab by default, and vice versa.
Show ruler
Select to show the horizontal and vertical rulers in the design area. If you select the option, Designer select Rules on the View menu tab by default, and vice versa.
Show guidelines
Select to show the guidelines in the main window of the reports. If you select the option, Designer select Gridlines on the View menu tab by default, and vice versa.
Show paragraph marks
Select to show the paragraph marks in the design area.
Show margins
Select to show the margins in the design area. If you select the option, Designer select Margin on the View menu tab by default, and vice versa.
- Margin Line Color
Select the color of the margin line. Select a color from the drop-down list or select Custom to customize a color in the Pick a Color dialog box.
Grids
You can specify the grid properties in this box, which Designer synchronizes with the Grids option on the View menu tab.
- Show grids
Select to show grids in reports. - Snap to grids
Select to snap and lock objects with the grids when you move and place objects around. - Size
Specify the size of the grids in the design area. - Color
Select the color of the grids. Select a color from the drop-down list or select Custom to customize a color in the Pick a Color dialog box.
You can specify the display attributes for Designer in this box, which you can also set in the Display Attributes dialog box.
- Decimals
Specify the precision of the fractional data in reports. For instance, if you set Decimal to 3, Designer rounds all the property values of the objects in the Report Inspector to the thousandth. - Units
Select the unit of the measurement to use in the report properties: centimeter or inch. - Resolution
Select the resolution in dots per inch. If you select "default", Designer applies the resolution of your monitor.
Restore Defaults
Select to restore all the options to their default values.
Panel Category
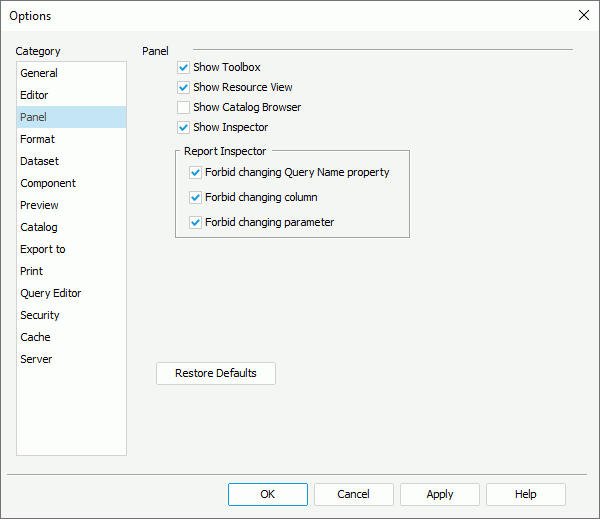
Use this category to specify whether to show the basic panels of Designer by default, and some options for the Inspector panel.
 >
>
Show Components
Select to show the Components panel in the Designer main window. If you select the option, Designer selects Components on the View menu tab by default, and vice versa.
Show Data
Select to show the Data panel in the Designer main window. If you select the option, Designer selects Data on the View menu tab by default, and vice versa.
Show Catalog Manager
Select to show the Catalog Manager in Designer. If you select the option, Designer selects Catalog Manager on the View menu tab by default, and vice versa.
Show Inspector
Select to show the Inspector panel in the Designer main window. If you select the option, Designer selects Inspector on the View menu tab by default, and vice versa.
Report Inspector
You can specify options for the Inspector panel in this box.
- Forbid changing Query Name property
Select to allow the changing of the property Query Name or Data Name in the Report Inspector. - Forbid changing column
Select to allow the changing of the property Column Name in the Report Inspector. - Forbid changing parameter
Select to allow the changing of the property Parameter in the Report Inspector.
Restore Defaults
Select to restore all the options to their default values.
Format Category
Use this category to specify the default format properties for the columns in a catalog.
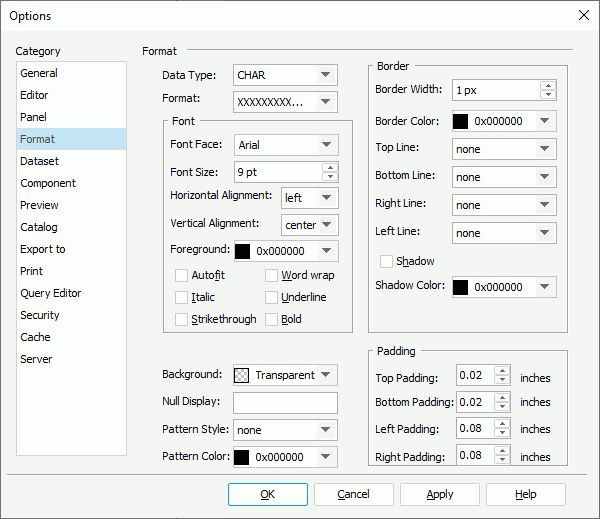
Data Type
Select the data type of the columns.
Format
Select the format of the columns.
Font
You can specify the font properties of the text in the columns in this box.
- Font Face
Select the font face of the text in the columns. - Font Size
Specify the font size of the text in the columns. - Horizontal Alignment
Select the horizontal alignment of the text in the columns. - Vertical Alignment
Select vertical alignment of the text in the columns. - Foreground
Select the foreground color of the text in the columns. Select a color from the drop-down list or select Custom to customize a color in the Pick a Color dialog box. - Autofit
Select to adjust the width and height of the columns according to their contents. - Word wrap
Select to wrap the text according to the width of the columns. - Italic
Select to italicize the text in the columns. - Underline
Select to add a horizontal line under the text in the columns. - Strikethrough
Select to draw a line through the text in the columns. - Bold
Select to apply the bold style to the text in the columns.
Border
You can specify the properties of the column borders in this box.
- Border Width
Specify the thickness of the borders, in pixels. - Border Color
Select the color of the borders. Select a color from the drop-down list or select Custom to customize a color in the Pick a Color dialog box. - Top Line
Select the line style of the top border. - Bottom Line
Select the line style of the bottom border. - Right Line
Select the line style of the right border. - Left Line
Select the line style of the left border. - Shadow
Select to add a drop shadow effect to the borders.- Shadow Color
Select the color of the border shadow.
- Shadow Color
Background
Select the background color of the columns. Select a color from the drop-down list or select Custom to customize a color in the Pick a Color dialog box.
Null Display
By default, if there is no value in a column, Designer displays NULL as the value of the column. You can specify what you want to display instead when there is no value in a column.
Pattern Style
Select the pattern for the columns.
Pattern Color
Select the color to draw the pattern.
Padding
You can specify the spaces between the text of a column and its borders in this box.
- Top Padding
Specify the space between the text and the top border of the column. - Bottom Padding
Specify the space between the text and the bottom border of the column. - Left Padding
Specify the space between the text and the left border of the column. - Right Padding
Specify the space between the text and the right border of the column.
![]() Designer applies the padding values when you add data columns to a catalog. You can adjust the values for each column in the Catalog Manager, or after adding the columns to reports in the Report Inspector.
Designer applies the padding values when you add data columns to a catalog. You can adjust the values for each column in the Catalog Manager, or after adding the columns to reports in the Report Inspector.
Dataset Category
Use this category to specify the options for using datasets in reports.
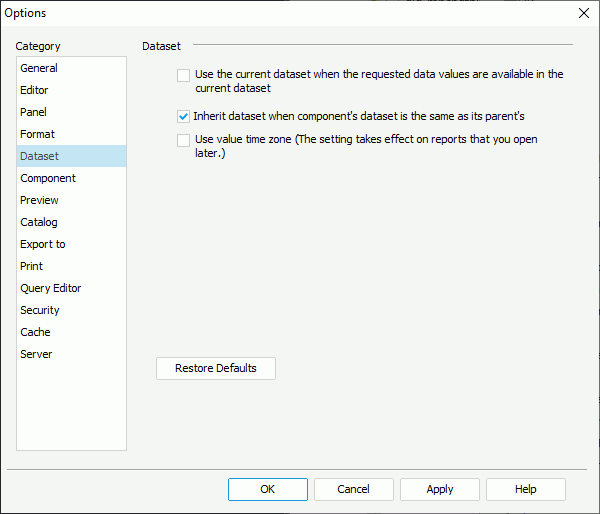
Use the current dataset when the requested data values are available in the current dataset
Select to use the current dataset by default if the requested data values are available in the current dataset.
Inherit dataset when component's dataset is the same as its parent's
Select to inherit the dataset from the parent when the data component's dataset is the same as its parent's.
Select it if you want the date and time values in reports to use the time zone that you set in the XML data source, when you view and export the reports in Designer. It takes effect on the reports that you open after you save the setting; otherwise, Designer applies the VM time zone to all date and time data in reports.
The calculation of grouping and filtering on Date, Time, or DateTime type data is always based on the VM time zone, as the unified standard, regardless of the value-level time zone that you set in the XML data source.
Restore Defaults
Select to restore all the options to their default values.
Component Category
Use this catalog to specify the options for using components in reports.
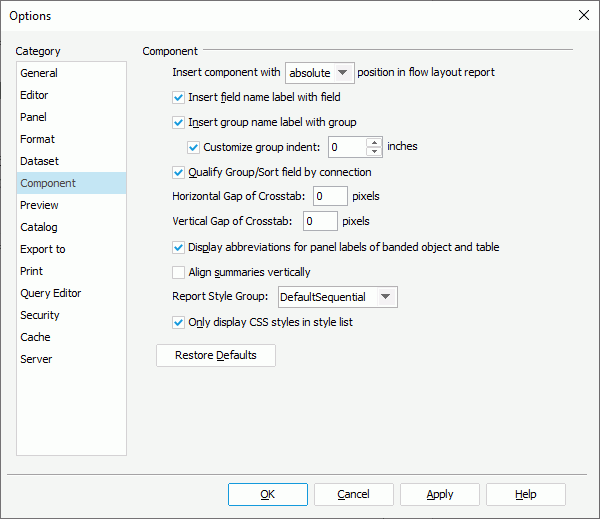
Insert component with static/relative/absolute position in flow layout report
Specify the default method with which to place components:
- static
Select to place the component at the top left of the location where you insert it. There are no X and Y coordinate property values. - relative
Select to place the component at an offset to the position where you insert it. Designer determines the offset by the X and Y coordinate property values. Not all components support relative position. - absolute
Select to place the component at the position specified by dragging and dropping or by setting its X and Y coordinate property values.
See the Position property for more information.
![]()
- When you insert a table, crosstab, chart, tabular, banded object, subreport, or map component into a flow layout container, this option does not take effect.
- The position for all the components that you insert into a banded panel is absolute, so when you insert components into the banded panels, this option does not take effect.
Insert field name label with field
Select to insert fields together with their default name labels in reports.
Insert group name label with group
Select to insert groups together with their default name labels in reports.
Select to customize the indent of the groups created via the component wizard. By default, the indent of the groups is 0 inch or centimeter. You can also type a value between 0 and 4 to customize the indent.
If you do not select this option, when you create groups in a report in the component wizard, Designer indents the groups according to the width of the group-by fields.
Qualify Group/Sort field by connection
By default, you can use any field that you add to a catalog to perform grouping and sorting. You can select this option to control whether a field can be used to group or sort. Designer stores the qualification information in the database connection.
Horizontal Gap of Crosstab
Specify the horizontal gap between two parts of a crosstab, which Designer splits according to the page settings.
Vertical Gap of Crosstab
Specify the vertical gap between two parts of a crosstab, which Designer splits according to the page settings.
Display abbreviations for panel labels of banded object and table
Select to display abbreviations for the panel labels of banded object and table in the design area. If you do not select the option, you can see the full name plus the group-by field name.
Select to align the summaries that you add to tables and banded objects via the component wizard vertically. For tables, this option takes effect only when the summaries are in detail columns, namely, the table type should be Group Above or Group Left.
Select the default selected style for the four types of components when creating them via the component wizard: table, crosstab, chart, and banded object. However, when you insert them into a banded object which can bind style, the default selected style type is "Inherit Style" instead of the style specified by this option.
All CSS styles in the <install_root>\style directory are available in the drop-down list.
Only display CSS styles in style list
Select to display only the CSS styles in the style list.
Restore Defaults
Select to restore all the options to their default values.
Preview Category
Use this category to specify the options for previewing reports in Designer.
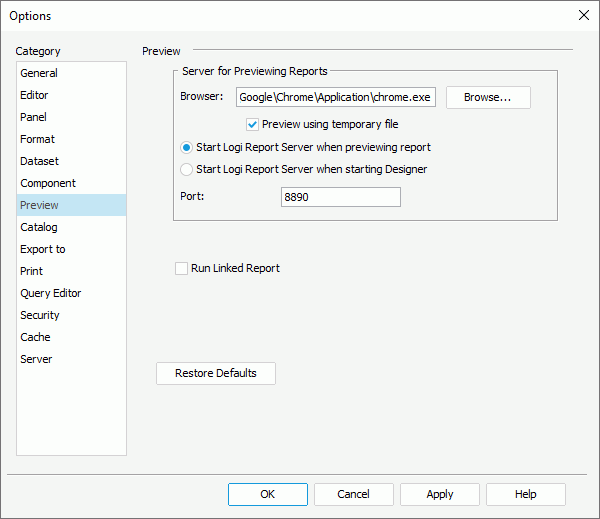
Browser
Specify the browser using which to preview reports in Designer. Select Browse to specify the browser.
Preview using temporary file
Select to preview reports using temporary files.
Start Logi Report Server when previewing report
Select to start the Preview Server when you preview a report for the first time in Designer.
Start Logi Report Server when starting Designer
Select to start the Preview Server when you start Designer.
Port
Specify the port as the TCP port to which the Preview Server listens.
Run Linked Report
Select to generate the linked reports (not including the detail reports) when viewing the primary reports in Designer or previewing the primary reports in all formats except for Web Report Result and Page Report Result. Generating linked reports at the same time, especially when the linked reports contain a large amount of data, causes performance issue.
Restore Defaults
Select to restore all the options to their default values.
Catalog Category
Use this category to specify the options for working with catalogs in Designer.
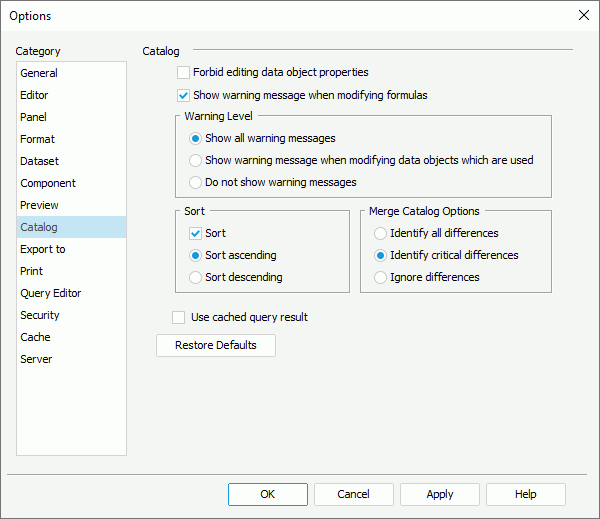
Forbid editing data object properties
Select if you do not want to allow changing the data property values in the Catalog Manager.
Show warning message when modifying formulas
Select to show the warning message when you modify formulas in a catalog. The message warns you that modifying a certain formula may impact other reports using the same formula.
Warning Level
You can specify the warning level in this box.
- Show all warning messages
Select to show all the warning messages. - Show warning message when modifying data objects which are used
Select to show warning massage when you modify data objects that are being used. - Do not show warning messages
Select if you do not want to show the warning messages at any time.
You can specify whether and how to sort the data objects in each node in the data resource tree in this box. Designer does not sort the logic folder nodes for categorizing the resources and the elements in a hierarchy.
- Sort
Select to enable sorting the data objects in each node in the data resource tree.- Sort ascending
Select to sort the data objects in an ascending order. - Sort descending
Select to sort the data objects in a descending order.
- Sort ascending
You can specify the checking level for merging catalogs when you use "Save To" to save a report to a directory where a catalog with the same name already exists in this box.
- Identify all differences
Select if you want Designer to check for all the differences between the two catalogs, Designer then displays all the resources referenced by the report in the Merge dialog box and marks all the conflicting resources. - Identify critical differences
Select if you want Designer to check for differences which can cause Logi Report Engine to fail in running a report, Designer then displays all the resources referenced by the report in the Merge dialog box and marks the critical conflicting resources only. If you select the option, Designer may return different values when you run the saved report later. - Ignore differences
Select if you do not want Designer to show the differences between the two catalogs, then when any conflicts exist in the catalogs, they remain in the resources of the target catalog. If you select the option, the saved report might not run later.
Use cached query result
Select to use cached query result instead of the database to retrieve data for running reports. If you select the option, when you view or run a report that uses a query or business view with cached query result, Designer displays a dialog box for you to choose the result file with which to get data for the report.
Restore Defaults
Select to restore all the options to their default values.
Export to Category
Designer provides the options of this category in three tabs: HTML, E-mail, and Fax.
Restore Defaults
Select to restore all the options to their default values.
Layout Precision
Select to open the Advanced Export Settings dialog box to customize the layout precision for each export format.
HTML Tab
You can specify the preferences for exporting the report result to HTML in this tab.
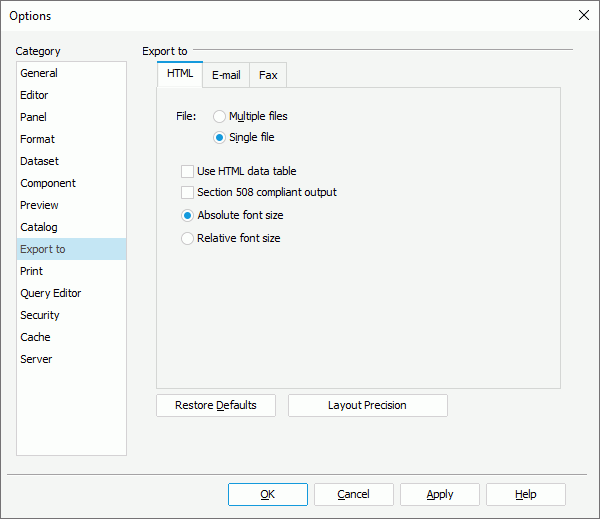
File
Specify whether to convert the report into a single or multiple files.
- Multiple files
Select to convert the report into multiple files and designate a serial number for each HTML page. For example, if a 3-page report is named "Sales", Designer creates three files: Sales_1.html, Sales_2.html, and Sales_3.html. - Single file
Select to export the report into one file.
Use HTML data table
Select to generate the table and crosstab components as table objects in the HTML output.
Section 508 compliant output
If you select the option, Designer exports the accessibility attributes that you define for the report elements in the Report Inspector to HTML which is Section 508 compliant. For more information, see Exporting Reports to Accessible HTML and PDF.
When you select this option, Designer automatically selects the "Use HTML data table" and "Relative font size" options and disables them. The HTML report output is then Section 508 compliant including HTML data table, accessible attributes, and relative font feature.
Absolute font size
Select to generate the report result using an absolute font size, which means the font size is fixed and you cannot adjust it according to the font size settings in the web browser.
Relative font size
Select to generate the report result using a relative font size, which means you can adjust the font size according to the font size settings in the web browser.
E-mail Tab
You can specify the email server and the preferences for exporting the report result to email in this tab.
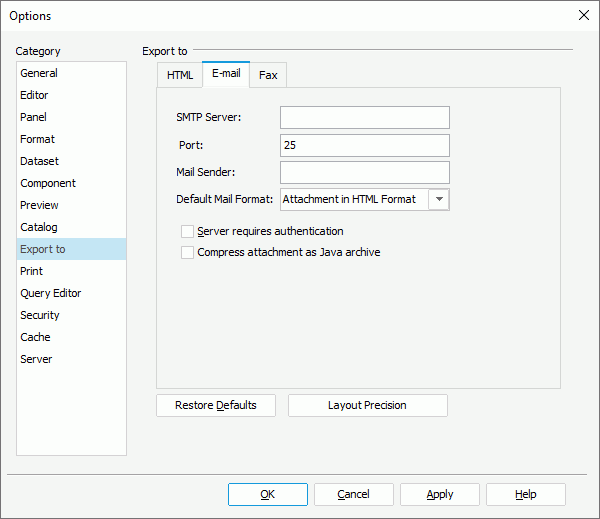
SMTP Server
Specify the numeric or named host of the machine where the email server is located.
Port
Specify the port where the email server runs.
Mail Sender
Specify the address of the email sender. You must specify an address and make sure that the format of the specified address is valid.
Default Mail Format
Select the default format with which to send the report result.
- E-mail Result in HTML E-mail Format
Select to send the report result via email to the specified address in HTML. If you select this format, the report result displays in HTML in the mail body. - E-mail Result in Plain Text E-mail Format
Select to send the report result via email to the specified address in plain text format. If you select this format, the report result displays in plain text in the mail body with no other information such as color and images. - Attachment in Logi Report Result Format
Select to send the report result via email to the specified address with a Logi Report result file as attachment. - Attachment in HTML Format
Select to send the report result via email to the specified address with an HTML file as attachment. - Attachment in PDF Format
Select to send the report result via email to the specified address with a PDF file as attachment. - Attachment in Excel Format
Select to send the report result via email to the specified address with an Excel file as attachment. - Attachment in Text Format
Select to send the report result via email to the specified address with a Text file as attachment. - Attachment in RTF Format
Select to send the report result via email to the specified address with a RTF file as attachment. - Attachment in XML Format
Select to send the report result via email to the specified address with an XML file as attachment. - Attachment in PostScript Format
Select to send the report result via email to the specified address with a PostScript file as attachment.
Server requires authentication
You should select this option if an SMTP Server requires authentication.
Compress Attachment as Java Archive
Select to compress the mail attachment as Java Archive.
Fax Tab
You can specify the fax settings for exporting the report result to fax in this tab. You can export the report result either via a fax machine or a fax server.
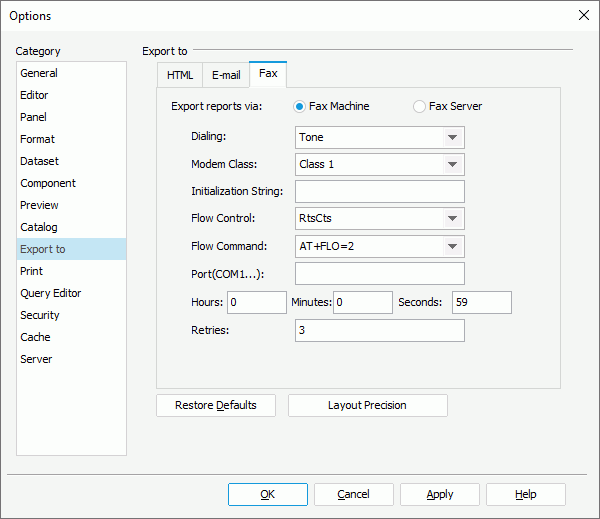
Fax Machine
Select to export the report result via a fax machine.
- Dialing
Select the dialing mode of the fax modem, Pulse or Tone. - Modem Class
Select the class of the modem: Class 1, Class 2, or Class 2.0. Most modem only support Class 1, so be sure that higher protocols are supported by the modem if you select Class 2 or Class 2.0. - Initialization String
Specify the string to initialize the modem. You should obtain the string from the modem manual. - Flow Control
Select the flow control mode between DTE (Data Terminal Equipment) and DCE (Data Circuit-terminating Equipment). You can select from the following options:- RtsCts
Select to apply the flow control of the hardware. - Xon/Xoff
Select to apply the flow control of the software. - None
Select if you do not want to apply flow control.
- RtsCts
- Flow Command
Select the flow command according to the flow control mode. You should obtain the command from the modem manual. - Port
Specify the port number of the fax machine. You should obtain the port from the modem manual. - Timeout
Specify the maximum amount of time for how long the fax should wait for a response from the destination before timing out. - Retries
When the line is busy, you cannot fax the report result. You can specify the maximum number of times for the modem to retry faxing the report result.
Fax Server
Select to export the report result via a fax server.
- Fax Gateway Connector
Specify the name of the class implemented by users. - Server IP
Specify the IP address or domain name of the fax server. - Server Port
Specify the port number of the fax server. - Login ID
Specify the ID for the class communicating with fax server. - Password
Specify the password for the class communicating with fax server. - Fax Sender
Specify the user's name to display in the fax server manager. - Special Parameters
Specify some parameters for the fax server. - Timeout
Specify the maximum amount of time that the fax should wait for a response from the destination before timing out. - Retries
Specify the number of times the modem retries faxing the report result.
Print Category
Use this category to specify the options for printing reports.
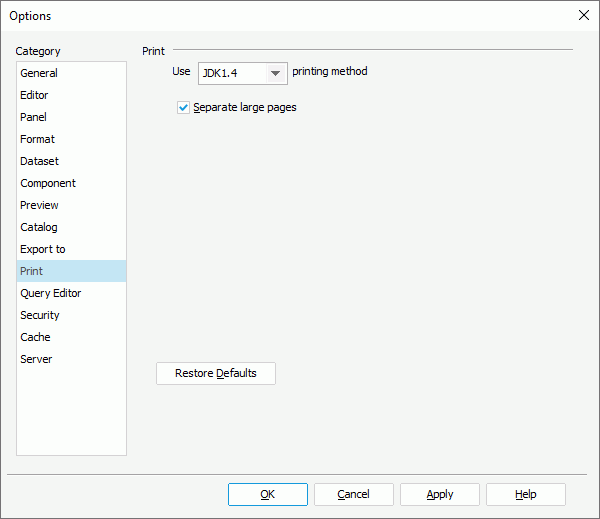
Use JDK1.1/JDK1.2/JDK1.4 printing method
Specify the printing method using which to print reports.
- JDK1.1
This method is quick in speed but the printing quality cannot be guaranteed. - JDK1.2
This method can give you a satisfactory result, even for a ".gif" file, but it is slow in speed. - JDK1.4
Compared with the above two methods, this one is more advanced, and gives you a satisfactory result.
Separate large pages
Select to separate large pages during printing. When you print a report with a report page size which is larger than the print paper size, Designer prints the report in multiple pages serially, meaning Designer automatically separates a large page of the report.
Restore Defaults
Select to restore all the options to their default values.
Query Editor Category
Use this category to specify the default properties of the Query Editor which you use for creating queries.
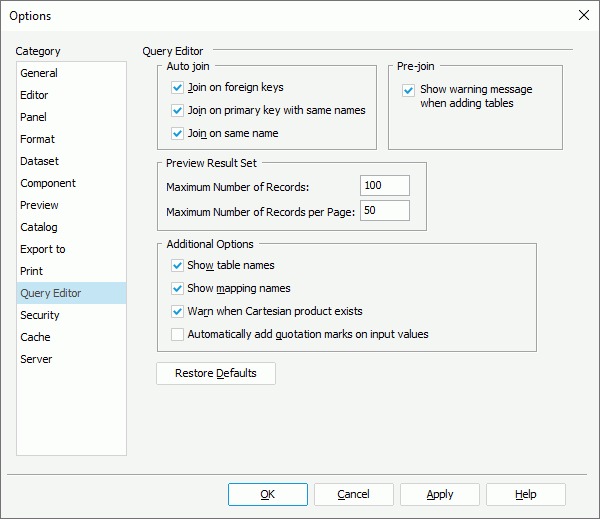
Auto join
You can specify the options for auto joins in this box.
- Join on foreign keys
Select to automatically join tables in a query through a reference from Table A to a primary key in Table B. For example, an order form in Table A shows information on purchases that are made by a customer with a primary key of CustomerID. The customer ID # refers to a record in Table B which lists a specific address, phone number, name, and so on for the customer. CustomerID in Table A is a foreign key because it links the customer's ordering information in Table A to the customer's information in Table B using the CustomerID field. - Join on primary keys with same names
Select to automatically join tables in a query through a field or a combination of fields that uniquely and specifically identifies a record. For example, OrderID may be the primary key in a table for Orders and also for Payments. - Join on same name
Select to automatically join tables in a query through a link between two columns of the same name in two different tables. This often creates many invalid joins such as Amount that appears in both tables.
Pre-join
You can specify the default settings for pre-joins in this box.
- Show warning message when adding tables
If you enable the Pre-join feature, when you add a table to a query, you may also need to add other tables in order to form a pre-join path. You can select this option to let Designer display the warning message in cases like this.
Preview Result Set
You can specify the default settings for previewing queries in this box.
- Maximum Number of Records
Specify the default total number of records to display when you preview a query. - Maximum Number of Records per Page
Specify the default maximum number of records to display on one page when you preview a query.
Additional Options
You can specify some additional options in this box.
- Show table names
Select to display the table that each column belongs to in the criteria panel of the Query Editor. - Show mapping names
Select to display the full name of the column in the criteria panel of the Query Editor. - Warn when Cartesian product exists
Select to display a warning when a Cartesian exists. A Cartesian product is used when you add tables to a query with no join specifications.For example, Table A has three values: A, B, and C, and Table B has three values: 1, 2, and 3. Value A matches value 1, value B matches value 2, and so on. This is a specific match.
A Cartesian product would have value A matching with 1, 2, and 3, and value B matching with 1, 2, and 3, and so on. Depending on the data values, Cartesian products can produce large datasets since each record in Table A matches every record in Table B.
- Automatically add quotation marks on input values
Select to enable Designer to add quote marks automatically after you type a String value into the second expression text box in the AND format when you specify certain criteria for the fields to be retrieved from the database.
Restore Defaults
Select to restore all the options to their default values.
Security Category
Use this category to set one or more user accounts to use Designer.
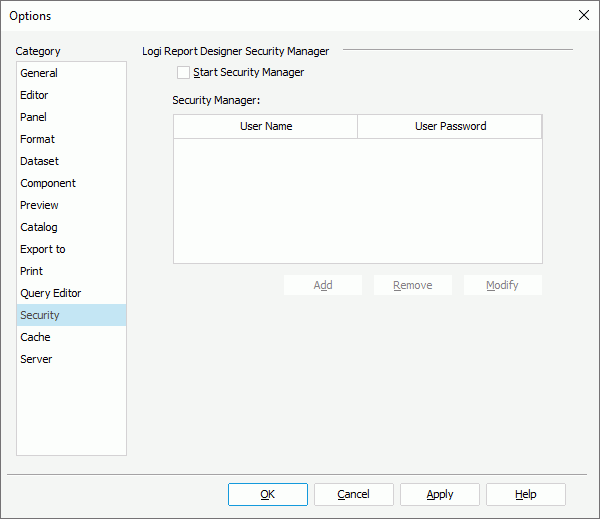
Start Security Manager
Select to enable using the Security Manager feature. For the first time you select this option, Designer prompts you to create a user account in the Report Register dialog box:
- Administrator
Specify the name for the new user account. The user name should contain at least 4 characters. - Password
Specify the password to sign in. The password should contain at least 6 digits. - Confirm Password
Specify the password again to confirm it. - Submit
Select to create the user account and close the dialog box. - Cancel
Select to cancel creating the user account and close the dialog box.
Security Manager
This box lists all the user accounts which can use Designer.
- Add
Select to add a new user account. - Remove
Select to delete the specified user account. - Modify
Select to modify the specified user account.
Cache
Use this category to specify the image cache in Designer.
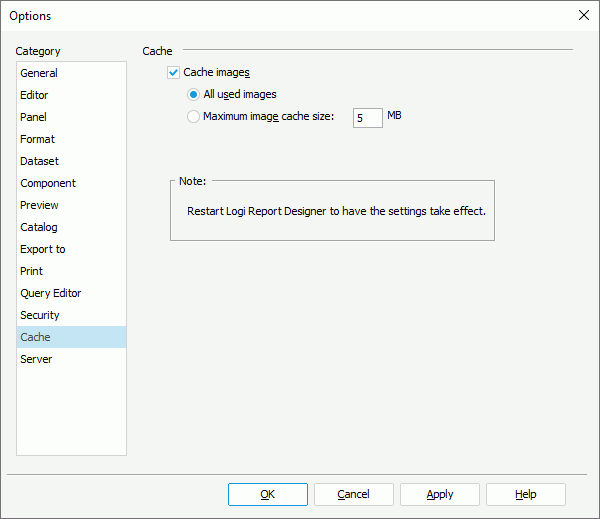
Cache images
Select to enable image cache.
- All used images
Select to cache all the images that are used in reports. - Maximum Image Cache Size
If you select the option, you can specify the maximum size for caching images. The default value is 5 MB.
Server Category
Use this category to specify the options for connecting with a started Logi Report Server in order to publish or get resources from the Server.
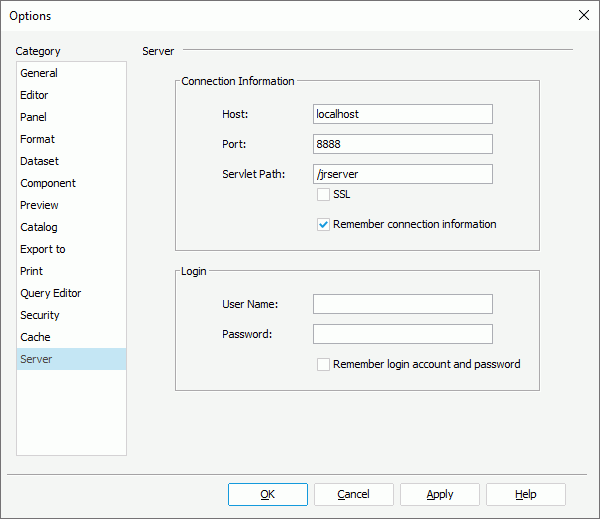
Connection Information
You can specify information for connecting to the Server in this box.
- Host
Specify the host of the Server. You can use the host name or the IP address. - Port
Specify the port that the Server listens to. By default, it is 8888. - Servlet Path
It is "/jrserver" if the Server runs in a standalone environment. If the Server is integrated with another application server using jreport.jar for example, the servlet path is "/jreport/jrserver". - SSL
Abbreviation of Security Socket Layer. Select this option to create an SSL connection when the Server is integrated with another application server which supports SSL. - Remember connection information
Select to allow Designer to remember the connection information, so that it can set up the connection automatically when you want to connect to the Server.
Login
You can specify the user name and password for signing in to the Server in this box.
- User Name
Specify the user name for accessing the Server. When the Organization feature is enabled on the Server and the user is an organization user, User Name should include the organization name. Use "\" to separate the organization name and the user name, for example, "org1\user1". - Password
Specify the password of the user name. - Remember login account and password
Select to allow Designer to remember the user information, so that it can sign you in to the Server automatically. You cannot select this option if you do not select "Remember connection information".
When both the connection and user information is remembered by Designer and the specified Server is started, when you want to connect to the Server to publish or get resources, Designer sets up the connection and signs you in automatically; otherwise, Designer displays the Connect to Logi Report Server dialog box for you to specify the connection and user information.
 Previous Topic
 Back to top