 Previous Topic
Crosstab Wizard Dialog Box
You can use the Crosstab Wizard dialog box to create a page report tab with a crosstab in it, create a library component with a crosstab in it, or edit an existing crosstab in a report. This topic describes the options in the dialog box.
Designer displays different options in the Crosstab Wizard dialog box according to the type of the data resource used for the crosstab: business view or query resource.
Crosstab Wizard Dialog Box - Business View Based
When you use the Crosstab Wizard dialog box for creating or editing a crosstab using a business view, you see the following screens in the dialog box (Designer displays the Filter screens only when you use the dialog box for creating a crosstab):
You see these buttons in all the screens:
Back
Select to go back to the previous screen.
Next
Select to go to the next screen.
Finish
Select to finish your work and close the dialog box.
Cancel
Select to close the dialog box without saving any changes.
Help
Select to view information about the dialog box.
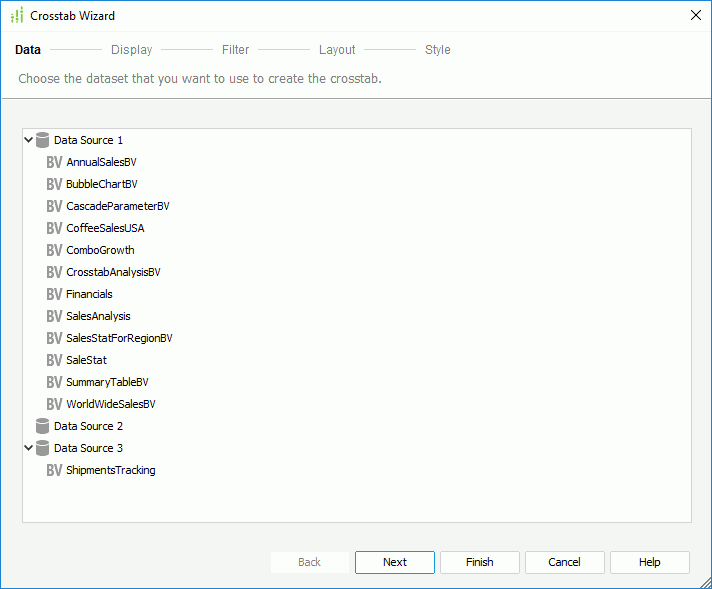
Data Screen
Use this screen to specify the business view for the crosstab. You can select from all the predefined business views in the current catalog.
Inherit from the Parent
Designer displays and enables the option only when you use the dialog box for editing a crosstab that is inside any of the following panels in a banded object: banded header panel, banded footer panel, group header panel, or group footer panel. Select it if you want the crosstab to inherit the business view that its parent banded object uses.
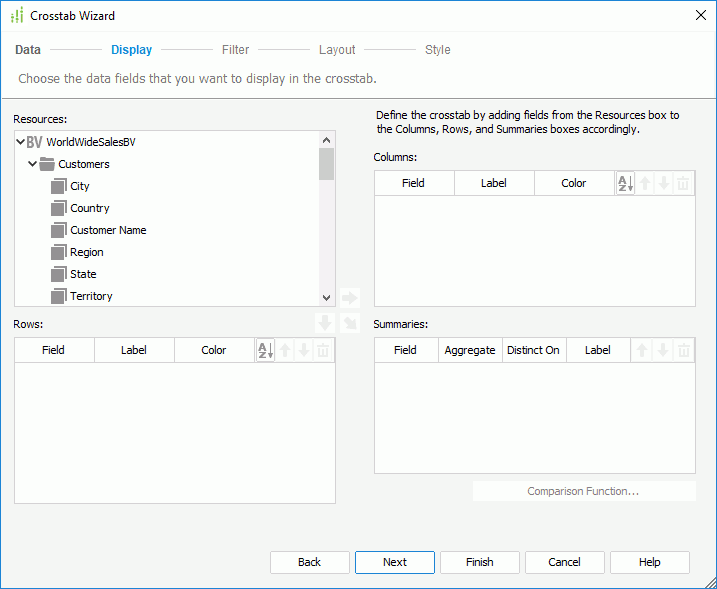
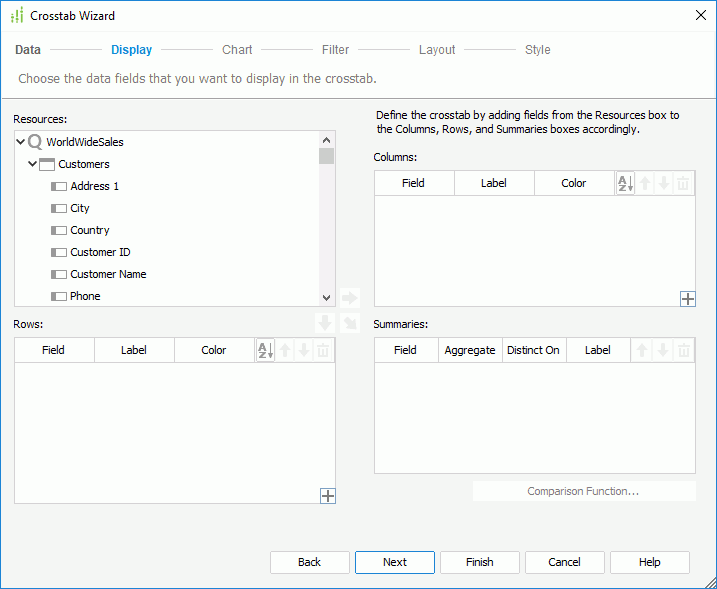
Display Screen
Use this screen to specify the column, row, and aggregate fields to display in the crosstab.
Title
Specify the title of the crosstab.
Resources
This box lists the resources in and related to the specified business view, which you can use to create the crosstab.
 Add Column button
Select to add the specified field in the Resources box to display on the column header of the crosstab.
 Add Row button
Select to add the specified field in the Resources box to display on the row header of the crosstab.
 Add Summary button
Select to add the specified field in the Resources box to create aggregations in the crosstab.
Columns/Rows
- Field
This column shows the fields that you add on the column/row headers of the crosstab. - Label
This column shows the labels for the column/row headers. By default, Designer does not add labels for the column/row headers. You can double-click the text boxes to edit the labels, or select the Auto Map Field Name checkboxes in the text boxes to automatically map the labels to the dynamic display names of the fields at runtime. - Color
This column shows the background colors that you select for the fields. Double-click in the text box and select the color from the drop-down list. -
 Sort button
Select a field and select the button to specify in which manner to sort the values of the field, ascending or descending.
Summaries
- Field
This column shows the fields that you add as aggregate fields to create aggregations in the crosstab. - Aggregate
This column shows the aggregate functions that you select for the fields to calculate data. - Distinct On
Designer enables this option and you should set it when you select DistinctSum as the aggregate function. Select the ellipsis to select the fields according to whose unique values to calculate DistinctSum in the Select Fields dialog box.
 - Label
This column shows the labels for the aggregations. By default, Designer does not add labels for the aggregations. You can double-click the text boxes to edit the labels, or select the Auto Map Field Name checkboxes in the text boxes to automatically map the labels to the dynamic display names of the fields at runtime. - Comparison Function
Select to open the Comparison Function dialog box to add a comparison function for the selected aggregate field.
 Move Up button
Select to move the specified field higher in the display order.
 Move Down button
Select to move the specified field lower in the display order.
 Remove button
Select to delete the specified field from the crosstab.
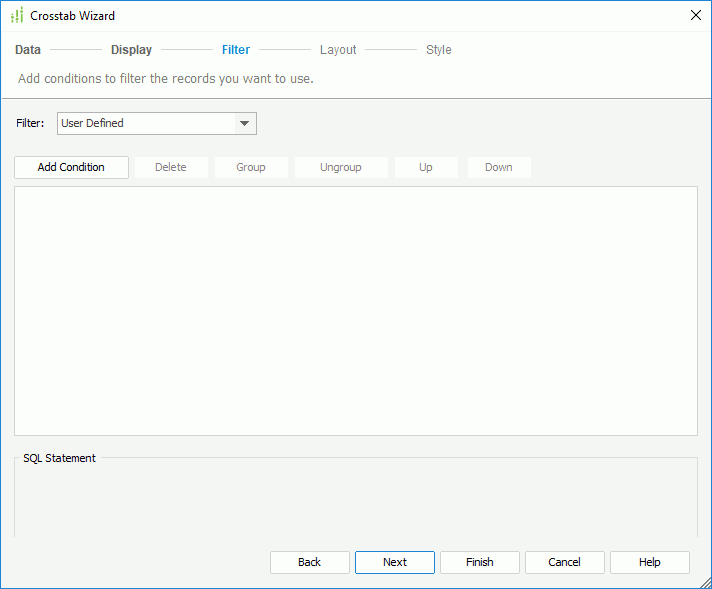
Filter Screen
Use this screen to narrow down the data to display in the crosstab.
Designer displays the same options in the Filter screen as in the Edit Filter dialog box.
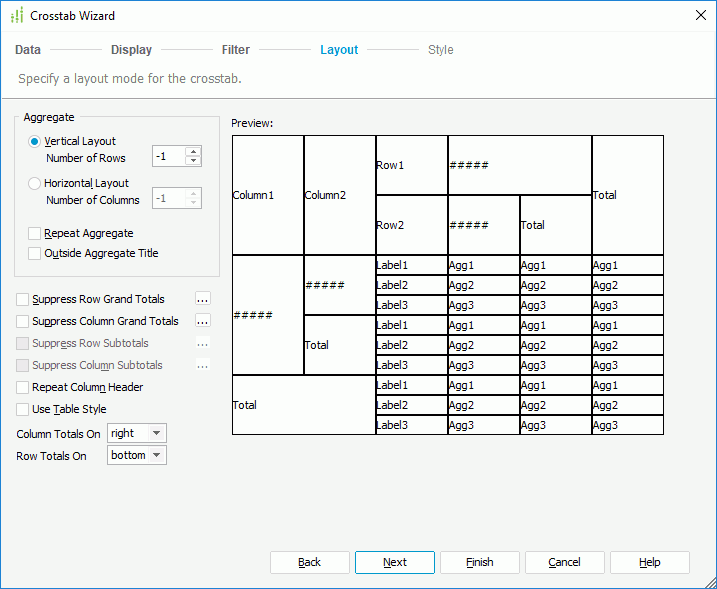
Layout Screen
Use this screen to specify the layout of the crosstab. For more information about the layout settings, see Customizing the Layout of a Crosstab.
Style Screen
Use this screen to specify the style of the crosstab.
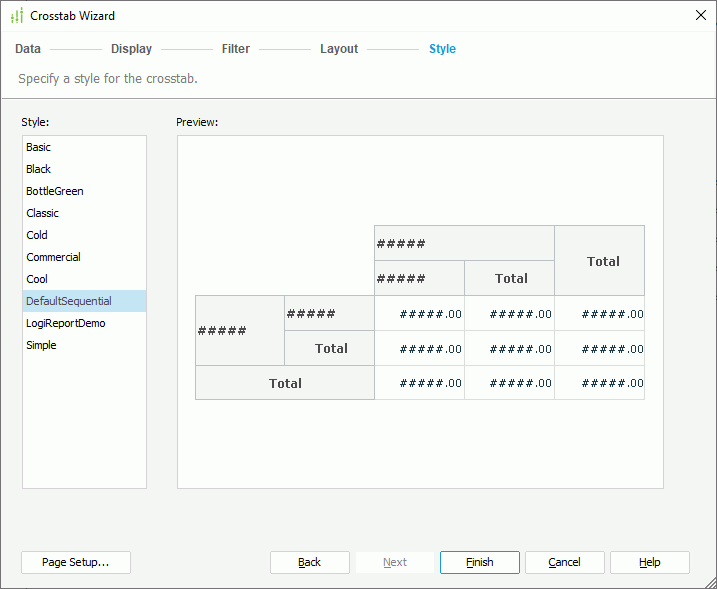
Style
This box lists the styles that you can apply to the crosstab. Select the style for the crosstab.
- <Custom>
This style contains no information. Designer uses it to support reports that was built with previous versions which did not bind any style, or when Designer cannot find the bound style in the style list.
Preview
This box displays a diagram illustrating the effect of the selected style on the crosstab.
Inherit Style
Designer displays the option only when you use the dialog box for editing a crosstab and the crosstab is inside a banded object. Select it if you want the crosstab to inherit the style of its parent.
Page Setup
Designer displays this button only when you use the dialog box for creating a chart in a page report tab. Select it to open the Page Setup dialog box to specify page properties for the report tab.
 Back to top
Crosstab Wizard Dialog Box - Query Based
When you use the Crossatab Wizard dialog box for creating or editing a crosstab using a query resource, you see the following screens in the dialog box (Designer displays some screens only when you use the dialog box for creating a crosstab):
You see these buttons in all the screens:
Back
Select to go back to the previous screen.
Next
Select to go to the next screen.
Finish
Select to finish your work and close the dialog box.
Cancel
Select to close the dialog box without saving any changes.
Help
Select to view information about the dialog box.
Data Screen
Use this screen to specify the dataset for the crosstab.

Data resource box
This box lists the predefined data resources in the current catalog. Select one and Designer automatically creates a dataset based on it for the crosstab.
More Options/Less Options
Select to show or hide the options for specifying a dataset for the crosstab.
- New Dataset
Select to create a dataset based on the current catalog data resources. If you select a query, Designer enables the Edit button at the bottom and you can select the button to edit the query in the Query Editor dialog box. - Existing Dataset
Select to use a dataset from the ones that you have created in the current page report. You can select Edit to edit the specified dataset in the Dataset Editor dialog box, or select <New Dataset...> to create a dataset in the page report using the New Dataset dialog box.
- Current Dataset
Designer enables this option only when you use the dialog box for editing a crosstab that is inside any of the following panels in a banded object: banded header panel, banded footer panel, group header panel, or group footer panel. Select it if you want the crosstab to inherit the dataset from its parent.
Display Screen
Use this screen to specify the column, row, and aggregate fields to display in the crosstab.
Resources
This box lists the resources in and related to the specified query resource, which you can use to create the crosstab.
Add Column button
Select to add the specified field in the Resources box to display on the column header of the crosstab.
Add Row button
Select to add the specified field in the Resources box to display on the row header of the crosstab.
Add Summary button
Select to add the specified field in the Resources box on which to create aggregations in the crosstab.
Columns/Rows
- Field
This column shows the fields that you add to display on the column/row headers of the crosstab. - Label
This column shows the labels for the column/row headers. By default, Designer does not add labels for the column/row headers. You can double-click the text boxes to edit the labels. - Color
This column shows the background colors that you select for the fields. Double-click in the text box and select the color from the drop-down list. -
Sort button
Select a field and select the button to specify in which manner to sort the values of the field, ascending or descending. -
 Add Compound Group button
Select to add a compound column/row group.
Summaries
- Field
This column shows the fields that you add as aggregate fields to create aggregations in the crosstab. - Aggregate
This column shows the aggregate functions that you select for the fields to calculate data. Double-click in the text box and select the function from the drop-down list. - Distinct On
Designer enables this option and you should set it when you select DistinctSum as the aggregate function. Select the ellipsis to select the fields according to whose unique values to calculate DistinctSum in the Select Fields dialog box. - Label
This column shows the labels for the aggregations. By default, Designer does not add labels for the aggregations. You can double-click the text boxes to edit the labels. - Comparison Function
Select to open the Comparison Function dialog box to add a comparison function for the selected aggregate field.
Move Up button
Select to move the specified field or compound group higher in the display order. For fields in a compound group, you can change their order within the current group only.
Move Down button
Select to move the specified field or compound group lower in the display order. For fields in a compound group, you can change their order within the current group only.
Remove button
Select to delete the specified field or compound group from the crosstab.
Chart Screen
Designer displays the Chart screen when you use the dialog box for creating a crosstab, and enables the options in the screen when you have added at least one field on the column or row header and one aggregate field in the crosstab. You can use the screen to create a chart together with the crosstab, which Designer places above the crosstab in the report body
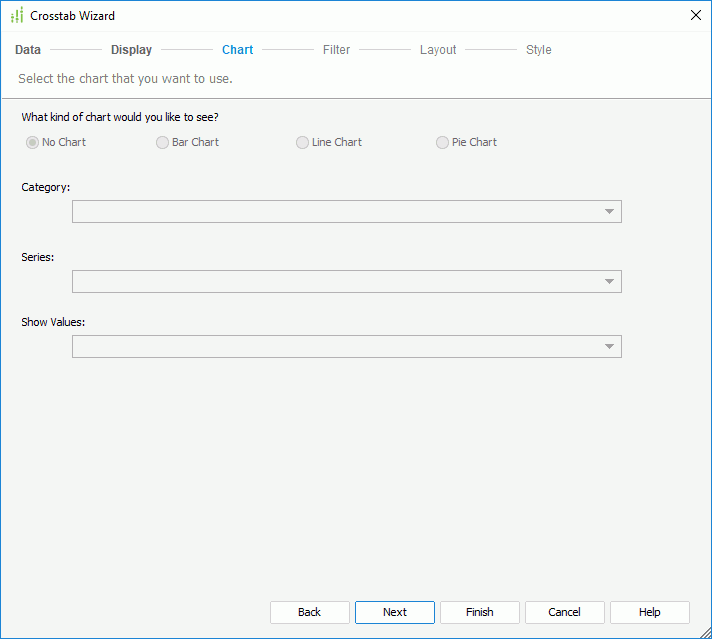
No Chart
Select if you do not want to create the chart.
Bar Chart
Select to create a Clustered Bar 2-D chart together with the crosstab.
Line Chart
Select to create a Line 2-D chart together with the crosstab.
Pie Chart
Select to create a Clustered Pie chart together with the crosstab.
Category
This drop-down list contains the fields that you add to the column and row headers of the crosstab. Select the field you want to display on the category (X) axis of the chart.
Series
This drop-down list contains the fields that you add to the column and row headers of the crosstab. Select the field you want to display on the series (Z) axis of the chart.
Show Values
This drop-down list contains the fields that you add as aggregate fields in the crosstab. Select the value you want to display in the chart.
Filter Screen
Use this screen to narrow down the data to display in the crosstab.
Designer displays the same options in the Filter screen as in the Edit Filter dialog box.

Layout Screen
Use this screen to specify the layout of the crosstab. For more information about the layout settings, see Customizing the Layout of a Crosstab.

Style Screen
Use this screen to specify the style of the crosstab.
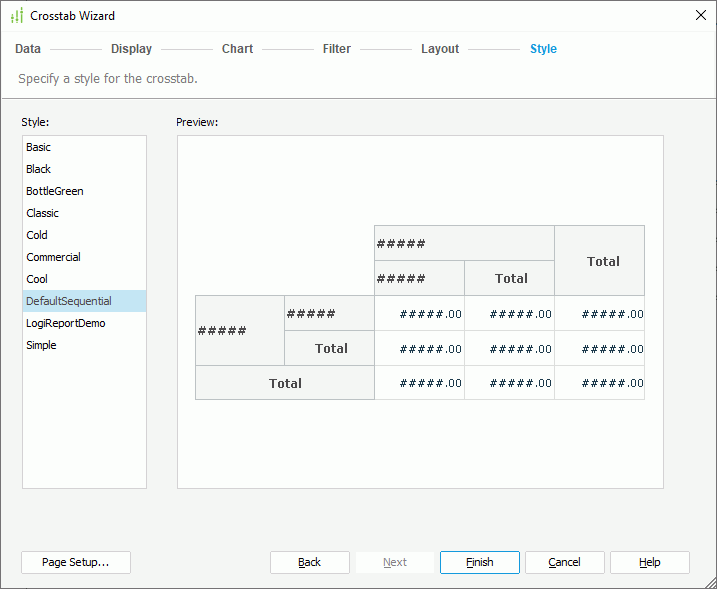
Style
This box lists the styles that you can apply to the crosstab. Select the style for the crosstab.
- <Custom>
This style contains no information. Designer uses it to support reports that was built with previous versions which did not bind any style, or when Designer cannot find the bound style in the style list.
Preview
This box displays a diagram illustrating the effect of the selected style on the crosstab.
Inherit Style
Designer displays the option only when you use the dialog box for editing a crosstab and the crosstab is inside a banded object. Select it if you want the crosstab to inherit the style of its parent.
Page Setup
Designer displays this button only when you use the dialog box for creating a crosstab in a page report tab. Select it to open the Page Setup dialog box to specify page properties for the report tab.