Editing Pre-joins in a Catalog
The queries you use for building reports may often contain a set of different data resources such as tables, views, synonyms, and imported SQLs. You have to define relationships and create joins among these data resources every time you create a query. To simplify the process, Designer provides you with the Pre-join feature, which enables you to predefine the relationships between the data resources in a catalog all at once and apply the joins when creating and editing queries with the data resources. You can also create distributed pre-joins between the data resources that are mashed up from different connections in a catalog. This topic describes how you can create pre-join relationships between different data resources in a catalog, define paths for the pre-joins, and save the pre-join information in a catalog.
This topic contains the following sections:
Creating Pre-joins
The Pre-join Editor is a convenient tool for you to predefine the relationships between data resources all at once in a catalog.
- Open the catalog for which you want to define pre-join relationships.
- In the Catalog Manager, select Pre-join on the toolbar.
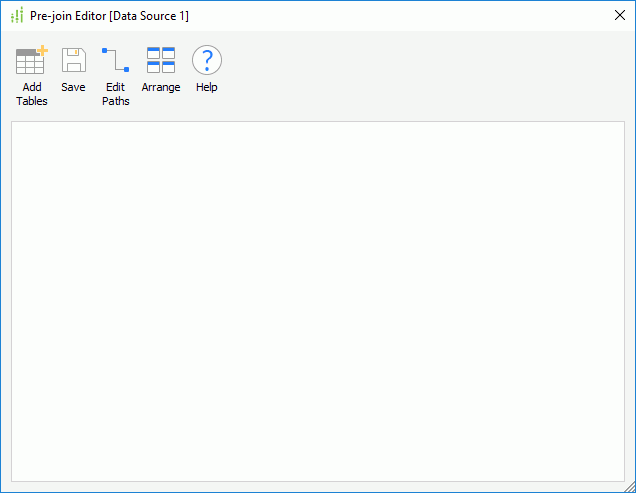
- In the Select Data Source dialog box, select the catalog data source for which you want to create the joins and select OK. Designer displays the Pre-join Editor dialog box.

- Select Add Tables on the toolbar, then in the Add Tables/Views/Queries dialog box, select the data resources such as tables, views, synonyms, queries, imported SQLs, imported APEs, stored procedures, and user-defined data sources in the specified catalog data source based on which to create the joins, and then select OK. Designer displays the added data resources as tables in the Pre-join Editor dialog box.
If the selected catalog data source contains XML connections, when you open the Pre-join Editor dialog box, Designer adds tables from the XML connections automatically to the editor, and when you have enabled the Generate the default pre-join path option for the XML connections, if the parent and children nodes are transformed to different tables in an XML connection, Designer embodies the joins by the parent-child relationship by default, which is maintained by primary key and foreign key in the tables.
- Select Arrange to organize the tables.
- Create joins between the tables by using mouse drag. You can make more than one join between two tables.
-
Point to one column in the source table, select and hold the mouse button, then move the pointer to the other column in the target table and release the mouse button. Designer then displays a green line with a join icon
 to link the two columns, which represents that you have created a join.
 - If you want to further edit the join, double-click its join icon
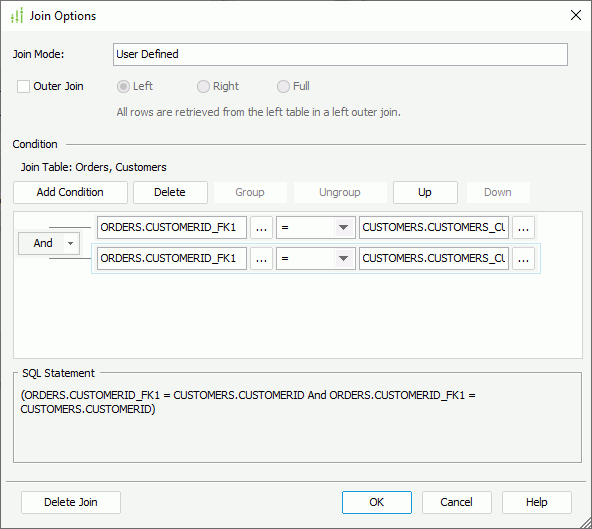
 . Designer displays the Join Options dialog box.

- To make the join an outer join, select Outer Join, then select either Left, Right, or Full if you would like all rows of the left table, right table, or both tables to be retrieved. Regardless of where you place the tables in the Pre-join Editor dialog box, left table is where the arrow starts and right table is where the arrow points.
- Edit the join condition in the Condition panel according to your requirements.
Select the ellipsis
 beside the two text boxes to select a column in the two tables involved in the join, or a parameter or constant level formula in the current catalog data source and select the operator to compose the condition. You can also manually type the column, parameter, or formula name in the text boxes (you should specify parameters and formulas in the format @FieldName or :FieldName). When you reference a parameter in a join condition, Designer ignores the Ignore Predicate If Parameter Value Is Null setting of the parameter. Using parameters in the join conditions can dynamically change query results at runtime. It works similarly as in query filters.
To add another condition line, select Add Condition and define the condition as required. Then from the logic drop-down list, specify the relationship between the two condition lines: "And", "Or", "And Not", or "Or Not". You can repeat this to add more condition lines.
To group some condition lines, select them and select Group, Designer then adds the selected condition lines in one group and applies them as one line of filter expression (you can also group conditions and groups together); to take out any condition or group from a group, select it and select Ungroup; to adjust the priority of the condition lines, select it and select Up or Down; to delete a condition line, select it and select Delete.
- Select OK to accept the changes and close the Join Options dialog box.
- Repeat steps 6 to 10 to create more joins.
- If you want to delete any join, double-click its join icon
 and then select Delete Join in the Join Options dialog box.
Outer Joins
With conventional joins, Designer eliminates records that do not satisfy the join condition from the result. An outer join preserves these records in the result and replaces the missing values with nulls. SQL syntax uses the left outer join if the records in the left side table are preserved and right outer join if the records on the right-side table are preserved. The left side is determined by where the arrow begins, and the right side is determined by the side the arrow points to. They are independent of the location of the table in editor.
For example, consider the following two tables where the join arrow points from the Customer.C# to the Order.C#:
Table 1:
| Order | O# | C# |
|---|---|---|
| 101 | 001 | |
| 102 | 002 | |
| 103 | 004 |
Table 2:
| Customer | C# | Name |
|---|---|---|
| 001 | GE | |
| 002 | IBM | |
| 003 | DELL |
The inner join of Customer.C# = Order.C# produces the following result:
| Join Result | O# | Customer.C# | Name |
|---|---|---|---|
| 101 | 001 | GE | |
| 102 | 002 | IBM |
The left outer join on Customer.C# = Order.C# produces the following result:
| Join Result | O# | Customer.C# | Name |
|---|---|---|---|
| 101 | 001 | GE | |
| 102 | 002 | IBM | |
| <null> | 003 | DELL |
The right outer join on Customer.C# = Order.C# produces the following result:
| Join Result | O# | Order.C# | Name |
|---|---|---|---|
| 101 | 001 | GE | |
| 102 | 002 | IBM | |
| 103 | 004 | <null> |
The full outer join on customer.C# = order.C# produces the following result:
| Join Result | O# | Order.C# | Customer.C# | Name |
|---|---|---|---|---|
| 101 | 001 | 001 | GE | |
| 102 | 002 | 002 | IBM | |
| <null> | <null> | 003 | DELL | |
| 103 | 004 | <null> | <null> |
![]()
- You cannot make outer joins for XML data sources.
- When the tables come from the same collection of a MongoDB database, you cannot edit the joins between them.
- Not all database systems support all forms of joins. For example, MySQL does not support Full Outer Join, so be sure to check your DBMS manuals.
Defining Pre-join Paths
After you have created joins between the tables for a catalog data source in the Pre-join Editor, you can then use them to define paths.
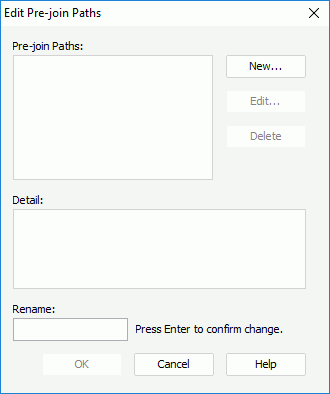
- Select Edit Paths on the toolbar of the Pre-join Editor dialog box. Designer displays the Edit Pre-join Paths dialog box.

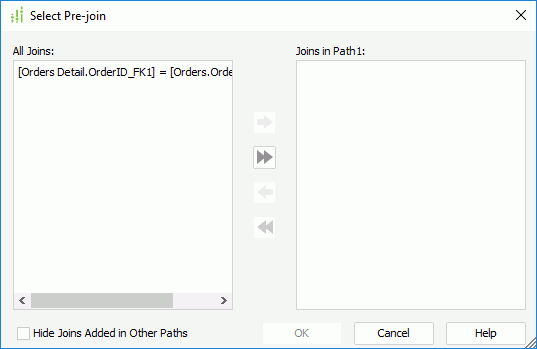
- Select New and type a name for the new path in the Enter Path Name dialog box (by default, the name is Path1, Path2, and so on), and then select OK. Designer displays the Select Pre-join dialog box.

- Designer displays all the joins you have created for the catalog data source in the All Joins box. Choose the joins you want and select Add
 to add them to the right box.
 - Select OK to add these joins in the path and go back to the Edit Pre-join Paths dialog box. Designer displays the joins included in the path in the Detail box.
- Select New and follow the above steps to create a new path. You can select Hide Joins Added in Other Paths to exclude the joins that you have already used for other paths from the All Joins box.
- For any path that you create, you can further edit, delete, or rename it.
To do this, first select the path in the Pre-join Paths box, then:
- To edit or delete the path, select Edit or Delete.
- To rename the path, in the Rename box, type the new name and select Enter on the keyboard to confirm.
- Upon finishing specifying the paths, select OK in the Edit Pre-join Paths dialog box to confirm the settings.
You must define at least one path for the joins you create. If you do not define a path, when you select Save on the toolbar of the Pre-join Editor dialog box:
- If there are no join loops among the joins, Designer creates a default path named "Path1", which includes all the joins you have created. Designer then displays a message box to ask whether you accept the default path (select Yes), or you can modify the default path (select No).
- If there are join loops among the joins, Designer displays the Edit Pre-join Paths dialog box for you to define at least one path.
![]()
- The joins in one path should never form a loop (any table in this path has direct or indirect joins with all the other tables). If you specify a path which forms a loop, Designer prompts you to reselect the joins.
- You cannot define a path which has all the same joins as with the existing paths. If you specify a path that is the same as an existing path, Designer prompts you to reselect the joins.
Saving Pre-join Relationships Together with a Catalog
To save the pre-join relationships you have defined between different data resources in a catalog, select Save on the toolbar of the Pre-join Editor dialog box. However, you do not really save the pre-join information to disk until you save the catalog. After you save the catalog, you can then use the pre-joins to develop reports.
The pre-join information is one type of resource that is not stored in the catalog. Designer saves it in a standalone file with the extension .pre, which shares the same prefix as the catalog file. It is not used at report runtime. In Designer, when you open a catalog, the pre-join file is opened at the same time. When you save the catalog, the pre-join file is also saved. Once you create a .pre in a folder, you can copy the .pre file to any other folders that use the same catalog.
 Previous Topic
 Back to top