Using Web Controls in Web Report
Web controls are report components designed to be similar to the kinds of controls on web pages. This topic describes how you can apply the four types of web controls in Web Report Studio: parameter control, parameter form control, filter control, and navigation control.
This topic contains the following sections:
- Using Parameter Control to Specify a Parameter to a Report
- Using Parameter Form Control to Run Reports
- Using Filter Control to Filter Report Data
- Using Navigation Control to Undo/Redo Value Selection in Filter Controls
Using Parameter Control to Specify a Parameter to a Report
A parameter control is a web control that you can bind with a parameter used by the current report. By specifying values to the parameter in a parameter control, you can pass the parameter values to Web Report Studio and run the report with the specified values.
You cannot use cascading parameters in parameter controls. If you want to do this, use parameter form controls instead.
To insert a parameter control and use it to specify a parameter to a web report:
- Drag Parameter Control from the Components panel to the destination in the report. Server displays the Insert Parameter Control dialog box.
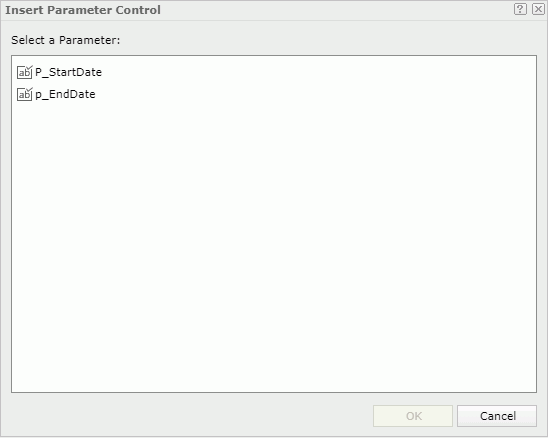
- Select the parameter you would like to add to the parameter control.
- Select OK to insert the parameter control.
- Switch Web Report Studio to View Mode to specify the value for the parameter. Once the value in the parameter control changes, the report re-runs with the new parameter value.
![]() If the report no longer uses the specified parameter, the parameter control becomes invalid.
If the report no longer uses the specified parameter, the parameter control becomes invalid.
Using Parameter Form Control to Run Reports
A parameter form control is a web control that you can bind with the parameters used by the current report or other reports. By specifying values to the parameters in a parameter form control, you can make the reports run with the specified parameter values.
To insert a parameter form control and use it to run web reports:
- Drag Parameter Form Control from the Components panel to the destination in the report. Server displays the Insert Parameter Form Control dialog box.
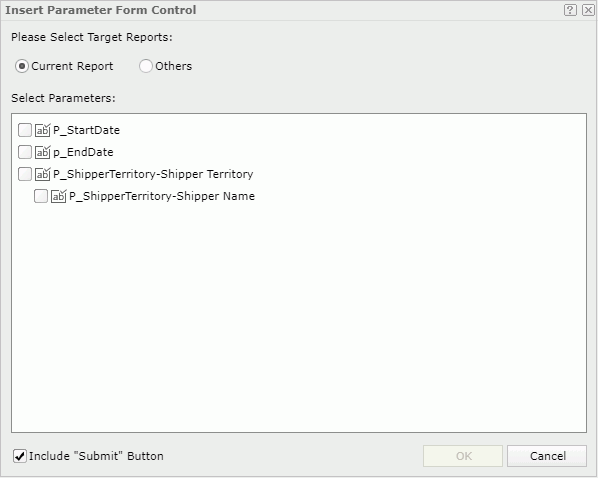
- Specify the target reports to run using the parameter form control.
- To run the current report, select Current Report, then specify the parameters to run the report from the Select Parameters box.
- To run other reports, select Others, then select the reports you want to run. If all the selected reports contain no parameters, you cannot finish the dialog box.
- Select Include "Submit" Button if you want to include the Submit button in the parameter form control. You can use the Submit button to submit the parameter values you specified in the parameter form control. If you do not select Include "Submit" Button, once you change the values of a parameter in the parameter form control, the new values apply automatically.
- Select OK. Server inserts the parameter form control in the report, listing the selected parameters for the current report or all parameters used by the specified reports.
- Switch Web Report Studio to View Mode.
- Specify values of the listed parameters in the parameter form control. Select the Submit button to run the current report or the specified reports if the button is available. If there is no Submit button, the change of values in the parameter form control triggers report re-running.
![]() If you save or publish a report containing a parameter form control to another directory, Server does not save or publish the reports that you bind the parameter form control with, along with the report.
If you save or publish a report containing a parameter form control to another directory, Server does not save or publish the reports that you bind the parameter form control with, along with the report.
Using Filter Control to Filter Report Data
You can use a filter control to filter one or more data components (tables, charts, crosstabs, banded object, and KPIs) in a web report. For how a filter control works, see Filtering Scenarios and Filter Logic.
In web reports you can use two types of filter controls:
- Text List enables you to pick one or more random values from a list and is used with categorical or nominal variables. You can choose one or more values from anywhere in the list and there is no mean or median value calculation.
- Drop-down List functions basically the same as Text List. It differs from the Text List type by listing values by means of a drop-down list so that it takes less space in a report. In a drop-down list filter control, Logi Report provides checkboxes ahead of the values for easy selection of multiple values.
The filters you created via filter controls are referred to as on-screen filters, the values of which you can save as the default ones.
To insert a filter control and use it to filter data in a web report:
- Drag Filter Control from the Components panel to the destination in the report. Server displays the Insert Filter Control dialog box.
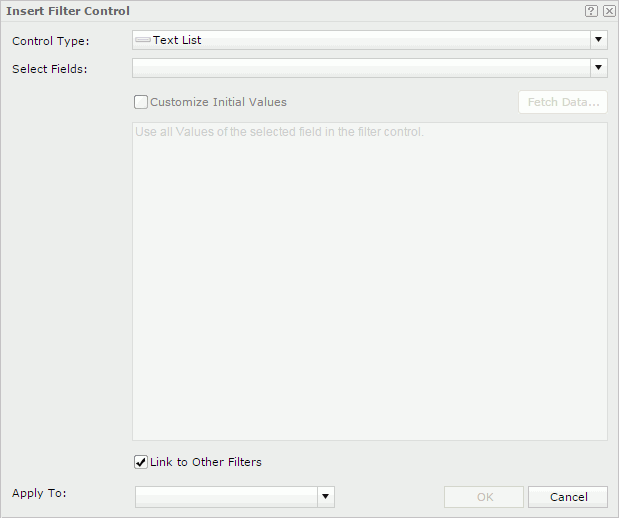
- Select a type from the Control Type drop-down list: Text List or Drop-down List.
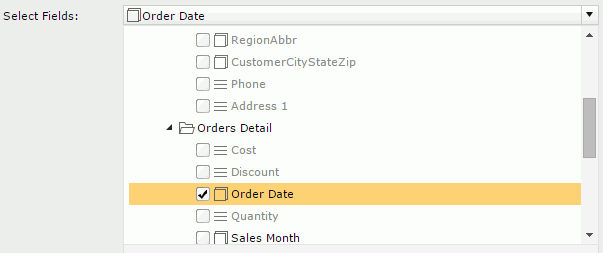
- The Select Fields drop-down list lists all the group and detail objects in the business views used by the current report. Select the objects of the same data type to bind to the filter control, and then select outside of the drop-down list to close it. For Text List, Server displays the name of the first object you selected in the list as the name of the filter control.
- By default, a text list filter control displays all values of the selected objects, and a drop-down list displays 300 values at most. If you want to customize the value list, select Customize Initial Values and then select Fetch Data to select the desired values in the Fetch Data dialog box. You can also type the values manually in the value text box.

Type a value, and then press Enter to start a new row. General text editing operations such as Copy, Paste, Cut, Backspace, and Delete are supported. You need to make sure of the accuracy of the formats and values. If the selected objects are of the Date/Time type, you can also select the Calendar icon
 to specify a date and time value from the calendar.
 - By default, Server links all the on-screen filters that apply to the same data component in a web report. If you do not want other on-screen filters to affect the filter control, clear Link to Other Filters.
- From the Apply To drop-down list, select the data components in the report to apply the filter to.
By default, Web Report Studio applies the filter to all the data components created using the business views in which the selected objects are obtained. If you do not select the data components which are based on the same business view as any selected objects, Server neither uses these objects in the filter nor lists their values in the filter control.
- Select OK to insert the filter control. If the objects bound to the filter control have the same values, the values are distinctive in the filter control.
- Switch Web Report Studio to View Mode.
- Select the values with which you want to filter the report data. A filter condition based on the selected values then applies to the specified data components in the report.
For Text List, you can make use of the Ctrl or Shift key to select multiple values. If the values themselves have inter-relationship, after you make the selection, Web Report Studio deals with the rest values to put the related ones on the top and gray the ones that have no relationship with the selected values. The grayed values are still selectable.
For Drop-down List, select the arrow button on the right to open the drop-down list, select or clear the values, and then select OK to apply the selected values. You can use <All> to select or clear all the values.
After inserting filter controls in the report, you can also insert a navigation control for undoing/redoing the value selection in the filter controls. For more information, see Using Navigation Control to Undo/Redo Value Selection in Filter Controls.
Managing a Filter Control
When you right-click on a filter control, these options are available for managing the filter control.
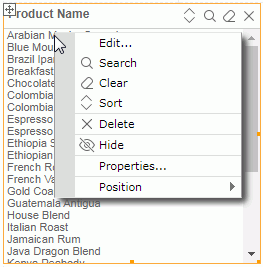
- Edit
Select to open the Edit Filter Control dialog box to edit the filter control settings. - Search
Select to display the search bar right above the value list to search for values in the filter control. You can also select the Search button on the title bar of the filter control to launch the search bar. For more information, see Select Values dialog box.
 - Clear
Select to cancel the selection of values in the filter control. You can also use the Clear button on the title bar to cancel the selection. You can undo or redo this operation.
 - Sort
Select to sort the values in the filter control in the ascending or descending order. You can also use the Sort button on the title bar to sort the values.
 - Delete
Select to remove the filter control from the report and Server removes the filter you created with the filter control from the report too. You can also use the button X on the title bar to delete the filter control. - Hide
Select to hide the filter control. - Properties
Select to open the Filter Control Properties dialog box for updating the properties of the filter control. The dialog box provides an entry to editing the filter control. To do this, in the General tab, select the ellipsis button beside the Filter On text box. Server displays the Edit Filter Control dialog box. Change the settings in the same way as you take for inserting the filter control.
 - Position
Select the position of the filter control.
![]()
- When there are more than 300 values in a filter control, Server uses Big Data Loading logic. In this case, the Shift Key for multiple selection does not work.
- If you deleted all the data components in a web report that use a business view, Server removes the fields in the business view that you have added in the filter controls in the report from the filter controls too.
- Sometimes, when you change the position of a filter control due to layout change, the advanced search bar in the filter control might not follow the filter control but stay where it is.
Using Navigation Control to Undo/Redo Value Selection in Filter Controls
You can consider a navigation control as an accessory control for filter controls and use it to deal with the value selection operations in all the filter controls in the same report.
To insert a navigation control into a report, drag Navigation Control from the Components panel to the destination in the report.
A navigation control is a combination of three buttons:
- Back
Select to go back to the previous value selection status and refresh the report data accordingly. - Clear
Select to remove all the value selection histories and all the filter conditions based on the selections, and refresh the report data accordingly. - Forward
Select to go forward to the next value selection status and refresh the report data accordingly.
 Previous Topic
 Back to top