Managing Groups
Managing groups includes many functions and they are available to administrators only. This topic describes how you can create groups, add members to groups, customize the scheduling recipients for groups, and perform other group functions.
To manage groups, first select the realm in which the groups are, then on the system toolbar of the Server Console, navigate to Administration > Security > Group to display the Group page.

This topic contains the following sections:
- Creating a New Group
- Searching for Groups
- Editing a Group
- Editing the Members of a Group
- Editing the Scheduling Recipients for a Group
- Deleting a Group
Creating a New Group
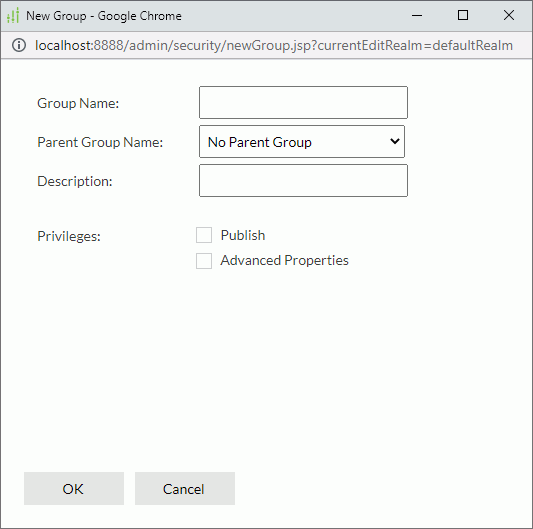
- Select New Group on the task bar. Server displays the New Group dialog box.

- In the Group Name text box, type the name of the group.
- From the Parent Group Name drop-down list, you can select a parent group for the new group.
- Type the description of the group to briefly describe it.
- Select Publish and Advanced Properties to give the group the privileges of publishing resources to Logi Report Server and of viewing advanced resource properties information.
- Select OK to create the group. The new group is now added in the group table.
Searching for Groups
In the Search box, type the text of the group names you want to search for and the groups containing the matched text will be listed. After typing text in the Search box, you can select the arrow  that appears in the box to specify the following search options: Highlight All, Match Case, and Match Whole Word. To cancel the search operation, clear the text or select
  .
.
Editing a Group
In the group table, select the name of the group. In the Edit Group dialog box, add or remove the Publish and Advanced Properties privileges for the group and select OK.
Editing the Members of a Group
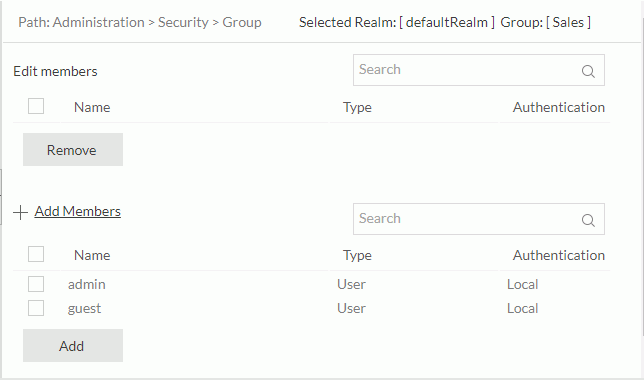
You can edit members of a group, such as adding a new member, or removing a member from the group. To do this, in the group table, select members of the group. The member list of the group is then displayed.

The following shows the options in the member list:
| Option | Description |
|---|---|
| Search box | Searches for the required members. |
| Name | Shows the name of the members. |
| Type | Shows the type of the members: User, Group, or Role. |
| Authentication | Shows the members' authentication type: Local or LDAP. |
| Remove | Select to remove the selected members from the group. |
| Add Members | Select to display the members that can be added to the group. |
| Add | Select to add the selected members to the group. |
You can edit the members of the group:
- To add a member to the group, select Add Members, select the new member, and then select Add.
- To remove a member from the group, select the member and then select Remove.
![]()
- A group can have more than one child member and parent member.
- You cannot add a parent member to the current group as its child member.
Editing the Scheduling Recipients for a Group
Logi Report Server adopts permission control on the scheduling recipients each user can access. You can customize the scheduling recipients for a group so that when the users belonging to the group schedule report tasks to publish the report results to email, they are able to select the recipients allowed for the group to use the recipients' addresses to send the email.
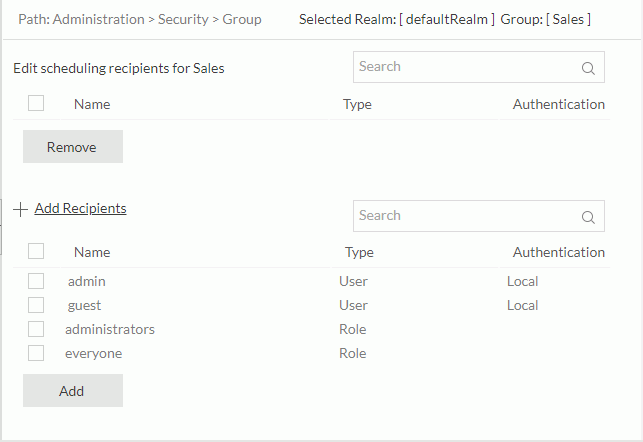
- In the group table, select recipients of the group. Server displays the recipient list for the group.

- Select Add Recipients. Server displays the recipients that you can choose.
- Select the recipients that you would like to be accessible to the users in the group.
- Select Add. Server displays a confirmation message. After you confirm, server moves the recipients you just selected to the recipient list.
To remove a recipient from the group, select it in the recipient list and then select Remove.
Deleting a Group
If you find a group is no longer required, you can delete it by selecting the corresponding Delete link in the Control column of the group table. However, groups that are not empty, having child members or parent members, cannot be deleted.
 Previous Topic
 Back to top