 Previous Topic
Adding User-Defined Data Sources to a Catalog
This topic describes the procedure to add user-defined data sources (UDS) into a catalog, and provides examples about adding UDSs of different types.
This topic contains the following sections:
- Adding a UDS to a Catalog
- Example 1: Adding a Flat File UDS
- Example 2: Adding an SQL Data Source UDS
- Example 3: Adding a Java Object Data Source UDS
- Example 4: Adding a Dynamic UDS
Adding a UDS to a Catalog
The general steps to add a UDS to a catalog are:
- Create a catalog or open a catalog, then in the Catalog Manager, right-click the node of a data source and choose New User Defined Data Source from the shortcut menu.
If you want to add the UDS to a new data source in the catalog, select any of the existing catalog data source, select New Data Source on the Catalog Manager toolbar, then in the New Data source dialog box, specify the name of the data source, select the User Defined connection type and select OK.
Designer displays the New User Defined Data Source dialog box.
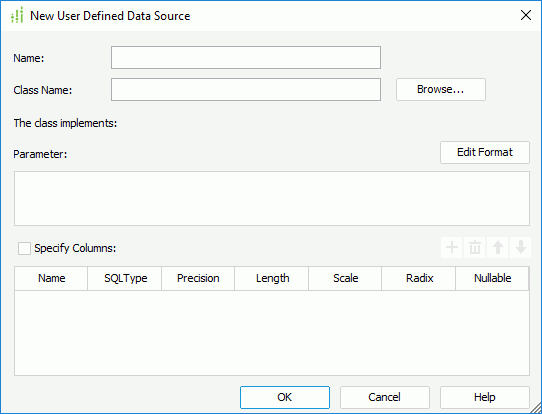
- In the Name text box, specify a name for the UDS.
- In the Class Name text box, provide the class name with package name. You can also select Browse to find the class file. The class you specify must exist and can be found by Designer, which means the class should be in the class path of the system environment or set in ADDCLASSPATH of setenv.bat/setenv.sh. After you fill in this text box, Designer automatically displays the class name of the interface that the class implements behind "The class implements:".
- In the Parameter box, specify the parameter for the UDS. The parameter string must match the format defined in the UDS class.
You can reference parameters and constant level formulas predefined in the current catalog data source in the format @FieldName, and the special field "User Name" as @username in the parameter string. For example, if the parameter string of a UDS is
SQL=select * from employee, and you want to use the predefined parameter p_sql to replace the part after "=", then the parameter string is SQL=@p_sql. - When you reference parameters and formulas in the parameter string, you can select Edit Format to edit the format of their values.
- Select Specify Columns to enable the column definitions list and add column definitions. If you don't specify the column definitions, Designer gets them from the result set automatically.
- Name
The name of a column. It should have the same validation with a common table column. The default names for column definitions are ‘column1', ‘column2', and so on. - SQLType
The data type of the column. - Precision, Length, Scale, Radix
The default value for each SQL type. You can select the cell and modify the value. - Nullable
Indicates whether the value of the column can be null. "X" stands for NoNulls, "√" stands for Nullable, and "?" stands for Nullable Unknown.
- Name
- Select OK to add the UDS.
 If you reference parameters in the parameter string, Designer runs the UDS with the default parameters and use the returned data to determine the data type of the columns. If you use formulas in the parameter string, you need to put temporary values in the formulas since Designer does not prompt you to provide values for the parameter string when you add the UDS.
 Back to top
Example 1: Adding a Flat File UDS
This example uses three classes and their source code are AddressListUDS.java, AddressListResultSet.java, and AddressListResultSetMetaData.java. The data file is AddressesList.txt. You can get all these files in <install_root>\help\samples\APIUDS\txtUDS.
AddressesList.txt is a plain text file which contains data information in a table:
Laurena Croft 34826 Atwood St. New York City NY 10004 USA...
Jonathan Hopkins 5062 Brandon Green Ave. Minneapolis MN 55402 USA...
Jeremy Miner 9283 Cherry Leaf Lane Palo Alto CA 94303 USA...
....
You can notice that each line sequentially records the name, address, state, region, zip code, country, email address, and other information.
If you use your own UDS classes, you must be sure that the directory is classpath/package name so that Server can find the class files at runtime. For this demo's UDS classes, they belong to a package named "help". Copy the above necessary files to <install_root>\help, and add the additional entry to the ADDCLASSPATH variable of the batch file setenv.bat in <install_root>\bin.
Task 1: Compile and run the Address UDS
For example, on Windows, if you have installed Designer into the default directory C:\LogiReport\Designer,
- Copy the above necessary files to
C:\LogiReport\Designer\help. - Compile the Java files.
javac -classpath "C:\LogiReport\Designer\lib\JREngine.jar" Address*.java - Add the additional entry into the ADDCLASSPATH variable of setenv.bat in
C:\LogiReport\Designer\bin.set ADDCLASSPATH=%JAVAHOME%\lib\tools.jar;C:\LogiReport\Designer\help;
Task 2: Add the Address UDS to a catalog
After compilation, you can now add the UDS to a catalog.
- Start Designer.
- Open an existing catalog.
- In the Catalog Manager resource tree, right-click the data source to which you want to add the UDS, then select New User Defined Data Source from the shortcut menu.
- In the New User Defined Data Source dialog box, specify the following information:
- Name: The name you want to use for identifying the UDS in Designer. Here we use Address.
- Class Name: The class name of the UDS. You can type one in or select Browse to select a class file. Here we use help.AddressListUDS.
- Parameter: AddressesList.txt
- Select OK to add the UDS.
Example 2: Adding an SQL Data Source UDS
This is a fairly complex example, which executes an SQL statement and returns a result set through the JDBC API.
See the following Java code for class definition of the example:
import jet.datasource.*;

public class SQLDataSource implements JRUserDataSource {
    // Define data.
    public ResultSet getResultSet(String param)
            throws JRUserDataSourceException {
        // Method body.
    }
    /**
    * Free the resources such as: Connection, Statement, ResultSet.
    */
    public void releaseResultSet() throws JRUserDataSourceException {
        // Method body.
    }
}
The following explains the above code.
- The format of the String variable parameter is DRIVER=driver&URL=url&USER=user&PSWD=password&SQL=sql.
For example, we use HSQL DB as the data source, and
C:\LogiReport\Designer\Demo\db\JRDemoas the HSQL DB path; "sa" as the user's name, "" as the password, andSelect * from authorsas the SQL string. The parameter string may be similar to:DRIVER="org.hsqldb.jdbcDriver"&URL="jdbc:hsqldb:C:\\LogiReport\\Designer\\Demo\\db\\JRDemo"&USER=sa&PSWD=&SQL=select * from employeeIf you want to use predefined parameters in the catalog, you can type the parameter string as:
DRIVER="org.hsqldb.jdbcDriver"&URL="jdbc:hsqldb:C:\\LogiReport\\Designer\\Demo\\db\\JRDemo"&USER=@un&PSWD=&SQL=@sqlWhere, "@sql" is a parameter predefined in the catalog, and its default value is "select * from employee".
Every time when running, java.sql.Resultset must return the same metadata (UDS fields), including the number and order of fields, and the field properties such as column name, SQL type, precision, scale, nullable, currency, and array. - The method getResultSet() parses the parameter string, builds a connection to the URL, and then executes the SQL statement.
- The method releaseResultSet() releases the resource such as Connection, Statement, and ResultSet.
Task 1: Compile and run SQLDataSource
This example uses one class and its source code is SQLDataSource.java, which is available in <install_root>\help\samples\APIUDS\sqlUDS. In this example, SQLDataSource returns the result set from the demo HSQL DB. You should set up the HSQL DB path in the URL string and point it to the demo database at <install_root>\Demo\db\JRDemo.
Copy SQLDataSource.java to <install_root>\help, and compile it to generate SQLDataSource.class. Append the path <install_root>\help to the ADDCLASSPATH variable of the batch file setenv.bat in <install_root>\bin, so that SQLDataSource can be found at runtime.
Task 2: Add the SQLDataSource UDS to a catalog
After compilation, you can now add the UDS to a catalog.
- Start Designer.
- Open an existing catalog.
- In the Catalog Manager resource tree, right-click the data source to which you want to add the UDS, then select New User Defined Data Source from the shortcut menu.
- In the New User Defined Data Source dialog box, specify the required information.
If you select Specify Columns, Designer enables the column definitions list and you can add column definitions. If you don't specify column definitions, Designer obtains them from the result set automatically. Here, we do not specify column definitions, instead, we use the default ones from ResultSet and ResultSetMetaData.
Type employees in the Name text box and SQLDataSource in the Class Name text box. In the Parameter box, type:
DRIVER="org.hsqldb.jdbcDriver"&URL="jdbc:hsqldb:C:\\LogiReport\\Designer\\Demo\\db\\JRDemo"&USER=sa&PSWD=&SQL=select * from employeeMake sure that the five bold parts in the above line are capitalized.
- Select OK to add the UDS.
Example 3: Adding a Java Object Data Source UDS
The Designer UDS can use any Java object as a data source to create reports. To implement this function, Designer provides the class, UDSForJavaBean, in which the method getResultSet() creates instances for the interface JavaBeanDataProvider, and then uses the method init() to initialize the data of the created instances.
See the following Java code for class definition of the example:
public class UDSForJavaBean implements JRUserDataSource
{
    // Define data.
    public ResultSet getResultSet(String param)
            throws JRUserDataSourceException
    {
        	// Method body.
    }

    /**
    * Free the resources such as : Connection, Statement, ResultSet.
     */
    public void releaseResultSet() throws JRUserDataSourceException
    {
            // Method body.
    }
}
The interface JavaBeanDataProvider is defined as follows:
public interface JavaBeanDataProvider
{
    public void init(String dataID, Properties initprops)
         throws JavaBeanDataProviderException;
    public Class getMetadataJavaBean()
        throws ClassNotFoundException;
    public Object next() throws JavaBeanDataProviderException;
    public boolean requireDetails(String collectionPropName);
    public int getMaxShareTimes(String collectionPropName);
    public int getTimeoutForSubCollection(String collectionPropName);
    public void exit()throws JavaBeanDataProviderException;
}
For examples about how to use the Java object data interface, Designer provides you with two demos which are available in <install_root>\help\samples\APIUDS\javaUDS.
Before running the demos, you need to do the following:
- Copy all the content in
<install_root>\help\samples\APIUDS\javaUDSto<install_root>\help\UDSForJavaBean. You need to create the UDSForJavaBean directory. - Compile all the java files.
javac -classpath <install_root>\help\UDSForJavaBean;<install_root>\lib\JREngine.jar;<install_root>\lib\log4j-core-2.13.3.jar;<install_root>\lib\log4j-api-2.13.3.jar; <install_root>\help\UDSForJavaBean\jreport\uds\javabean\*.java - Copy data.txt in
<install_root>\help\UDSForJavaBeanto<install_root>\bin. - Add the path
<install_root>\help\UDSForJavaBeanin the ADDCLASSPATH variable in setenv.bat in the<install_root>\bindirectory.
Demo 1: Using a Simple Java Object UDS
In this demo, we use a Java object named "Person" as the data source. You can find the file person.java in <install_root>\help\UDSForJavaBean\jreport\uds\javabean\beans.
public class Person implements Serializable
    {
    private String gender;
    private String ssn;
    private String emailAddress;
    private Date birthDate;
    private Long newbornWeight;
    private YesNo isDataVerified;
    private Name name;
    private Address currentMailingAddress;
    private Phone currentWorkPhone;n;
/**
* @return the birthDate.
*/
public Date getBirthDate()
    {
    return birthDate;
    }
}
Similar to the code above, other attributes of the Person object are defined by other Java objects, such as currentMailingAddress which is defined by the Address class.
To create a report from the Person Java object:
- Make the necessary preparations.
- In Designer, open an existing catalog, then in the Catalog Manager, expand the data source to which you want to add the UDS.
- This demo uses generated data, in order to get the real collection of the data objects, create two parameters before importing the Person Java object.
- Name: pUseFakeData (Specify whether to use generated data when running the report.)
Value Type: Boolean
Prompt Value: True - Name: pNumOfFakeData (Specify the number of records to generate what will be shown when running the report.)
Value Type: Integer
Prompt Value: Any integer number
For more information about creating parameters, see Creating a Parameter.
- Name: pUseFakeData (Specify whether to use generated data when running the report.)
- Right-click the data source node, and select New User Defined Data Source from the shortcut menu.
- In the New User Defined Data Source dialog box, type Person in the Name text box.
- For the Class Name text box, select Browse, go to
<install_root>\help\UDSForJavaBean\jreport\uds\javabean, and then choose UDSForJavaBean.class, which imports the class jreport.uds.javabean.beans.Person with full class name. - In the Parameter box, type in the following string:
JavaBeanDS_DataProvider=jreport.uds.javabean.GenericBeanDataProvider&JavaBeanDS_RuntimeDataID=persions&GBeanProvider_BeanClsName=jreport.uds.javabean.beans.Person&GBeanProvider_UseFakeData=true&GBeanProvider_NumOfFakeData=@pNumOfFakeData&GBeanProvider_RptDataInitializer=jreport.uds.javabean.SubRptCollectionDataInitializerAll the highlighted names in the parameter string above are the key words for the information required by this UDS and related Java class. See the detailed explanation below:
- JavaBeanDS_DataProvider is used to specify the Java class which implements jreport.uds.javabean.JavaBeanDataProvider interface, and returns the list of required data objects at runtime. In this demo, it is a list of the Person objects.
- JavaBeanDS_RuntimeDataID is a reserved value used as a key to get data objects from DataCenter.
- GBeanProvider_* are required values for the special data provider, jreport.uds.javabean.GenericBeanDataProvider, which is specified by JavaBeanDS_DataProvider.
You can use this provider (jreport.uds.javabean.GenericBeanDataProvider) or create your own provider by implementing the interface jreport.uds.javabean.JavaBeanDataProvider.
- Select OK to add the UDS.
- Create a page report with a standard banded object in it which is based on this UDS.
- Select the View tab to preview the report. In the Enter Parameter Values dialog box, type 3 as the value of the parameter pNumOfFakeData, and select OK. Three records are returned. However, the data you get now is the generated data, because in the parameter string of the UDS, you have specified the value of the key word GBeanProvider_UseFakeData to "true".
- In order to get the real collection of data objects, you can use the parameter pUseFakeData to control the value of the key GBeanProvider_UseFakeData value dynamically.
In the Catalog Manager, right-click the UDS Person and select Edit User Defined Data Source on the shortcut menu. In the Edit User Defined Data Source dialog box, modify the value of GBeanProvider_UseFakeData to @pUseFakeData in the Parameter box.
- Preview the report again and specify the value of pUseFakeData as false to get the real collection of data at runtime.
Designer applies the key word "GBeanProvider_RptDataInitializer" in the data provider jreport.uds.javabean.GenericBeanDataProvider to specify the Java class name which implements jreport.uds.javabean.RptDataInitializer interface. Therefore, if you use the data provider jreport.uds.javabean.GenericBeanDataProvider, you just need to provide a class which implements jreport.uds.javabean.RptDataInitializer to return a collection, list, or array of the data objects according to different reports and parameters. Also, jreport.uds.javabean.GenericBeanDataProvider can recognize vector, collection, and array of objects and retrieve the objects inside of the collection one by one.
Methods in the demo
- jreport.uds.javabean.GenericBeanDataProvider
jreport.uds.javabean.GenericBeanDataProvider implements the interface of jreport.uds.javabean.JavaBeanDataProvider by using the following methods:public void init(String dataID, Properties initprops) throws JavaBeanDataProviderException;
public Class getMetadataJavaBean() throws ClassNotFoundException;
public Object next() throws JavaBeanDataProviderException;
public boolean requireDetails(String collectionPropName);
public int getMaxShareTimes(String collectionPropName);
public void exit()throws JavaBeanDataProviderException;- init()
UDSForJavaBean calls this method to ask the data provider to prepare the data collection/list by the given initProperties. Basically, the initProperties are the name and value pairs parsed from the UDS parameter string.For example, the GenericBeanDataProvider gets the list of properties with the following keys:
JavaBeanDS_DataProvider
JavaBeanDS_RuntimeDataID
GBeanProvider_BeanClsName
GBeanProvider_UseFakeData
GBeanProvider_NumOfFakeData
GBeanProvider_RptDataInitializerGenericBeanDataProvider applies the values of those keys to prepare the data collection. For example, if the value of GBeanProvider_UseFakeData is "true", GeneridBeanDataProvider uses the fake data; otherwise, it creates an instance by the class name provided by GBeanProvider_RptDataInitializer and asks the data initializer object to return the collection of data objects.
- getMetadataJavaBean()
This method is called back from the UDS to get the bean class in order to construct the metadata for UDS. For GenericBeanDataProvider, the Java bean class in the collection is passed in by the key GBeanProvider_BeanClsName when you define this data source by UDS. - next()
This method is called back from the UDS to fetch the next data object as a record for the report at runtime. For GenericBeanDataProvider, the method init() constructs the data object collection, and the method next() is going to check if the collection is a Vector, Collection, or array of objects to determine automatically how to get the next object from the constructed collection. - exit()
This method is called back from the UDS when Logi Report Engine closes the result set returned by UDS. For GenericBeanDataProvider, it calls the data initializer to close if the data is constructed by data initializer. - requireDetails()
This method is called back by the UDS to check if a certain collection attribute from Java bean needs to display in the metadata. - getMaxShareTimes()
The subcollection attribute from the Java data object could be shared among subreports. This is the call-back method from the UDS to determine the maximum number of times that a certain subcollection object is going to be shared by the current report. If your report is trying to share the same subcollection of a Java data object more than this specified value, you will get an error at runtime. However, if your report actually needs to be shared less than the number specified, the data will stay in the buffer without being cleaned.
- init()
- jreport.uds.javabean.RptDataInitializer
GenericBeanDataProvider applies the implementation of this interface to provide the collection of Java objects for different reports and parameters.You need to implement the following methods for this interface:
public Object getDataCollection(Properties props)throws RptDataInitializerException;
public void close();- getDataCollection()
This method is called by GenericBeanDataProvider to return the data collection object. The input props are passed down from GenericBeanDataProvider and includes all the values passed down into the init() method of the GenericBeanDataProvider. - close()
This method is called back by GenericBeanDataProvider when the exit() function is called there.
- getDataCollection()
Demo 2: Using a Java Object UDS with Multilevel Collections
Sometimes, you define the attributes of a Java object by other lists/collections, such as the Java object SimpleBeanTest in <install_root>\help\UDSForJavaBean\jreport\uds\javabean\beans.
public class SimpleBeanTest implements Serializable {
    private String test;
    private long l;
    private int i;
    private int[] intarray;
    private Person[] persons;
    private Collection addresses;
    private Date dMyDate;
}
From the code above, you can see that the Java class SimpleTestBean contains an array of Persons, a collection of addresses and an array of Int values.
For this kind of Java object, Designer can create a report that gets records from SimpleTestBean, but it cannot show the list of persons information in the same report. If you want to create such a report - each record comes from the SimpleBeanTest object, and for each record, display the list of persons information - you have to use a primary report and subreport to implement this function.
Task 1: Create the primary report
- Make the necessary preparations.
- In Designer, open an existing catalog, then in the Catalog Manager, expand the data source to which you want to add the UDS.
- Create a parameter, which we use to specify the number of records to generate what to show.
Name: pNumOfFakeData
Value Type: Integer
Prompt Value: Any integer number. Note that the parameter must have at least one value that is larger than 0; otherwise, you will get exceptions when you run the reports. - Right-click the data source node and select New User Defined Data Source on the shortcut menu.
- In the New User Defined Data Source dialog box, type SimpleTestBean in the Name text box.
- For the Class Name text box, select Browse, go to
<install_root>\help\UDSForJavaBean\jreport\uds\javabean, and then choose UDSForJavaBean.class. The UDS class UDSForJavaBean.class imports the class jreport.uds.javabean.beans.SimpleTestBean with full class name. - In the Parameter box, type in the following string:
JavaBeanDS_DataProvider=jreport.uds.javabean.GenericBeanDataProvider&JavaBeanDS_RuntimeDataID=&GBeanProvider_BeanClsName=jreport.uds.javabean.beans.SimpleBeanTest&GBeanProvider_UseFakeData=true&GBeanProvider_NumOfFakeData=@pNumOfFakeData&GBeanProvider_FakeDateSubCollectionInfo=persons,jreport.uds.javabean.beans.Person&GBeanProvider_RptDataInitializer=&GBeanProvider_ListOfDetailProps=persons,1,30000All the highlighted names in the parameter string above are the key words for the information required by this UDS and related Java class. See the detailed explanation below:
- GBeanProvider_ListOfDetailProps specifies the following items:
- The list of property names of subcollections that are displayed in the metadata
- How many times that this report is going to share the subcollection per main object
- The timeout for the shared data in the DataCenter in milliseconds (the default value is 1 minute).
In this demo, Designer only imports the subcollection property persons from the SimpleTestBean class, and the share time is 1. If you want to create another subreport using addresses, you have to specify the value for this keyword.
=&GBeanProvider_ListOfDetailProps=persons,1,30000$addresses,1,30000And separate different properties by the "$" symbol.
- GBeanProvider_FakeDateSubCollectionInfo - Designer uses the value of this key word to construct the fake data for SimpleTestBean collections. Each Java class can have multiple subcollection objects, and Designer allows not constructing the values of these subcollection objects if you do not want to use them. However, if you do not specify them here in this parameter string as
<property name>,<property class name>$<property name>,<property class name>, Designer does not construct the fake data for those subcollections, and problems occur when you run the report on fake data.
- GBeanProvider_ListOfDetailProps specifies the following items:
- Select OK and Designer adds the UDS SimpleTestBean. In the Catalog Manager, you can see that persons appears in the resource tree under the SimpleTestBean node.
- Create a page report named "MainRpt.cls", with a standard banded object in it as the primary report based on the UDS SimpleTestBean.
Task 2: Create the subreport
- Expand the data source in the catalog to which you want to add the UDS for the subreport.
- Create a parameter, which we use to specify whether to use generated data when running the report.
Name: pUseFakeData
Value Type: Boolean
Prompt Value: True - Create another parameter, which we use when setting up the link between the primary report and the subreport.
Name: pRunTimeDataInfo
Value Type: String
Prompt Value: persons - Right-click the data source node and select New User Defined Data Source on the shortcut menu.
- In the New User Defined Data Source dialog box, type PersonsAsSubRpt in the Name text box.
- For the Class Name text box, select Browse, go to
<install_root>\help\UDSForJavaBean\jreport\uds\javabean, and then choose UDSForJavaBean.class. - In the Parameter box, type in the following string:
JavaBeanDS_DataProvider=jreport.uds.javabean.GenericBeanDataProvider&JavaBeanDS_RuntimeDataID=@pRunTimeDataInfo&GBeanProvider_BeanClsName=jreport.uds.javabean.beans.Person&GBeanProvider_UseFakeData=@pUseFakeData&GBeanProvider_NumOfFakeData=@pNumOfFakeData&GBeanProvider_RptDataInitializer=jreport.uds.javabean.SubRptCollectionDataInitializerAll the highlighted names in the parameter string above are the key words for the information required by this UDS and related Java class. See the detailed explanation below:
- JavaBeanDS_RuntimeDataID is defined to use a parameter which is the link point from the subreport to the subcollections in the primary report.
- GBeanProvider_RptDataInitializer's value is jreport.uds.javabean.SubRptCollectionDataInitializer, which is Logi Report's built-in data provider set up especially for the subreport to return the collection of data by referencing the subcollection in the primary report. Logi Report Engine passes the referencing information via the parameter value @pRunTimeDataInfo which we use when setting up the link between the primary report and the subreport.
- The class name for GBeanProvider_BeanClsName is Person because the subreport uses the Person object.
- Select OK to add the UDS PersonsAsSubRpt.
- Create a page report named "SubRpt.cls", with a table in it as the subreport based on the UDS PersonsAsSubRpt.
Task 3: Link the primary report and the subreport
- In the Catalog Manager, create a formula named "NotUseFakeData" to return "false" all the time, for example,
return false. Designer passes this formula into the subreport as the value of the parameter pUseFakeData in the subreport, so that when the subreport runs with the primary report, it always uses the data from the primary report instead of constructing the fake data itself. - Open MainRpt.cls, add a new detail panel into the report.
- Selected the newly added panel and select Insert > Subreport. When a box attached to your mouse pointer, select in the panel and Designer displays the Subreport dialog box.
- Select Browse, choose SubRpt.cls as the subreport, then in the Parameters tab, specify values for the parameters as follows:
Parameter Value pNumOfFakeData pNumOfFakeData pUseFakeData NotUseFakeData (gives a "false" value to the parameter) pRunTimeDataInfo persons (specifies to use the subcollection persons of the primary report as the data source of the subreport at runtime) - Select OK to insert the subreport. For more information about using subreports, see Subreports.
- Select the View tab to preview the primary report. Designer displays the corresponding persons information in the subreport.
- If you want to insert another subreport which shares the same subcollection with SubRpt.cls, you should modify the value of the key word GBeanProvider_ListOfDetailProps in the primary report's UDS parameter string to GBeanProvider_ListOfDetailProps=persons,2,30000. That changes the share amount of the persons property from 1 to 2.
Example 4: Adding a Dynamic UDS
Designer supports the Dynamic UDS feature, which can improve performance by retrieving only the selected fields and not all the fields. At runtime, Server provides an option for picking up the columns users want to see in the report. In this way, Server generates a dynamic report according to your selection.
In this example, we use SQLDataSource to illustrate the usage and effect of the Dynamic UDS feature. Assume that you have generated SQLDataSource.class, start Designer with the modified batch file (for more information, see Task 1: Compile and run SQLDataSource in Example 2).
- Open an existing catalog.
- In the Catalog Manager resource tree, expand the data source to which the UDS is to be added.
- Create a parameter with the following information:
- Name: sql
- Value Type: String
- Prompt Values:
Select * from employee
select salary from employee
select employeeid, employeeposition, hiredate, notes, salary, photo from employee
- Right-click the data source node, and then select New User Defined Data Source from the shortcut menu.
- In the New User Defined Data Source dialog box, specify the following information:
- Name: employees
- Class Name: SQLDataSource
- Parameter:
DRIVER="org.hsqldb.jdbcDriver"&URL="jdbc:hsqldb:C:\\LogiReport\\Designer\\Demo\\db\\JRDemo"&USER=sa&PSWD=&SQL=@sql
- Select OK to add the UDS.
Next, we create a page report using the UDS to test the Dynamic UDS feature. If you want to create web reports and library components on this UDS, you need to first create a business view using this UDS.
- Select Home/File > New > Page Report.
- In the Select Component for Page Report dialog box, specify the report title and choose the Table (Group Left) component. Select OK.
- In the Data screen of the Table Wizard dialog box, choose the UDS employees from the User Defined node. Then, select Next.
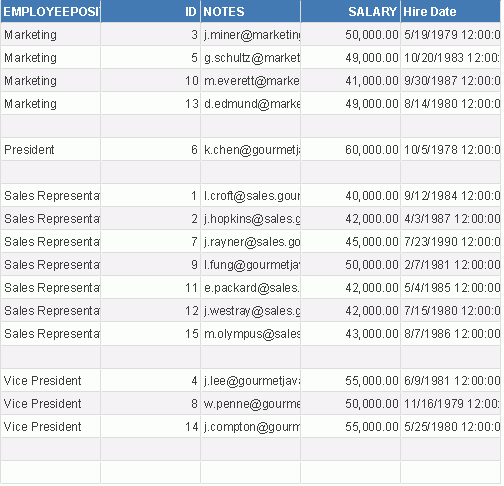
- In the Display screen, add the fields EMPLOYEEID, employees_NOTES, employees_SALARY, and HIREDATE to display in the table, edit their display names to ID, Notes, Salary, Hire Date. Select Next.
- In the Group screen, specify to group on the field EMPLOYEEPOSITION.
- Skip the Summary, Chart, and Filter screens.
- In the Style screen, select the Classic style.
- Select Finish to create the report.
- Select the View tab to preview the report. Designer prompts you to specify a parameter.
- Select select * from employee as the parameter. You can see that Designer retrieves data for all of the fields.
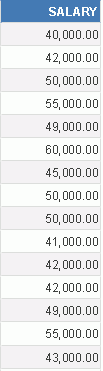
- Select the Design tab to go back to design mode and preview the report again. This time, choose Select salary from employee as the parameter value. You can see that the report displays no groups and the group name changes to NULL. This is because Designer selects the field employees_SALARY this time, and makes no reference to the employees_Position column, on which the group is based.
 To make a dynamic UDS work, if the SQL statement at runtime does not include all the UDS columns, you need to make sure that you do not edit any of the UDS columns' properties, that is, you should clear the Specify Columns option in the New User Defined Data Source dialog box; otherwise, you get exceptions when using the SQL statement to generate a dynamic report from the UDS.