Built-in UDOs: JHyperLink and JRotator
Logi Report provides two built-in UDOs: JHyperLink and JRotator. You can use JHyperLink to create hyperlinks in reports, and JRotator to rotate text or images. This topic introduces ways to use the two built-in UDOs.
This topic contains the following sections:
Creating Links with JHyperLink
You can use JHyperLink to create hyperlinks in page reports that use query resources. The following shows two specific examples about using JHyperLink.
Example 1: Building Hyperlinks Using JHyperLink
Sometimes, you have a number of reports that contain different views of the same data. You may want to build a summary report to organize these reports together. For example, Report A is Summary Information for Orders, while Report B is an Invoice Report showing the detail line items of the order. When you select an order ID in Report A, it goes to the detail page of that order in Report B. With this Hyperlink feature, you can build hyperlinks among reports. You can also insert any hyperlink you want to invoke. In any case, you can get the specified pages in your default web browser.
- Open the page report in which you want to build a hyperlink. The page report should use query resources and contain a banded object.
- Select a panel of the banded object.
- Select Insert > UDO. Designer displays the Insert UDO dialog box.
- Select JHyperLink from the UDO drop-down list, and then select OK to insert a JHyperlink object into the selected banded panel.
- Keep the JHyperLink object focused.
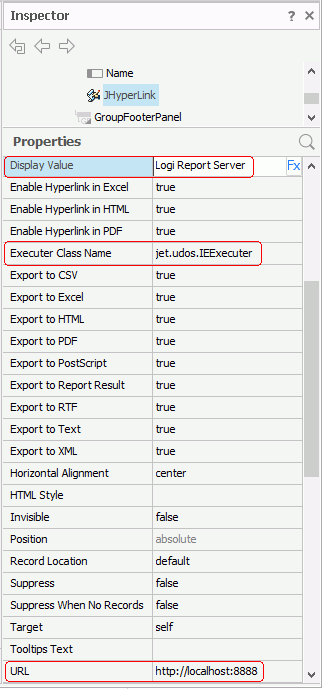
- In the Report Inspector, type http://localhost:8888 in the value cell of the URL property, make sure value of the Executer Class Name property is jet.udos.IEExecuter, and then type Logi Report Server in the Display Value property value cell as the display name of the hyperlink.
- Insert another hyperlink using the same way and define its properties in the Report Inspector.
- URL: http://www.logianalytics.com
- Executer Class Name: jet.udos.IEExecuter (the default value)
- Display Value: Website
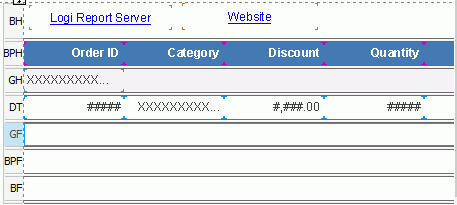
The two hyperlinks display as follows in the report:
- Select the View tab to preview the report.
- Select the Logi Report Server hyperlink. Designer brings out a browser session to connect with Server. Make sure that you have launched Server and that the URL corresponds with your Server configuration.
- Select the Website hyperlink. You can then see the http://www.logianalytics.com home page in a web browser.
![]() After you insert a JHyperLink into a report and want to export the report to PDF, Excel, or HTML, you can specify whether to make the hyperlink effective by setting a property which corresponds to the format type. Respectively, they are: Enable Hyperlink in PDF, Enable Hyperlink in Excel, and Enable Hyperlink in HTML.
After you insert a JHyperLink into a report and want to export the report to PDF, Excel, or HTML, you can specify whether to make the hyperlink effective by setting a property which corresponds to the format type. Respectively, they are: Enable Hyperlink in PDF, Enable Hyperlink in Excel, and Enable Hyperlink in HTML.
Example 2: Linking Reports Using Parameters with JHyperLink
You can also use the JHyperLink object to control the URL to show the information in the linked reports on Server. It is similar to master/detail but does not have the ability to navigate through the detail and return to the master. The key to using JHyperlink in this case is understanding how to use URLs to call page reports. For more information, see Running Reports via URL in the Logi Report Server Guide.
Designer provides an example to help you better understand how to use JHyperLink to link reports using a URL. You can get all the needed materials for this example, including the reports and catalog in <install_root>\help\samples\UDODemo.
- Open the catalog for this example Demo.cat from
<install_root>\help\samples\UDODemo\reports. - Select one of the existing reports and ensure the reports in this catalog can run. If there is a problem, open the Catalog Manager, highlight the connection node, then in the Properties sheet, modify the value of the URL property to connect to the demo database, which is
jdbc:hsqldb:<install_root>\help\samples\UDODemo\db\demo.
Linking the master report to the detail report
We use formulas to control the URL and Display Value properties of JHyperLink to make it link the master and detail reports.
- Open the report that contains the master report, mainreport.cls.
You can find a JHyperLink object in the detail panel of the banded object in the report. The URL and Display Value property values of the object are:
- URL: Controlled by the formula linkToSalesYearly, the expression of which is:
"http://localhost:8888/jrserver?jrs.cmd=jrs.web_vw&jrs.catalog=/USERFOLDERPATH/admin/Demo.cat&jrs.report=/USERFOLDERPATH/admin/SalesPerformancebyYear.cls&jrs.result_type=8&jrs.param$pEmployeeID="+@"Employee_Employee ID"This URL value enables users to drill down to the detail report and also make a link for this detail report on the top of the page to drill up and down at runtime.
- Display Value: Determined by the DBField Employee Name to show the employee names in the master report.
- URL: Controlled by the formula linkToSalesYearly, the expression of which is:
- Open the report that contains the detail report, SalesPerformancebyYear.cls.
In the group header panel of the banded object in the report, the value of Total is a JHyperLink object, and its URL and Display Value property values are both controlled by formulas.
- URL: Controlled by the formula linkToQuarter, the expression of which is:
"http://localhost:8888/jrserver?jrs.cmd=jrs.web_vw&jrs.catalog=/USERFOLDERPATH/admin/Demo.cat&jrs.report=/USERFOLDERPATH/admin/SalesYearPerformancebyQuarter.cls&jrs.result_type=8&jrs.param$pEmployeeID="+@"Employee_Employee ID"+"&jrs.param$pYear="+@getYear;We use the URL to access the detail report SalesYearPerformancebyQuarter.cls, and filter the records of the detail report by the parameters pEmployeeID and pYear.
- Display Value: Controlled by the formula getSalesByYear, the expression of which is:
"$"+ToText(@Sum_TotalSales0)This formula returns the total sales amount for the year.
- Target: The options are self, parent, top, and blank. Use "self" to replace the current report with the linked report; use "blank" if you want to open a new browser tab so you can return to the master report window.
- URL: Controlled by the formula linkToQuarter, the expression of which is:
Running the reports on Server
This example requires you to access the report by URL. You can drill down through the reports.
- Start Server.
- Publish the reports and catalog to Server as admin into the root level of My Reports.
- Run the master report mainreport.cls in Page Report Studio.
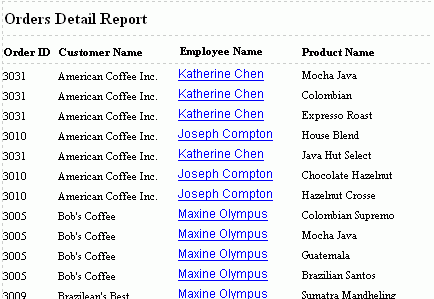
- Select any name in the Employee Name column and you can get the employee's year performance.
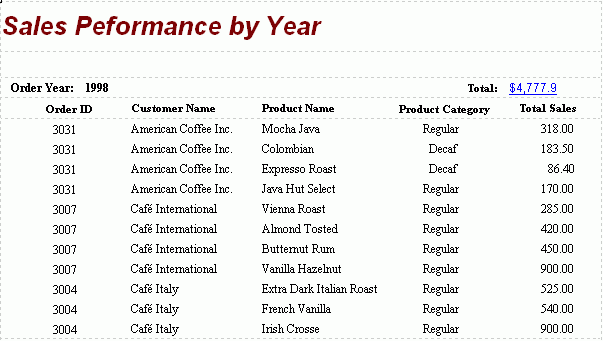
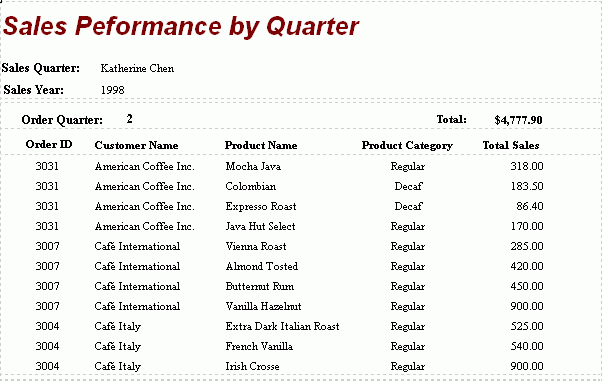
- Select the Total number and you can drill down to the next detail report.
![]() When using JHyperLink to link reports as master and detail reports, if you use a parameter the value of which contains special characters such as "\" and "&" in the URL, you need to add "\" before the special character. For example, if the parameter value is "a&b", you need to type it as "a\&b".
When using JHyperLink to link reports as master and detail reports, if you use a parameter the value of which contains special characters such as "\" and "&" in the URL, you need to add "\" before the special character. For example, if the parameter value is "a&b", you need to type it as "a\&b".
Rotating Text/Image with JRotator
You can use JRotator to rotate text or images. Since Logi Report currently supports rotating only images but not text, using JRotator to achieve text rotation becomes a feasible solution. JRotator rotates the text inside the JRotator object but not the object itself, so if you rotate text or DBFields, you may have to change the size of the JRotator object in order to see the full value.
The following introduces three cases of using JRotator:
Using JRotator to Rotate Text
- Open a page report that contains a banded object created using a query resource.
- Select a banded panel.
- Select Insert > UDO. Designer displays the Insert UDO dialog box.
- Select JRotator from the UDO drop-down list, and then select OK to insert a JRotator object in the banded panel.
- Keep the JRotator object focused.
- In the Report Inspector, locate the Display Value property and type in the required text in the value cell. Designer displays the specified text in the JRotator object.
- Specify a rotation degree in the value cell of the Rotate property, for example, 180. The text in the JRotator object now displays upside down.
Using JRotator to Rotate an Image
- Open a page report that contains a banded object created using a query resource.
- Select a banded panel.
- Select Insert > UDO.
- In the Insert UDO dialog box, select JRotator from the drop-down list, and then select OK to insert a JRotator object in the banded panel.
- Keep the JRotator object focused.
- In the Report Inspector, specify the local path of the required image in the value cell of the Display Image property, for example, C:\image.jpg. Designer displays the image in the JRotator object.
- Specify a rotation degree in the value cell of the Rotate property, for example, 45. The image in the JRotator object now rotates at a 45 degree angle.
- Resize the JRotator object as needed to view the entire image.
- Save the report.
Using JRotator to Rotate a DBField
- Open a page report that contains a banded object created using a query resource.
- Select a banded panel.
- Select Insert > UDO.
- In the Insert UDO dialog box, select JRotator from the drop-down list, and then select OK to insert a JRotator object in the banded panel.
- Keep the JRotator object focused.
- In the Report Inspector, select the required DBField or create a formula for a calculated field and select the formula from the drop-down list in the value cell of the Display Value property. Designer displays the field in the JRotator.
- Specify a rotation degree in the Rotate value cell, for example, 90. The field in the JRotator object now rotates at a 90 degree angle.
- Change the size of the JRotator object as needed to view the entire text.
- Save the report.
 Previous Topic
 Back to top