Applying Cached Report Bursting
Cached report bursting is a security mechanism for controlling user access to data at the group level in page reports. It enables different users to view different data groups according to their access privileges. This topic describes the working principle of cached report bursting and how you can apply cached report bursting to limit user access to different groups of data.
This topic contains the following sections:
How Cached Report Bursting Works
Logi Report implements cached report bursting via the following security properties on the group panels of tables and banded objects in page reports: Cascade, Grant, Groups, and Roles.
In Designer, the report designer edits the security properties to define which groups of data in a page report are available to which users, groups, or roles that exist in the security system of Server. Then when a specified user accesses the report at runtime, Server checks the user and the group and role of the user, and then merges the groups of data the user is authorized to see and displays permitted result to the user. Cached report bursting also applies to nested groups.
Defining Cached Report Bursting for a Page Report
The following example shows the basic procedure to set up a cached report bursting policy.
- Create a group table in a page report for customer information which is grouped by the Country field.
- Create a formula to control the Grant property value. This formula returns a String value indicating which user has the privilege to access the data of which Country group.
Here, we write the formula Burst_User to set the security identifier.
if (@Country == "China" || @Country == "Canada")
return "admin";
if (@Country == "USA")
return "jennifer";
"admin" and "jennifer" are two users in the security system of Server. The above formula states that, the user "admin" is authorized to view the China and Canada groups, while the user "jennifer" can only view the USA group.
If you write the formula as follows, user1, user2, and user3 can view the USA group.
if ( @Country =="USA")
return "user1|user2|user3"; - Create another formula Burst_Group to control the Groups property value. This formula returns a String value indicating which group of users has the privilege to access the data of which Country group.
if(@Country=='Italy')
return 'group1';
if(@Country=='USA')
return 'group2'; - Create one more formula Burst_Role to control the Roles property value. This formula returns a String value indicating which role has the privilege to access the data of which Country group.
if(@Country=='Japan')
return 'role1';
if(@Country=='USA')
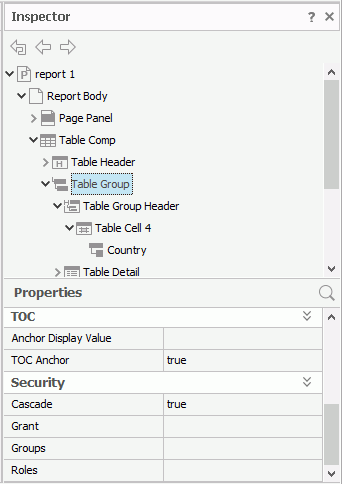
return 'role2'; - In the Report Inspector, select the Table Group object for the group and locate the Security section in the Properties sheet (for a banded object, it is the Group Panel object).

- Select in the value cell of the Grant property, then select the formula Burst_User from the drop-down list to use the formula to control the value of the property.
- Set the values of the Groups property to Burst_Group, and Roles to Burst_Role in the same way.
- Save the report to apply the security policy.
After you publish a report with cached report bursting to Server, when the specified users access the report, they can only view the groups of data that are authorized to them. In the above example, if the user "admin" belongs to group1 and role1, he is able to view the China, Canada, Italy, and Japan groups; the user "jennifer" is able to view only the USA group if she belongs to group2 and role2.
![]() In addition to creating formulas and selecting the formulas to control the security properties, you can also edit expressions directly as the values of the properties to define the cached report bursting security policy.
In addition to creating formulas and selecting the formulas to control the security properties, you can also edit expressions directly as the values of the properties to define the cached report bursting security policy.
 Previous Topic
 Back to top