 Previous Topic
Saving a Web Report
This topic describes how you can save changes that you made to a web report and save a copy of it.
To save the changes you made to the current report, select the Save button  on the toolbar or Menu > File > Save.
- If you created the report just now and has not saved it yet, Server displays the Save As dialog box.
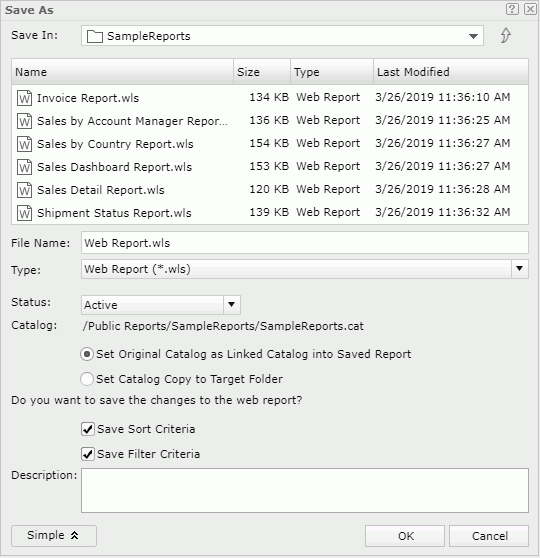
- In the Save In section, browse to the folder in the server resource tree where you want to save the web report. You can use the arrow button
 to return to the parent folder.
The resource table shows the resources in the current folder. You can select the column names to change the order of the resources in the table.
Tip: You must have the Write permission on a folder to save the report there.
- In the File Name box, type the name of the report or use the default name.
- The default file type is Web Report (.wls).
 You can also save the report in the XML format (.wls.xml).
 - Optionally, select Advanced to set advanced settings for the report.
- From the Status list, select a status for the report. By default, it is Active which means you can run, advanced run, and schedule to run the report. If you want to disable the report for running, choose Inactive. If you have not finished editing the report, choose Incomplete.
- Choose the relationship between the saved report and the catalog used to run it. By default, the saved
report links to its catalog in which way it can always run with
the latest version of the catalog. Select Set Catalog Copy to Target Folder if you want to copy the catalog to
the folder where you save the report.
There should be only one catalog per folder. If there is already a catalog in the folder where you are going to copy the catalog to, it may cause other reports in the folder not to be able to run as they may use the wrong catalog. Also, if there is an existing version of the same catalog in the folder, Server replaces it with the copied catalog, and existing reports that use it are not able to run with the new catalog version. Therefore, it is always better to link the catalog rather than copy it.
- By default, Server saves the report together with the sort and filter criteria. The criteria will automatically apply to the report the next time it opens.
- Optionally, type comments in the Description box as a description for the report.
- Select OK to save the report.
- Select OK in the Confirm dialog box.
- In the Save In section, browse to the folder in the server resource tree where you want to save the web report. You can use the arrow button
- If the report is an editable shared report, Server displays the Confirm dialog box, prompting you to choose whether to save a finished or unfinished version for the report.
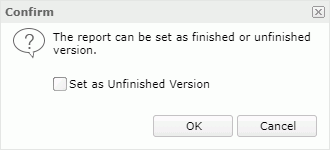
By default, Server saves the report as a finished version. If you are not the report owner of the shared report, you should select Set as Unfinished Version to save the report as an unfinished version so that you can access your modified version next time you run the shared report. If you save the shared report as a finished version, the next time you run the report you are not able to access this version unless it is the latest finished version of the report.
To save a copy of a report, select Menu > File > Save As or the Save As button  on the toolbar. Server displays the Save As dialog box. Then do as above. If you are saving to an existing web report, Server displays the Confirm dialog box asking whether you want to replace it or save a new version into it.
 Back to top