Fill Effects Dialog Box Properties
This topic describes how you can use the Fill Effects dialog box to specify either a gradient or an image as the fill effect of an object.
This topic contains the following sections:
You see these elements on both tabs:
OK
Select OK to apply any changes you made here.
Cancel
Select Cancel to close the dialog box without saving any changes.

Select to view information about the Fill Effects dialog box.

Select to close the dialog box without saving any changes.
Gradient Tab Properties
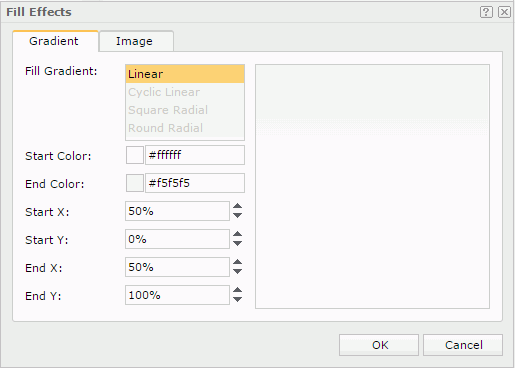
This tab enables you to specify the gradient colors to fill the object.

Fill Gradient
Displays the type of gradient to fill the object. It is Linear by default.
Start Color
Specifies a color in the gradient graph.
End Color
Specifies the other color in the gradient graph.
Start X
Specifies the horizontal position, measured in the percentage of the object's width, from the left edge of the object, where the gradient starts.
Start Y
Specifies the vertical position, measured in the percentage of the object's height, from the top edge of the object, where the gradient starts.
End X
Specifies the horizontal position, measured in the percentage of the object's width, from the left edge of the object, where the gradient ends.
End Y
Specifies the vertical position, measured in the percentage of the object's height, from the top edge of the object, where the gradient ends.
Preview
Displays a preview of your settings.
Image Tab Properties
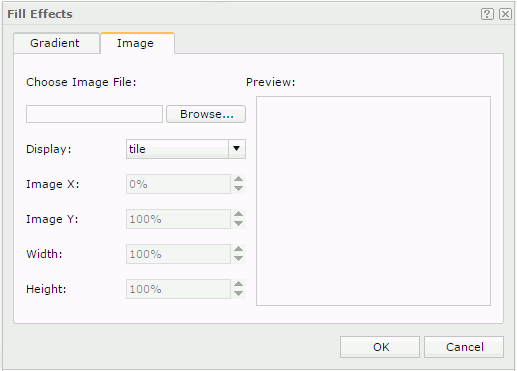
This tab enables you to specify an image to fill the object. It is not available when the dialog box is accessed from the Color List dialog box.

Choose Image File
Specifies the image file. Select Browse to select the required image.
Display
Specifies the layout style of the image in the object. It can be one of the following: Tile, Center and Scaled.
Image X
Displays the left position of the area, measured in the percentage of the image's width, from the left edge of the image.
Image Y
Displays the bottom position of the area, measured in the percentage of the image's width, from the bottom edge of the image.
Width
Displays the width of the area, measured in the percentage of the image's width.
Height
Displays the height of the area, measured in the percentage of the image's height.
The four options, Image X, Image Y, Width, and Height, are used to define an area in the image and put the defined area of the image into the object. Their values are fixed.
Preview
Displays a preview of your settings.
 Previous Topic
 Back to top