 Previous Topic
Web Report Studio Profile Properties
This topic describes how you can use the Web Report Studio Profile dialog box to create profiles for applying in Web Report Studio.
Server displays the dialog box when an administrator selects the New Profile link in the Administration > Server Profile > Customize Profile > Web Report Studio > Features tab on the Server Console.
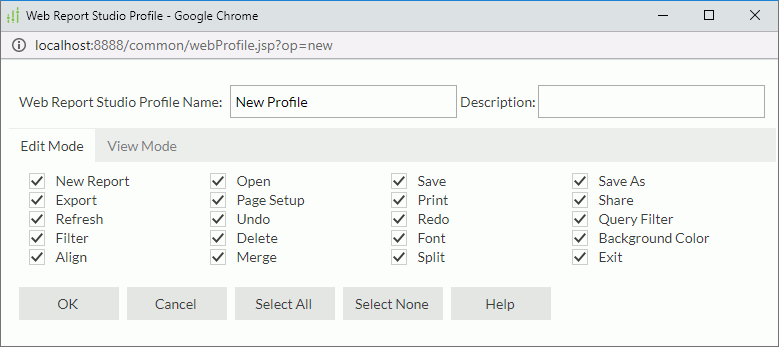
Web Report Studio Profile Name
The name for the new profile.
Description
Information about the new profile.
Edit Mode
In this tab, you can turn on/off the required Web Report Studio edit mode features for the profile.
- New Report
Select to enable the New Report feature which enables you to create a new web report based on an existing business view. - Open
Select to enable the Open feature which enables you to open a web report. - Save
Select to enable the Save feature which enables you to save the changes that you made to the current web report. - Save As
Select to enable the Save As feature which enables you to save a copy of the web report or the report page template in the current web report to server resources. - Export
Select to enable the Export feature which enables you to export the report result to disk or version in various formats. - Page Setup
Select to enable the Page Setup feature which enables you to configure the report page settings. - Print
Select to enable the Print feature which displays the Print dialog box for printing the web report result. - Share
Select to enable the Share Report feature which enables you to share your web reports to a public folder in the server resource tree so that other users can also work on them. - Refresh
Select to enable the Refresh feature which enables you to reload the report data. - Undo
Select to enable the Undo feature which enables you to undo the last operation. - Redo
Select to enable the Redo feature which enables you to reverse the operation of Undo. - Query Filter
Select to enable the Query Filter feature which enables you to apply a filter to the business view that the specified data component uses to narrow down data scope. - Filter
Select to enable the Filter feature which enables you to filter the report records according to the filter criteria you specify. - Delete
Select to enable the Delete feature which enables you to delete the selected object. - Font
Select to enable the Font feature which enables you to set the font format of the selected text. The Font feature is available only when you selected a label or field. - Background Color
Select to enable the Background Color feature which enables you to change the background color of the selected text. The Background Color feature is available only when a label or field is selected. - Align
Select to enable the Align feature which enables you to make the selected text left, center or right aligned. The Align feature is available only when a label or field is selected. - Merge
Select to enable the Merge feature which enables you to merge the selected tabular cells into one. - Split
Select to enable the Split feature which enables you to split the selected tabular cell into two cells vertically or horizontally. - Exit
Select to enable the Exit feature which enables you to close the current web report and exit Web Report Studio.
View Mode
In this tab, you can turn on/off the required Web Report Studio view mode features for the profile.
- Save
Select to enable the Save feature which enables you to save the changes that you made to the current web report. - Save As
Select to enable the Save As feature which enables you to save a copy of the web report or the report page template in the current web report to server resources. - Export
Select to enable the Export feature which enables you to export the report result to disk or version in various formats. - Page Setup
Select to enable the Page Setup feature which enables you to configure the report page settings. - Print
Select to enable the Print feature which displays the Print dialog box for printing the web report result. - Refresh
Select to enable the Refresh feature which enables you to reload the report data. - Undo
Select to enable the Undo feature which enables you to undo the last operation. - Redo
Select to enable the Redo feature which enables you to reverse the operation of Undo. - Query Filter
Select to enable the Query Filter feature which enables you to apply a filter to the business view that the specified data component uses to narrow down data scope. - Filter
Select to enable the Filter feature which enables you to filter the report records according to the filter criteria you specify. - Exit
Select to enable the Exit feature which enables you to close the current web report and exit Web Report Studio.
OK
Select OK to create the profile.
Cancel
Select Cancel to close the dialog box without creating the profile.
Select All
Select the button to select all options in the tab.
Select None
Select the button to clear all options in the tab.
Help
Select Help to view information about the Web Report Studio Profile dialog box.
 Back to top