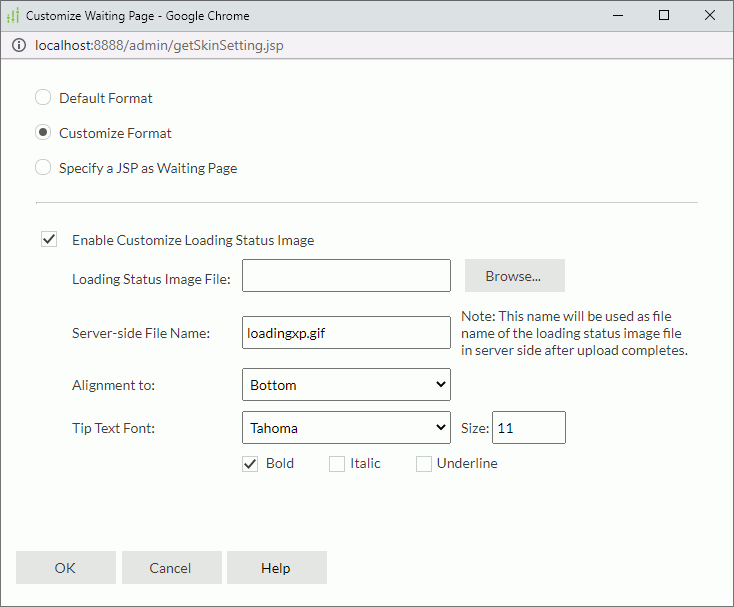
Customize Waiting Page Dialog Box Properties
This topic describes how you can use the Customized Waiting Page dialog box to customize the waiting page.
Server displays the dialog box when an administrator selects Customize for Enable Waiting Page in the Administration > Server Profile > Customize Server Preferences > Advanced tab on the Server Console.

Default Format
Server applies the default format.
Customize Format
Select to customize the loading status image and tip text font.
- Enable Customize Loading Status Image
Select if you want to upload a local image to Server as the loading status image in waiting pages.- Loading Status Image File
Select Browse to upload an image from the local drive. You can select these types of images: GIF, JPG, BMP, and PNG. - Server-side File Name
Type the name of the image file for use on Server after you upload it to Server. - Alignment to
Select the relative position of the image as compared to the tip text in waiting pages.
- Loading Status Image File
- Tip Text Font
Specify font face, font size, and the style of the tip text in the waiting pages.- Bold
Select to make the tip text bold. - Italic
Select to make the tip text italic. - Underline
Select to underline the tip text.
- Bold
Specify a JSP as Waiting Page
Select if you want to customize a JSP to implement the waiting page.
- JSP File
Select Browse to upload a JSP file from the local drive. The required JSP file is not exactly a complete JSP but a segment. Its body can contain only one pair of root <div></div> tags and the non-body section can contain only tags that are allowed in the <body></body> tags.
See the following sample code:
<div>
  <table  border="0" cellspacing="0" cellpadding="0" align="center">
    <tr>
      <td valign="middle" align="center">
        <table cellpadding="5" cellspacing="0" border="0">
          <tr>
            <td><font style="font-size:12px;font-family:Verdana;">waiting....processing</font></td>
          </tr>
          <tr>
            <td><img src="../images/loadingdefault.gif" /></td>
          </tr>
        </table>
      </td>
    </tr>
  </table>
</div> - File Name
Type the name of the JSP file for use on Server after you upload it to Server.
OK
Select to apply any changes you made here and exit the dialog box.
Cancel
Select to close the dialog box without saving any changes.
Help
Select to view information about the dialog box.
 Previous Topic
 Back to top