 Previous Topic
Button Properties
You can use the Button Properties dialog box to modify the properties of a button in a navigation control. This topic describes the properties in the dialog box.
The dialog box varies according to the button type:
- Button
Server displays the button as a normal button. - Image Button
Server displays the button as an image.
Button
When you select Button as the button type, Server displays the following properties.
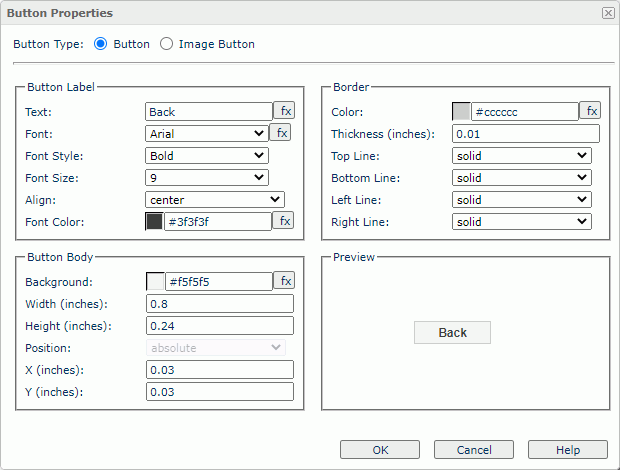
Button Label
Specify the properties of the button label.
- Text
Specify the text of the label. - Font
Select the font face of the text. - Font Style
Select the font style of the text. - Font Size
Select the font size of the text. - Align
Select the alignment way of the label in the button. - Font Color
Specify the font color of the text. To change the color, select the color indicator to access the Select Color dialog box, and then specify a new color. You can also type a hexadecimal RGB value to specify a color, for example, #9933ff.
Border
Specify the properties of the button border.
- Color
Specify the border color. To change the color, select the color indicator to access the Select Color dialog box, and then specify a new color. You can also type a hexadecimal RGB value to specify a color, for example, #9933ff. - Thickness
Specify the border width in inches. - Top Line
Select the style of the top border line. - Bottom Line
Select the style of the bottom border line. - Left Line
Select the style of the left border line. - Right Line
Select the style of the right border line.
Button Body
Specify the properties of the button body.
- Background
Specify the background color of the button body.To change the color, select the color indicator to access the Select Color dialog box, and then specify a new color. You can also type a hexadecimal RGB value to specify a color, for example, #9933ff. If you want to make the background transparent, type Transparent in the text box.
- Width
Specify the width of the button in inches. - Height
Specify the height of the button in inches. - Position
Select the position mode of the object when it is directly contained in the report body, a tabular cell, or a text box.
- Absolute
Select if you want to use the X and Y property values to decide the object's position. - Static
Select if you want to place the object at the default location in its container. Server will hide or disable the X, Y, and other position-related properties. - X
Specify the X coordinate of the button, in inches. - Y
Specify the Y coordinate of the button, in inches.
Preview
Server displays a preview of the button according to the button properties.
 Back to top
Image Button
When you select Image Button as the button type, Server displays the following properties.
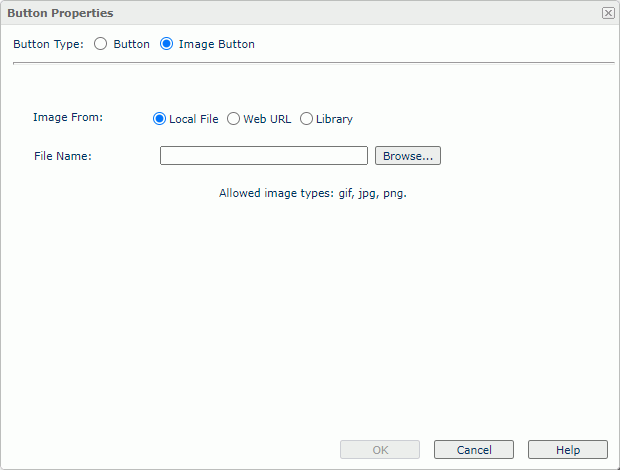
Image From
Select the source of the image file.
- Local File
Select to use an image from the local file system. Then, select Browse to locate the image file.Administrators can define the types and size of the images that you can be select, on the Administration > Configuration > Upload page on the Server Console.
- Web URL
Select to use an image via URL. Then, specify the URL of the image file. Server records the latest 10 entered URLs in the Image URL list. If your Server is in an intranet, to access the image via URL, you need to add the parameters
 -Dhttp.proxyHost=XXX -Dhttp.proxyPort=XXto the server's startup file JRServer.bat in<install_root>\bin. - Library
Select to use an existing image.- My Images
The My Images folder is a virtual location where Server stores the images that you have once inserted into reports. Select the image you want to use. - Preview
Server displays a preview of the selected image.
- My Images
OK
Select to apply any changes you made here and exit the dialog box.
Cancel
Select to close the dialog box without saving any changes.
Help
Select to view information about the dialog box.