 Previous Topic
Example 2: Setting Up a Logi Report Server Cluster for a Production Environment
This topic describes how you can set up a Logi Report Server Cluster on UNIX by configuring the Cluster UI on each Logi Report Server. We use three computers in the cluster: node1 (IP address: 192.168.0.1), node2 (IP address: 192.168.0.2), and node3 (IP address: 192.168.0.3). All the Logi Report Servers in the cluster use Apache Derby as the server system database.
Take the steps to set up the cluster:
- Make the time difference between the computers be within one minute.
- Install Logi Report Server on each of the three nodes in the directories
/home/LogiReport/Server1,/home/LogiReport/Server2, and/home/LogiReport/Server3respectively using the appropriate license key for the cluster. - Install Logi Report Server Monitor on one of the nodes.
- Launch the Logi Report Server you installed to
/home/LogiReport/Server1on node1. - Sign in to its Server Console.
- On the system toolbar, navigate to Administration > Configuration > Cluster > Configuration. Server displays the Configuration page.
- Specify a cluster name.
- Select Enable Cluster.
- Select Save to enable the cluster.
- Restart the Logi Report Server on node1.
- Go to the Administration > Configuration > Cluster > Configuration page again.
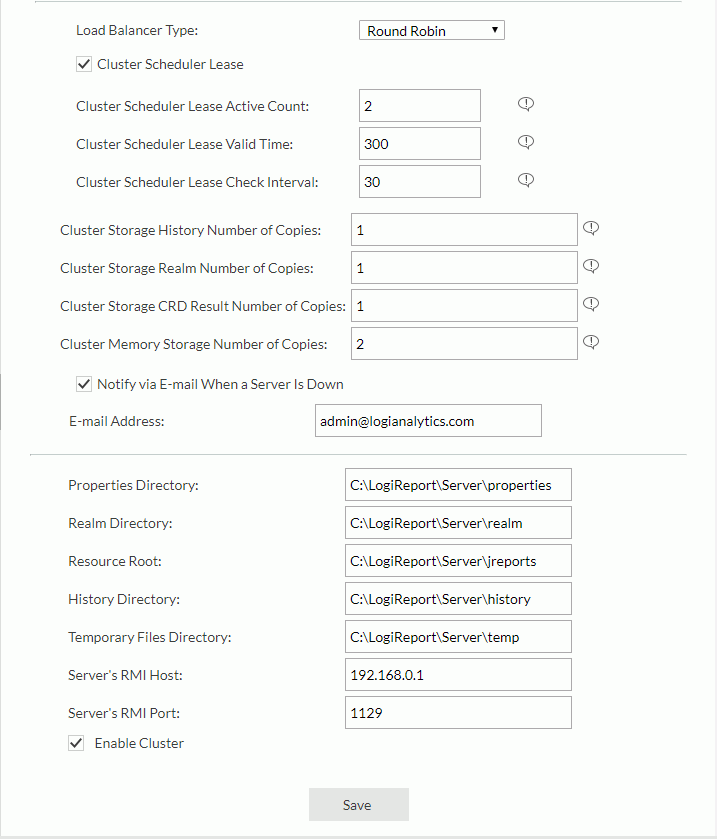
- Leave the Load Balancer Type as Round Robin.
- Select Cluster Scheduler Lease to enable scheduler leases for the cluster.
- Set the active count, valid time, and check interval for the cluster scheduler lease respectively. The default two active schedules with a time of 300 seconds and check interval of 30 seconds are a good starting point.
- Keep the cluster storage history, realm, and CRD result number of copies to 2. This means that the Cluster copies each resource to two of the three servers so there will be no single point of failure for the resources.
- Keep the default value 2 for Cluster Memory Storage Number of Copies, thus you can share 2 memory copies in the cluster.
- Select Notify via E-mail When a Server Is Down.
- In the E-mail Address text box, type the email addresses of the people to whom you want to send a notification email.
- Keep the default values for Properties Directory, Realm Directory, Resource Root, History Directory, and Temporary Files Directory.
- In the Server's RMI Host text box, type the IP address or host name of Server1 as 192.168.0.1.
- Type the port number in the Server's RMI Port text box as 1129.
- Select Save to accept all the changes.
- Navigate to Administration > Configuration > Server DB > System DB to open the System DB page of Server1.
- On the Configuration tab, copy the URL in the URL text box to a temporary file.
- Go to the Realm DB page to copy the URL using the same way.
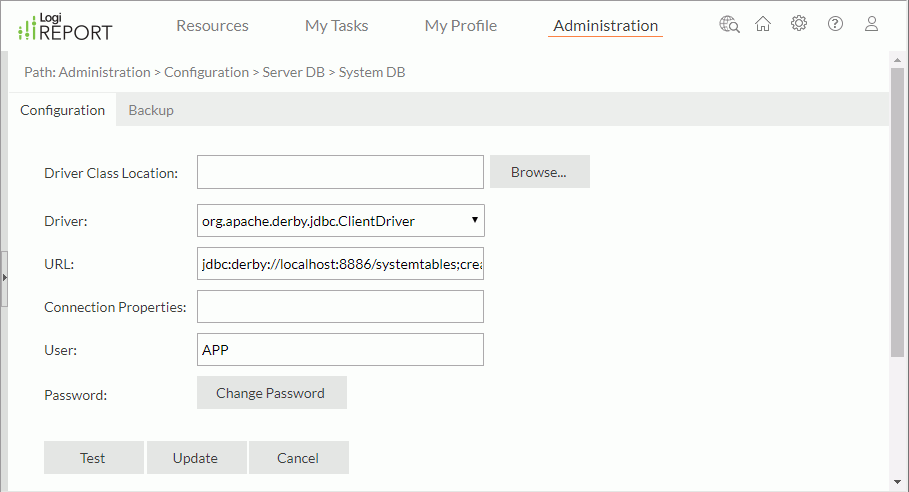
To use a Logi Report Server Cluster, all nodes in the cluster must use the same database. In this case, all three nodes will use the database Server1 uses. This ensures that all the servers in the cluster share a single DBMS instance.
- Shut down the server.
- Launch the Logi Report Server you installed to
/home/LogiReport/Server2on node2. - Sign in to its Server Console.
- Access the Administration > Configuration > Cluster > Configuration page.
- Use the same cluster name as Server1, thus making Server2 join the existing cluster.
- Select Enable Cluster.
- Select Save to enable the cluster.
- Restart the Logi Report Server on node2.
- Sign in to its Server Console again.
- Go to the Administration > Configuration > Server DB > System DB/Realm DB page.
- Make the system database and realm database in the URL text box the same as those of node1.
- Go to the Administration > Configuration > Cluster > Configuration page again.
- In the Server's RMI Host text box, type the IP address or host name of Server2 as 192.168.0.2.
- Type the port number in the Server's RMI Port text box as 1129.
- Select Save to accept all the changes.
- Shut down the server.
- Copy rmi.auth in
/home/LogiReport/Server1/binto/home/LogiReport/Server2/bin. This authorizes RMI between node1 and node2. - Launch the Logi Report Server you installed to
/home/LogiReport/Server3on node3. - Enable Cluster and make node3 join the existing cluster too.
- Restart the Logi Report Server on node3.
- Sign in to its Server Console again.
- Go to the Administration > Configuration > Server DB > System DB/Realm DB page.
- Make the system database and realm database in the URL text box the same as those of node1.
- Go to the Administration > Configuration > Cluster > Configuration page.
- In the Server's RMI Host text box, type the IP address or host name of Server3 as 192.168.0.3.
- Type the port number in the Server's RMI Port text box as 1129.
- Select Save to accept all the changes.
- Shut down the server.
- Copy rmi.auth in
/home/LogiReport/Server1/binto/home/LogiReport/Server3/bin. - Start the server Derby DBMS service by running the startNetworkServer.sh file in
/home/LogiReport/Server1/derby/bin. - Launch the server on node1.
- In the Command Prompt window, you see the information:
Logi Report Server is ready for service. - Similarly, launch the servers on node2 and node3.
 Back to top