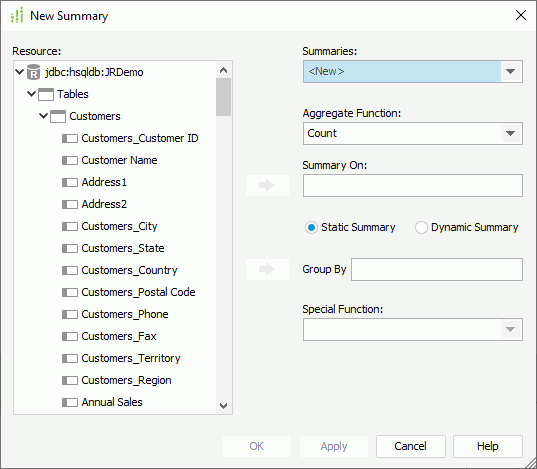
New Summary Dialog Box
You can use the New Summary dialog box to create a summary in the current catalog. This topic describes the options in the dialog box.
Designer displays the New Summary dialog box when you do one of the following:
- Right-click the Summaries node in the Catalog Manager and select New Summary from the shortcut menu.
- Select <New Summary...> where a summary list is available.
- In the Formula Editor dialog box or User Defined Function Editor dialog box, select Menu > File > New Summary.

You see the following options in the dialog box:
Resource
This box lists all the available resources that you can use to create the summary.
Summaries
By default, Designer selects <Create...> in the drop-down list. You can also select one of the existing summaries to edit it.
Aggregate Function
This drop-down list contains the aggregate functions that you can use to compute the selected field. Select the function you need.
- Distinct On
Designer enables this option and you should set it when you select DistinctSum as the aggregate function. Select the ellipsis to select the fields according to whose unique values to calculate DistinctSum in the Select Fields dialog box.
Summary On
Specify the field on which the summary is to compute. To specify the field, select it in the Resource box and then select  beside Summary On to add it to the text box.
Static Summary
Select it if you want the summary to take effect on a specific group that you define in the Group By text box.
- Group By
Specify the field by which to group the data. To specify the group-by field, select it in the Resource box and then select beside Group By to add it to the text box.
Dynamic Summary
Select it if you want the summary to take effect on the group according to the number that you specify in the Group By text box.
- Group By
Specify on which group you want the summary to take effect. To specify the group level, first select Up or Down from the drop-down list, then in the combo box, select a value or type an integer between 0 to 127.
Special Function
If the group-by field is of the Numeric, String, Date, or Time data type, you can select a special function for the field from the drop-down list to further specify to which level to group the data. If you select Customize, Designer displays the Customized Function dialog box for you to set the function.
OK
Select to apply your settings and close the dialog box.
Cancel
Select to close the dialog box without saving any changes.
Apply
Select to apply all changes and leave the dialog box open.
Help
Select to view information about the dialog box.
 Previous Topic
 Back to top