JSON Connection Wizard Dialog Box
You can use the JSON Connection Wizard dialog box to get data from a JSON data source to use in a catalog. This topic describes the options in the dialog box.
Designer displays the JSON Connection Wizard dialog box when you select JSON and select OK in the New Data Source dialog box, or in the Catalog Manager, right-click a data source and select New JSON Connection from the shortcut menu, or right-click an existing JSON connection and select Edit Connection from the shortcut menu.
The dialog box contains the following screens:
- Extract JSON Schema Screen
- Modify Schema Properties Screen
- Transformed Relational Schema Screen
- Add Table Screen
You see these buttons in all the screens:
Back
Select to go back to the previous screen.
Next
Select to go to the next screen.
Finish
Select to finish your work and close the dialog box.
Cancel
Select to close the dialog box without saving any changes.
Help
Select to view information about the dialog box.
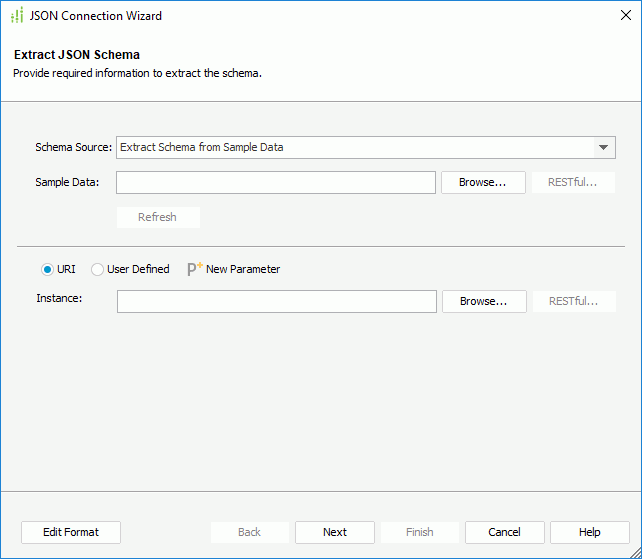
Extract JSON Schema Screen
Use this screen to specify the necessary information to extract the JSON schema.

Schema Source
Select the source to extract the JSON schema: Extract Schema from Sample Data or Extract Schema from Instance Data.
Designer displays different options in the Extract JSON Schema screen to specify the schema according to the schema source you select.
- If you select the Schema Source option of "Extract Schema from Sample Data", you see the following options:
Sample Data
Specify the sample data file from which to extract the JSON schema. You can select Browse to specify the sample data file from your local disk or type the URI string of the file in the text box.
- RESTful
Designer enables this button when the specified URI string begins with the "http://" or "https://" protocol. Select it to open the RESTful Data Source Options dialog box to define the RESTful options for the sample data.
URI
Select to get instance data from URI.
- Instance
Specify the JSON instance file. You can select Browse to specify the instance file from your local disk or type the URI string of the file in the text box. The instance should match with the JSON schema defined in the specified sample data file.- RESTful
Designer enables this button when the specified URI string begins with the "http://" or "https://" protocol. Select it to open the RESTful Data Source Options dialog box to define the RESTful options for the instance data.
- RESTful
User Defined
Select to get instance data from user-defined interface.
- Class Name
Specify the full name (including package name) of the class. You can select Browse to specify the class file from your local disk or type the class name with package name in the text box. You need to append the class to the class path in the system environment. - The class implements
After you fill in the Class Name text box, Designer displays the class name of the interface that the class implements here. - Parameter
Specify the parameter string for the user-defined data interface. The parameter string must match the format defined in the class.
New Parameter
Select to open the New Parameter dialog box to create a parameter in the current catalog data source. You can then reference the parameter to dynamically specify a JSON instance or user-defined interface that matches with the selected JSON schema.
- RESTful
- If you select the Schema Source option of "Extract Schema from Instance Data", you see the following options:
Instance
Specify the JSON instance file. You can select Browse to select the instance file or type the URI string of the file in the text box.
- RESTful
Designer enables this button when the specified URI string begins with the "http://" or "https://" protocol. Select it to open the RESTful Data Source Options dialog box to define the RESTful options for the instance data.
- RESTful
Edit Format
Select to open the Edit Format dialog box to specify the value formats of the referenced parameters and formulas.
- Name
This column shows the names of the parameters and formulas. - Format
This column shows the value formats that you specify for the parameters and formulas. - OK
Select to apply the changes and close the dialog box. - Cancel
Select to close the dialog box without saving any changes.
Refresh
Designer displays this button when you use the dialog box for editing an existing JSON connection. After you make changes in the dialog box and select the Refresh button, Designer reloads the JSON schema information according to what you have changed.
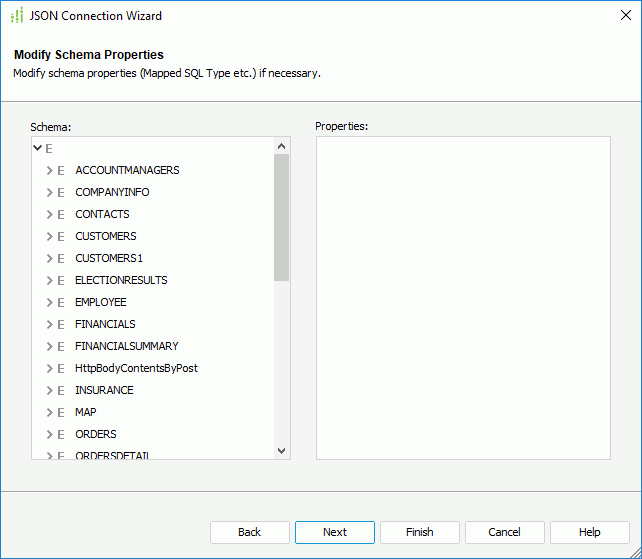
Modify Schema Properties Screen
Use this screen to specify the properties of the JSON schema.

Schema
This box lists the corresponding schema structure of the root.  stands for elements.
Properties
This box lists all the properties of the selected element in the schema.
- Name
This column shows the names of the properties for the selected element. - Value
This column shows the values that you specify for the properties of the selected element.
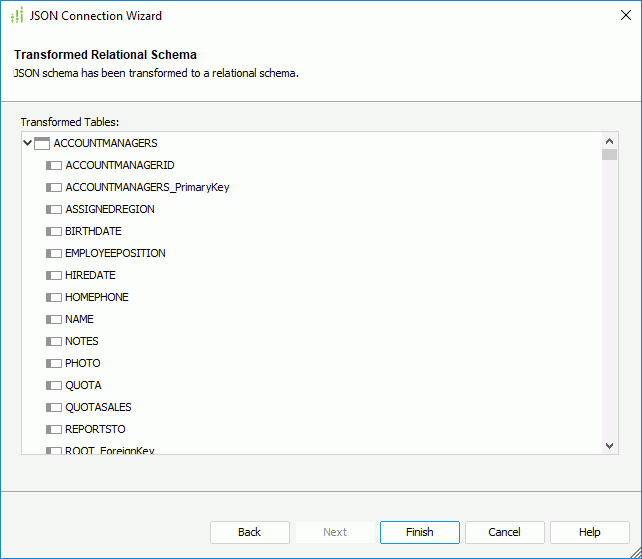
Transformed Relational Schema Screen
This screen lists the relational tables that Designer builds based on the transformed relational schema structure. Select Next to confirm the transformation result and go to the Add Table screen.

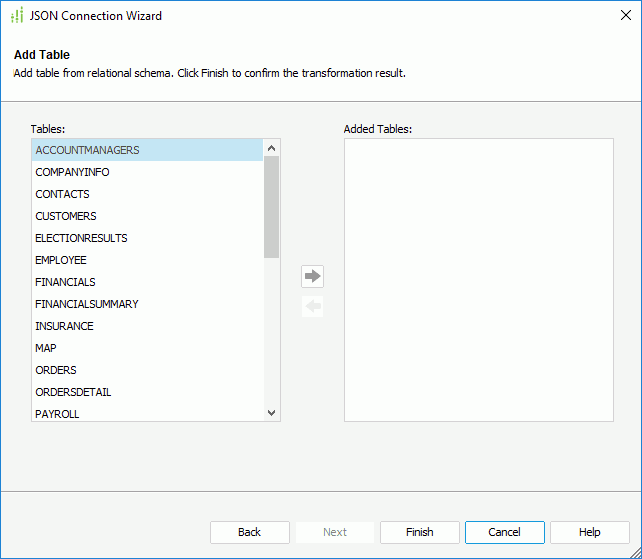
Add Table Screen
Use this screen to add tables that Designer transforms from the JSON data source to the connection. Designer does not display the screen when you use the dialog box for editing an existing JSON connection.

Tables
This box lists the tables that Designer transforms from the JSON data source, which you can add to the JSON connection.
Added Tables
This box lists the tables that you add to use in the JSON connection.
 Add button
Select to add the specified table in the Tables box to use in the JSON connection.
 Remove button
Select to remove the specified table from the Added Tables box.
 Previous Topic
 Back to top