Insert Group Column Dialog Box
You can use the Insert Group Column dialog box to insert new group columns into a table. This topic describes the options in the dialog box.
Designer displays the Insert Group Column dialog box when you right-click a table or a table column and select Insert > Group Column from the shortcut menu, and provides you with different options in the dialog box according to the data resource type the table uses: business view or query resource.
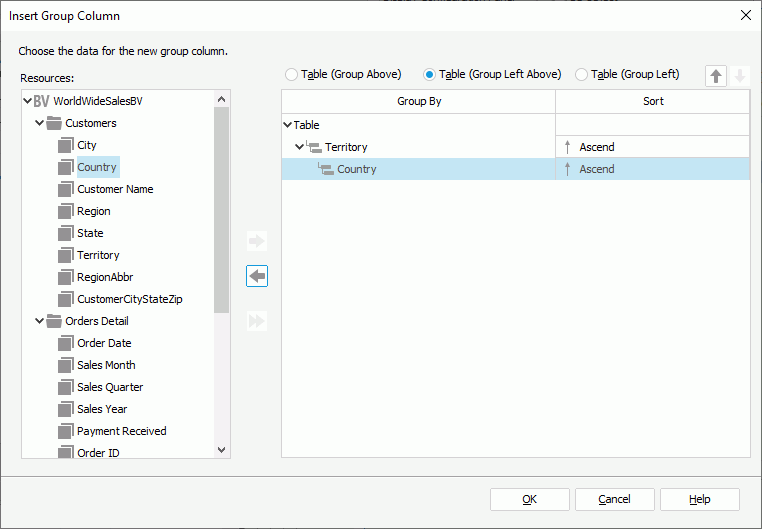
If the table uses a business view, you see the following options in the dialog box:

Resources
This box lists the view elements in and related to the business view the table uses which you can use for group columns.
 Add button
Select to add the specified field in the Resources box as a group-by field to the table.
 Remove button
Select to remove the specified group-by field from the table.
 Replace button
Select to replace the selected group-by field with the specified field in the Resources box.
Table (Group Above)
Select to place the specified group-by field above the detail information.
Table (Group Left Above)
Select to place the specified group-by field left above the detail information.
Table (Group Left)
Select to place the specified group-by field left to the detail information.
 Move Up button
Select to move the specified group to a higher group level.
 Move Down button
Select to move the specified group to a lower group level.
Group By
This column shows the group-by fields on which you select to group data in the table.
Sort
This column shows how you specify to sort groups at each group level. You can select from the following options:
- Ascend
Select to sort groups at the specified group level in an ascending order (A, B, C). - Descend
Select to sort groups at the specified group level in a descending order (C, B, A). - No Sort
Select to sort groups at the specified group level in their original order in database. - Custom Sort
Select to open the Custom Sort dialog box to set how to sort the groups at the specified group level.
OK
Select to apply your settings and close the dialog box.
Cancel
Select to close the dialog box without saving any changes.
Help
Select to view information about the dialog box.
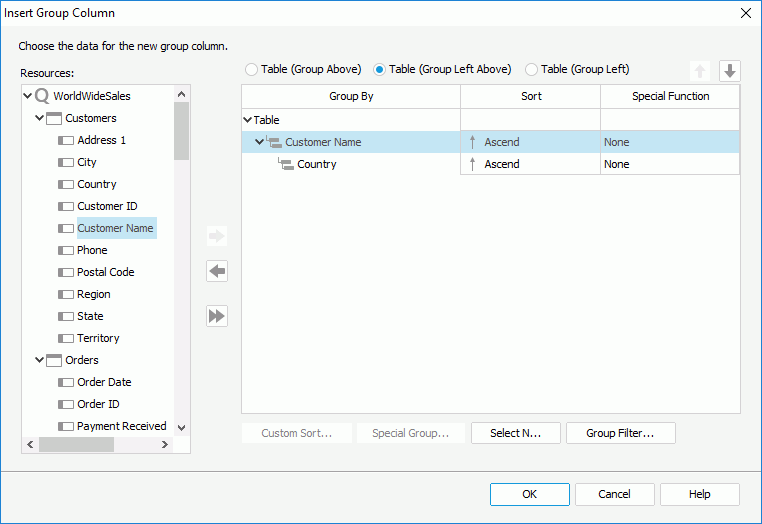
If the table uses a query resource, you see the following options in the dialog box:

Resources
This box lists the data fields in and related to the query resource the table uses that you can use for group columns.
 Add button
Select to add the specified field in the Resources box as a group-by field in the table.
 Remove button
Select to remove the specified group-by field from the table.
 Replace button
Select to replace the specified group-by field with the specified field in the Resources box.
Table (Group Above)
Select to place the specified group-by field above the detail information.
Table (Group Left Above)
Select to place the specified group-by field left above the detail information.
Table (Group Left)
Select to place the specified group-by field left to the detail information.
 Move Up button
Select to move the specified group to a higher group level.
 Move Down button
Select to move the specified group to a lower group level.
Group By
This column shows the group-by fields on which you select to group data in the table.
Sort
This column shows how you want to sort groups at each group level. You can select from the following options:
- Ascend
Select to sort groups at the specified group level in an ascending order (A, B, C). - Descend
Select to sort groups at the specified group level in a descending order (C, B, A). - No Sort
Select to sort groups at the specified group level in their original order in database. - Special Group
Select to open the User Defined Group dialog box to define grouping information. - Custom Sort
Select to open the Custom Sort dialog box to set how to sort the groups at the specified group level.
Special Function
This column shows the special functions that you select for the group-by fields of the Numeric, String, Date, and Time data types. Select a special function from the drop-down list to specify to which level to group the data of the specified field, or select Customize to set the function in the Customized Function dialog box.
Custom Sort
Designer enables this button after you have selected Custom Sort from the Sort column to define the sort manner of groups for the specified group level. Select it to specify how to sort the groups.
Special Group
Designer enables this button after you have selected Special Group from the Sort column to define a special group. Select it to specify how to group your information.
Select N
Select to open the Select N dialog box to specify the Select N condition for the specified group level.
Group Filter
Select to open the Group Filter dialog box to specify the group filter condition.
OK
Select to apply your settings and close the dialog box.
Cancel
Select to close the dialog box without saving any changes.
Help
Select to view information about the dialog box.
 Previous Topic
 Back to top