 Previous Topic
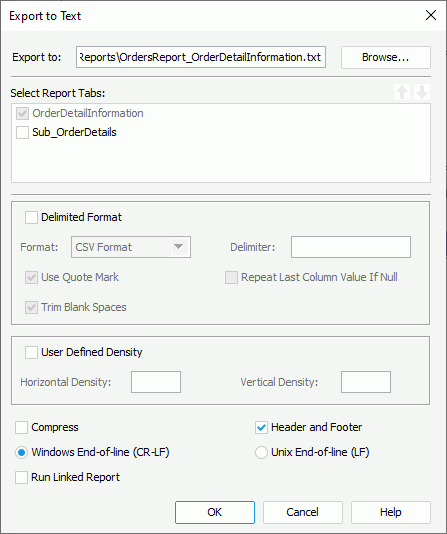
Export to Text Dialog Box
You can use the Export to Text dialog box to export a report to a Text file. This topic describes the options in the dialog box.
Designer displays the Export to Text dialog box when you select File > Export > To Text.
You see the following options in the dialog box:
Export to
Specify the file name and destination directory where to save the Text file. Select Browse to specify the file name and directory.
Select Report Tabs
Designer displays the option when you use the dialog box for exporting a page report. Select the report tabs in the page report that you want to export. Designer exports the selected report tabs in the list order. If the report has only one report tab, Designer selects the report tab by default.
 Move Up button
Select to move the specified report tab higher in the list.
 Move Down button
Select to move the specified report tab lower in the list.
Delimited Format
Select to use delimited format to export the report result.
- Format
Select the delimiter you want to use to separate the fields in the output.- CSV Format
Select to separate the fields by a comma. - Tab Delimited
Select to separate the fields by a tab. - Custom Delimited
Select to separate the fields by a user-defined delimiter. Type your own delimiter in the Delimiter box (the delimiter should be only one character).
- CSV Format
- Use Quote mark
Select to mark the fields in the output with quotation marks. - Repeat Last Column Value If Null
Select to apply the value of the previous cell in the same column when a cell in the output has no value. -
 Trim Blank Spaces
Select to remove the blank spaces at the beginning and end of the field values in the output.
User Defined Density
Select to use user-defined density to export the report result.
- Horizontal Density
Specify the value for each unit of the horizontal density between columns. - Vertical Density
Specify the value for each unit of the vertical density between columns.
Compress
Select to generate the Text output in a compressed size, meaning there will be no clearance between the columns.
Header and Footer
Select to include all headers and footers in the report, including report header/footer, page header/footer, and group header/footer in the Text output; otherwise, the Text output contains only data in the detail panel.
Windows End-of-line (CR-LF)
Select to use "CR-LF" in Windows convention as the end-of-line character.
Unix End-of-line (LF)
Select to use "LF" in UNIX convention as the end-of-line character.
Run Linked Report
Select to generate the reports that you link with the report (not including the detail reports) in the Text output.
OK
Select to apply your settings and close the dialog box.
Cancel
Select to close the dialog box without saving any changes.
Help
Select to view information about the dialog box.
 Back to top